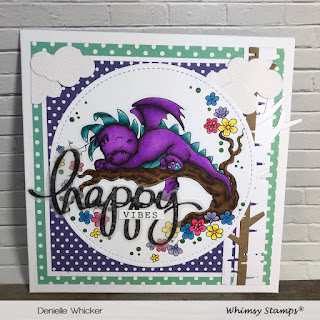
It is Week 2 of The May New Release Images over at Whimsy Stamps and I am sharing with you a card I have made using Wee Stamps Dreamy Dragon.
This image has previously been released as a Rubber Stamp but this month is released as a Digital Stamp so that is what I have used as part of the Design Team.
I started by printing the image onto X-Press it Blending cardstock using my Brother Laser Printer I then coloured the images using Copic Markers.
Using a Patterned paper pad from Kmart called The Craft Stall I cut two squares then cut a piece of white cardstock to mat the smaller paper with.
I ran the image through my Sizzix Big Shot using Lawn Fawn Stitched Circle Die, it fit perfectly.
I used some more dies on my card - MFT Stamp Puffy Clouds and MFT Stamps Birch Trees, I ran them both through my Big Shot using American Crafts white cardstock, I ran the tree through again using some Kraft Cardstock.
I adhered the bigger layers to a Couture Creations Card base using Scotch ATG, then I added the trees and the clouds using American Tombow Mono Multi Liquid Adhesive, Finally I added the image using Scotch ATG.
I stamped the word happy out onto some white cardstock.. I didn't end up using this as it was going to cover too much of my image, I ended up re-stamping onto some Vellum and used my EK Success Cutterbee Scissors to fussy cut.. I had to be really careful because the sentiment was actually this still wet. I carefully added some Tombow liquid adhesive to the back of the Vibessentiment and used my Silhouette Pick Me Up Tool to drop it onto my happy.
I carefully used the sticky end to hold the happy sentiment and added some Tombow adhesive to the back very small amounts and only when the thicker parts of the lines are so that you would see it through the front. I then carefully popped it on top of the image. I then used the reverse of the tool to go around and carefully push it on as like I said it was still wet and I didn't want to smudge it.
I added some Uni-ball white gel pen to my image and I was done.
I hope you have enjoyed my post today, if you have any questions feel free to send me a message or contact me via facebook (all links can be found below).
Watch the You Tube Video Here
Products Used On My Card (Affiliate Links Used Where Possible)

Copic Markers Used
V04, V06, V09
BG53, BG57, BG18
RV14, RV17, RV19
B14, B16
Y02, Y38
BV11, BV13
E57, E59
B0000
0 Colorless Blender
G07
Thanks for stopping by, Deni
CAMERA SET UP - FOR YOU TUBE VIDEOS ONLY
Blue Yeti Microphone
Sony Handycam HDR CX4-05
Tripod – Manfrotto MKCompactaCN-BK
S O C I A L MEDIA
B L O G : http://angelhandmadepapercraft.blogspot.com.au/
I N S T A G R A M : http://instagram.com/angelhandmadepapercraft
YOU TUBE: http://www.youtube.com/c/AngelHandmadePapercraft
F A C E B O O K: http://www.facebook.com/angelhandmadepapercraft
PINTEREST: https://www.pinterest.com.au/angelhandmadepapercraft
I was a 2018 Ambassador for Copic Marker Australia and NZ


No comments:
Post a Comment
Thankyou for stopping by, your comments mean a lot to me and I look forward to reading them :-)
Deni