Showing posts with label Stamping Bella. Show all posts

Sunday, 8 March 2020

Stamping Bella - Gamer

Hi Everyone,

This past week a work colleague asked me to make a card for her little boy who is a little bit of a gamer, I showed her the card I had made for my son using the Stamping Bella Oddball Gamer Stamp Set and she was happy to have this on her card.


I stamped him out onto X-Press It Blending Card using Memento Tuxedo Black and a Lawn Fawn Acrylic Block. I ran the image through my Sizzix Big Shot using Lawn Fawn Stitched Circle Die.


I coloured him up using Copic Markers which I will have listed at the end of this blog post.


I pulled in the MFT Stamps Game Controller Die Set and the matching Level Up Stamp Set. I used a white gel pen to add the finishing details to the controller.


I couldn't find any papers to match my card so I decided to make my own by doing repetitive stamping using the sentiments from the Level Up Stamp Set. I used my Misti Stamping Tool and Memento Tuxedo Black and stamped them onto X-Press It Blending Cardstock.. I like all my whites to be the same on a card.

I adhered the patterned paper I created to an American Crafts Black square I trimmed down. I then adhered these to a Couture Creations Card Base.

Using some stars that were leftover from previous projects, I adhered those around the corners of the patterned paper, then I adhered the image.


I stamped out the sentiment using Ink On 3 Embossing Ink and a Lawn Fawn Acrylic Block onto some American Crafts Black Cardstock, I used Ranger Ink Silver Embossing Powder which I then melted using a Heat Gun.


I added some Nuvo Crystal Drops in Ebony Black to the controller, it made such a big difference.


I love the way the finished card looks and my friend was also super happy with it :-)


I hope you have enjoyed my post today, if you have any questions feel free to send me a message or contact me via facebook (all links can be found below).

Watch the You Tube Video Here


Products Used On My Card (Affiliate Links Used Where Possible)


Copic Markers Used

B93, B95, B97, W00
E53, E587
T5, T7, T9
E000, E00, E21, E11, E04, R20

Thanks for stopping by, Deni

CAMERA SET UP - FOR YOU TUBE VIDEOS ONLY
Blue Yeti Microphone
Sony Handycam HDR CX4-05
Tripod – Manfrotto MKCompactaCN-BK

S O C I A L MEDIA 
B L O G : https://ldli.co/e/3xky6x
I N S T A G R A M : https://ldli.co/e/5dn20x
YOU TUBE: https://ldli.co/e/ej5l90 
F A C E B O O K: https://ldli.co/e/mjxn2r
PINTEREST: https://ldli.co/e/2l9zom


I was a 2018 Ambassador for Copic Marker Australia and NZ


Wednesday, 20 November 2019

Helmar - Rainbows and Unicorns

Hi everyone,

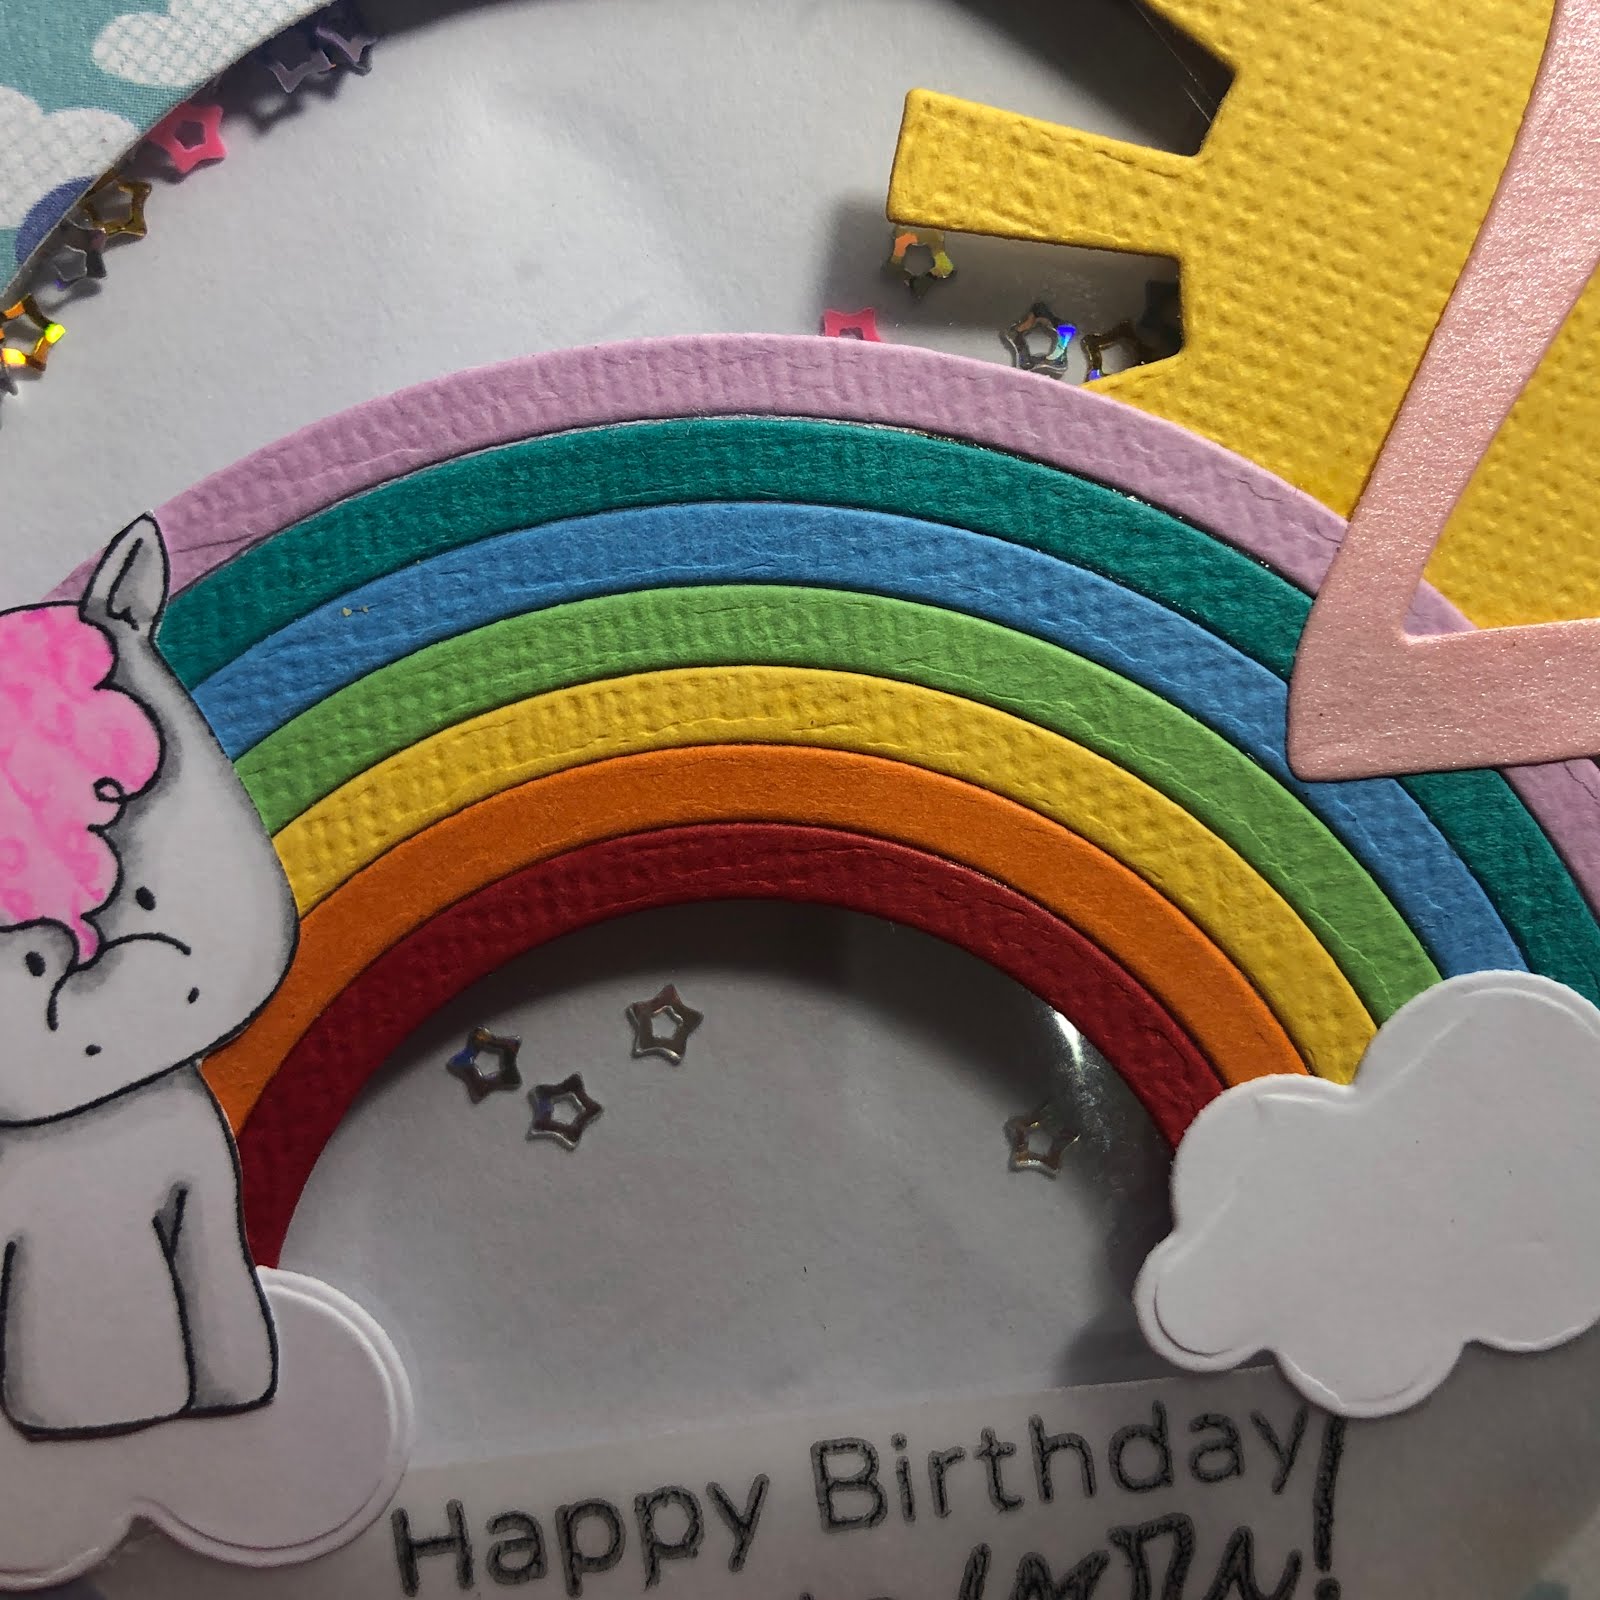
Today I am sharing with you a shaker card I made using products from Helmar Adhesive.


I used a stamp set from Stamping Bella called Unicorn Sentiments, I stamped the image out using a Lawn Fawn acrylic block onto X-Press It Blending Card with Memento Tuxedo Black.

I then coloured the image using Copic Markers, I will have those listed below.


Once I had the image coloured I began putting the card together.

I used Helmar Quick Dry and also the Acid Free to adhere all my pieces.

I started by making my rainbow, I used a whole lot of scraps from my leftovers bucket to cut all the strips then used the Quick Dry adhesive to adhere them all together, I did this on my glass media mat so I didn't make a mess.


I then added some puffy clouds to the ends of the rainbow and glued my unicorn the left side on top of one of the clouds. I also cut a sun and added that behind the rainbow on the right.


I used some clouds patterned paper from Pebbles to create my shaker laker, I ran a lawn fawn stitched circle die to cut out the centre and create my window. I didn't have any clear vellum left so i used some leftover acetate from packaging and ran that through with the same dies but the next size up and adhered that to the back of my clouds piece using the quick dry adhesive.

I added some foam tape to the back of the acetate and used star sequins from Beebee Craft for my shaker element.

I stamped out a sentiment from Studio Katia Birthday Greetings onto some vellum using Ink on 3 Blackout ink and carefully used my heat gun to make sure it was completely dry, I added some bling to the ends so I could hide some of the quick dry adhesive.


I cut a number 2 from Paper Rose Studio Jumbo Numbers using some pink card stock from my stash and added that to the sun in the top right corner..


Finally I adhered everything to a couture creations card base and my card was complete.


I hope you have enjoyed my post today, if you have any questions feel free to send me a message or contact me via facebook (all links can be found below).

Watch the You Tube Video Here


Products Used On My Card (Affiliate Links Used Where Possible)


Copic Markers Used

V20, V22,
RV00, RV02, RV04
N0, N4, 0 Colorless Blender

Thanks for stopping by, Deni

CAMERA SET UP - FOR YOU TUBE VIDEOS ONLY
Blue Yeti Microphone
Sony Handycam HDR CX4-05
Tripod – Manfrotto MKCompactaCN-BK

S O C I A L MEDIA 
B L O G : https://ldli.co/e/3xky6x
I N S T A G R A M : https://ldli.co/e/5dn20x
YOU TUBE: https://ldli.co/e/ej5l90 
F A C E B O O K: https://ldli.co/e/mjxn2r
PINTEREST: https://ldli.co/e/2l9zom


I was a 2018 Ambassador for Copic Marker Australia and NZ


Thursday, 7 November 2019

Stamping Bella - Oddball Gamer

Hi Everyone,

Today I am excited to share with you a commissioned card I made using Stamping Bella Oddball Gamer.


Unfortunately the customer was not happy with the end result but I do have other plans for this card.

I stamped the image out onto X-Press It Blending Card Stock using Memento Tuxedo Black and a Lawn Fawn rectangle stamping block, I also stamped out the sentiment that came with the stamp set.


I coloured the image up using Copic Markers (Shock Horror hehe).


Using patterned papers from Kaisercraft Just Landed 6.5" Paper Pad, I cut two layers and then cut mat layers from American Crafts Black Card stock.

I used numbers from Lawn Fawn Finley's 123s dies and ran through the 1 and the 6 using some scrap blue paper from my stash.


I ran MFT Stamps Game Controller through my Big Shot using some black American Crafts card stock, I also ran all the extra die pieces through using some small scraps from my stash to create the controller.

At the end of my card process I decided to add some Tonic Studios Nuvo Crystal Drops in Red Berry, Apple Green, Midnight Blue and Dandelion Yellow.

I love the way the Nuvo drops finished the controller off.


Once I was done with the front of the card I use some of the leftover card stock pieces to decorate the inside of the card.


I hope you have enjoyed my post today, if you have any questions feel free to send me a message or contact me via facebook (all links can be found below).

Watch the You Tube Video Here


Products Used On My Card (Affiliate Links Used Where Possible)


Copic Markers Used

E000, E00, E21, E11, E04, R20
W1, W5
N6, N8, N10
B02
E23, E25, E29

Thanks for stopping by, Deni

CAMERA SET UP - FOR YOU TUBE VIDEOS ONLY
Blue Yeti Microphone
Sony Handycam HDR CX4-05
Tripod – Manfrotto MKCompactaCN-BK

S O C I A L MEDIA 
B L O G : https://ldli.co/e/3xky6x
I N S T A G R A M : https://ldli.co/e/5dn20x
YOU TUBE: https://ldli.co/e/ej5l90 
F A C E B O O K: https://ldli.co/e/mjxn2r
PINTEREST: https://ldli.co/e/2l9zom


I was a 2018 Ambassador for Copic Marker Australia and NZ


Friday, 28 December 2018

Stamping Bella - Fishing Squidgy

Hey Everyone!

Today I am sharing with you Stamping Bella's Fishing Squidgy, I have stamped him out onto X-Press It Blending Cardstock using Memento Tuxedo Black.


I then proceeded to colour him up using Copic Markers, Unfortunately it looks like I have lost some of my video however I have uploaded the skin colouring and the card process into the one video.

I really enjoyed colouring this image, it is super sweet and I love all the boy tones.

Once I had the image all coloured up I fussy cut him out using EK Success Cutterbee Scissors.


I used some of the leftover blending card and an MFT Stamps Stitched Rounded Square frame and ran them through my Gemini die-cutting machine. Once I had the frame cut I selected some patterned paper from Kaisercraft Mountain Air Paper Pad, this fishing paper was perfect. I ran the same die through again using the patterned paper so I would have an insert to the frame. So they didn't move as  I was putting card together I used some Scotch Magic Tape on the back to keep them together whilst I was working on my layout. You wouldn't see this as it would be on the reverse anyway..

I trimmed my sentiment down using my Fiskars Trimmer, then fishtailed the ends using EK Success Cutterbee Scissors.

I grabbed one of my Couture Creations Pre-Made card bases and used my bone folder to make sure it was folded noice and straight.

I adhered everything using Tombow Mono Multi, a little did leak out so I just used an eraser once it was dry to remove the excess and you now cannot see it.

I then cut many of the same and decorated the inside of the card.

You can see the whole colouring and card process on my You Tube Channel below. I would love for you to hit the thumbs up and Subscribe to my channel so you can see more of my videos.


I hope you have enjoyed my post today, if you have any questions feel free to send me a message or contact me via facebook (all links can be found below).


Products Used On My Card (Affiliate Links Used Where Possible)


Copic Markers Used

E000, E00, E21, E11, E04, R20
BG02, BG05
YG05, YG09
E57, E59
T2, T4
B91, B93, B95, B97, B99
E74, E77, E79
YG93, YG97
N1, N3
E31, E34, E37
W1, W3, 0

Thanks for stopping by, Deni

CAMERA SET UP - FOR YOU TUBE VIDEOS ONLY
Blue Yeti Microphone
Sony Handycam HDR CX4-05
Tripod – Manfrotto MKCompactaCN-BK

S O C I A L MEDIA 
B L O G : http://angelhandmadepapercraft.blogspot.com.au/
I N S T A G R A M : http://instagram.com/angelhandmadepapercraft
YOU TUBE: http://www.youtube.com/c/AngelHandmadePapercraft
F A C E B O O K: http://www.facebook.com/angelhandmadepapercraft
PINTEREST: https://www.pinterest.com.au/angelhandmadepapercraft

PERSONAL BLOG 
ANGEL HANDMADE PAPERCRAFT: http://angelhandmadepapercraft.blogspot.com.au/

I am an Ambassador for Copic Marker Australia and NZ

Sunday, 28 May 2017

Auzz Trinklets N Crafts DT - All About Mum


Hello lovely followers,

Well the month of May is beginning to wind down, I can't believe how fast this month has gone!

I have had a lot of personal stuff going on this past month, including lots of Wedding Planning and also resigning from my day job this week ready for a fresh start elsewhere.

The Month of May to us is all about our Mum's and the Motherly figures in our lives. I am very lucky to have an awesome Mum and a fantastic Mother in Law to be. So we are celebrating them over on the Auzz Trinklets Blog.

I created this card with two sisters in mind to give their Mum, the image just made me think of two sisters hugging.


I started off by stamping the image - "Stamping Bella Huggy Squidgies" using a Lawn Fawn Acrylic Block and Memento Tuxedo Black and used Mondi Color Copy for my blending cardstock.

I then cut it out on my Sizzix Big Shot using a Lawn Fawn Stitched Circle die (i'm not sure if it was from the small or large set as mine are all in the same package).

It was then time to go and find some patterned papers, I used a 6x6 Paper pad from Crate Paper, there is no name on the pad but there is a number #680203. I was nearly finished this paper pad so I only had a few papers to use but I made it work.

I used a Lawn Fawn Stitched Square die (unsure if it was a small or large as again these are all packaged together) to cut one of the sheets of patterned paper using my Sizzix Big Shot.

I cut the black matting using Canson Cardstock on my Cutterpillar Pro. I cut the bird patterned paper to size and attached it to the black matting. I cut the strip using leftovers, the Loopy border is from La La Land Crafts August 2015 Stamp Club Kit (no long available), you can purchase this separately now (links below).


I used Lawn Fawn "Mom + Me" Stamp set to stamp the sentiment. I used my Embossing Buddy to prep the canon cardstock strip first, I then used Versamark Watermark stamp pad to stamp the sentiment and applied Ranger Superfine Embossing Powder in White, I then grabbed my Heat Tool to melt the embossing powder.

All layers were then adhered together using Scotch ATG and Tombow Mono Multi (I switch between the two for different layers). I then adhered all the layers down onto a Pre-made Twiddleybitz Card Base.

Once I thought the card was completed I decided something was missing, so I used the Lawn Fawn "Mom + Me" Stamp set to stamp the grass and the butterflies. I used My Favorite Things Hybrid Ink in Sour Apple, Razzle Berry and Lemon Drop. I then added At You Spica - Clear over the butterflies and the girls shoes.


Copic Markers Used

E000, E00, E21, E11, E04, R11
RV11, RV13, RV14
Y32, Y35
E55, E57, E59
E35, E37, E39
W00, W2
N0, N3

Products Used

Stamping Bella - Huggy Squidgies
Lawn Fawn - Mom + Me
La La Land Crafts - August 2015 Stamp Club Kit
La La Land Crafts - Loopy Border Die
Crate Paper - 6x6 Pad #680203
My Favorite Things - Hybrid Ink Sour Apple
My Favorite Things - Hybrid Ink Razzle Berry
My Favorite Things - Hybrid Ink Lemon Drop
Versamark - Watermark Stamp Pad
Ranger - Super Fine Embossing Powder White
Memento Tuxedo Black
Canson Cardstock - Black
Lawn Fawn - Acrylic Block
Sizzix Big Shot
Tombow Mono Multi Liquid Adhesive
Scotch ATG
Mondi Color Copy
Cutterpillar Pro
At You Spica - Clear
EK Success - Powder Tool
Lawn Fawn - Stitched Circles
Lawn Fawn - Stitched Squares
Twiddleybitz Cardbase


Thanks for stopping by,

Glitter Text @ Glitterfy.com

You Can find my cards for sale here https://www.facebook.com/angelhandmadepapercraft

My Blogs

http://angelhandmadepapercraft.blogspot.com.au/

http://auzztrinkletsnkrafts.blogspot.com.au/

Thursday, 10 March 2016

Auzz Trinklets N Krafts - Make It A Card Thursday

Good Morning Everyone,

Today i have a Make It A Card Thursday project for you for Auzz Trinklets N Krafts.

I have used a stamp from Stamping Bella called Tiny Townie Hayley The Hero. Such a cute image and an awesome one to colour.


I kind of went with a Superman colour theme for the image but added some pink in to make it more girly.

I have used papers from The Craft Stall which i found in the Reject Shop, they were quite cheap and seemed to fit my image perfectly, and since I'm still unpacking my craft room i mainly have all my new stuff next to my desk at the moment.

I have coloured the image up using Copic Markers which is generally my go to for colouring. I have stamped it using MFT Hybrid ink liquorice black on a Mondi cardstock. My aim for this year is to start using my other mediums lol. I have distress markers, prismacolours, inktense pencils, spectrum noir pencils and they all have been highly neglected haha.

On this card today i have used a few bits and pieces of leftover diecuts which i keep in a little basket on my desk. The little flag is from MFT, the star is also from MFT ( I have inked this up using a distress ink from Tim Holtz Ranger), Doily i think is from Kaisercraft. The Stitched Circle is from Lawn Fawn, Cardstocks are from Kaisercraft and American Crafts aswell as Canson. The Card Base and envelope are from Twiddleybitz. The small piece of ribbon is from my stash. I have attached everything using my Scotch ATG and Tombow Mono Multi for the small die cuts.
I have coated the mask and cape in Clear Wink Of Stella before attaching the image onto my card using Scotch Mounting Tape.

I hope you have enjoyed my post today, if you have any questions feel free to send me a message or contact me via facebook (all links can be found below).


Thanks for stopping by,

Glitter Text @ Glitterfy.com

You Can find my cards for sale here https://www.facebook.com/angelhandmadepapercraft

My Blogs

http://angelhandmadepapercraft.blogspot.com.au/

http://auzztrinkletsnkrafts.blogspot.com.au/

Friday, 6 March 2015

Make it with scraps Friday - Auzz Trinklets N Krafts - Under the Umbrella

Hi Everyone!


It's Make it with Scraps Friday over at Auzz Trinklets N Krafts today, I have made a card which actually doesn't use much scraps as I only need one piece, however it is a leftover piece from a previous card.

I have used a stamp from Stamping Bella called Emily and Ryan Under The Umbrella.

I have stamped the image using Memento Tuxedo Black and coloured the image using Copic Markers.


Copic Markers Used

Bride
Skin E50, E51, E53, E55, R20
Dress R35, R24, R37, R59
R81, R83, R85

Groom
Skin E50, E51, E53, E55, R20
Jacket C1, C3, C4, C5
Pants B91, B93, B95, B97, B99
Shoes T4, T6, T8, T10

Flowers
G40, G43, G46
R81, R83, R85
YR00, YR21, YR14

Umbrella
R000, R00, 0

Grass
G40, G43, G46

Products Used On This Card

Twiddleybitz Card Base
Scotch ATG
Kaisercraft
Memento Tuxedo Black
Fiskars Stamp Press
X-Press it Mounting Tape
Wink Of Stella
CC Designs Amy R Stamps


Thanks for stopping by,

Glitter Text @ Glitterfy.com

You Can find my cards for sale here https://www.facebook.com/Angelscrapbookgoodies

My Blogs

http://angelscrapbookgoodies.blogspot.com.au/

http://auzztrinkletsnkrafts.blogspot.com.au/