Friday 28 February 2014

My Aussie Besties Dt Pearls and Bling

The challenge at the moment over at My Besties Aussie Challenge blog is pearls and bling, so much fun, so why not come over and join us :-)  

I haven't had a chance to post my recent cards as our internet provider is doing maintenance in our area at the moment and my service is not good on either my phone or our internet which is not good for my blog :-(


Anyway, here is my gorgeous card for My Besties. The Image I have used is Img 235, I knew I had to use this image the minute I seen it, she is absolutely adorable.
 
Image was coloured using Copic Markers purchased from Craft-a-Lot. Papers are from American Crafts and some others are from my stash.
 
The fence is from Magnolia, Clouds are from CC Designs as are the hearts. Pearls are from Bella, I have used Derivan Kindy Glitz on the flower and her glasses. I have also used Tim Holtz Distress ink on a few layers of the card.


Thanks for stopping by,
 
Deni

Friday 14 February 2014

Fitztown GD Post


Hello :-) GD Deni here stopping by the Fitztown Blog with a nice long post.

Today I have decided to do a quick tutorial on how I make my Christmas Tags. I don't have a you tube channel so I am doing it by pictures, any questions please ask :-)

First I have chosen an image from Fitztown's 2013 Winter Collection. He is one of the snowmen from Winter 1. You can find them here 

Ok, firstly I have resized my image to approximately 5cm wide, so that he will fit in my tag die. I have then printed 2 (just incase haha) on x-press it blending Cardstock. I purchased this from Forever Markers  (only available from here in Australia).


Please remember to make sure u clean off your craft mat before u start crafting so you don't leave any ink residue or any leftovers from your last project. I use baby wipes, I find they are quick and easy and readily available as I use them to clean my rubber stamps. 

I will be working with Copic Markers today but u can use whatever medium you are comfortable with. 

Next I start laying down my colours, I am working on the candy came first as sometimes red bleeds and I don't want to ruin my whole image if this happens, if I do it first and it bleeds I can start over. 

I have chosen to colour my candy cane using R24, R27, R29. Due to this being a small image there won't be as much blending required as what I would normally be doing. 

So first I lay down my R24 on every second stripe, then I use my R27 to come in from the edges and lay down a bit more colour but leaving a stripe down the middle, I then do the same thing with my R29 but not going to the end of the R27, so some R27 is still showing. 


Now I normally work light to dark and then work my way back, but due to this being a smaller image I will be skipping the R27 in the blending back and using my R24 to blend the R29-R27 back into the R24. You will notice you will still be left with the stripe down the middle. If you re using a larger image them feel free to use all the colours when blending back to lightest. 
Please leave your markers (or other medium( out as we will be using them again later. 


Candy cane is now complete let's move onto something else :-)

Let's work on his hat. Another red section so I will be using the same colours again, R24, R27, R29.

So same process as before, lay down your base colour (lightest colour) R24. Next start putting in your shadows with R27, come out a little bit as you will need to add darker colour closer to the edge.  (don't quote me on these shadows as I'm not the best at them hehe). Next do the same with your R29, not quite coming out as far as your R27.


Next we are going back in with our R24 (no blending with R27 as it's a small image).


Next we will do his nose, this won't take much as it's so small. I will be using YR04, YR07.


I didn't do any blending at all on the nose, I just layed down the base colour YR04, and did a quick shadow with YR07.

Next I will be doing the scarf I'm thinking a nice blue. B93, B95, B97

I layed down my base colour of B93, added some shadow with B95 and then B97. I then went back with my B93 ( I skipped my middle colour again as it wasn't required on such a small image) and blended them out. 


Next is the buttons, I think I may just use some browns on those :-) E53, E55. 

Firstly lay down base layer of E53, now some shadow with E55, then back to E53 to blend out the E55. I found this lightened the shadows too much so I have had to go back I with my E55 and add the shadows again without blending out this time. 

Next I am just going to add some shadows into the snow. I am going to use c1, c3 and my 0 blender, 
Firstly lay down a small shadow using your c1 then go back and add the c3 in the same places but closer to the edge leaving some c1 showing. 


Next, using your c3 blender, blend your shadows back into the snowman, using a short flicking motion over the top of your c1 and c3 towards the centre of the image. 


I won't be adding any shadows to the hat white areas as I will be covering this with glitter and in such a small area you won't see them. 

Next I am going to turn the image into a tag. 

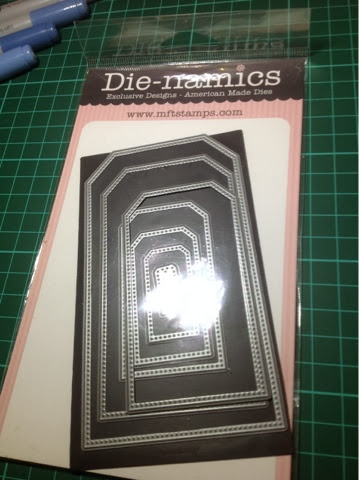
I will be using my MFT Die-namics Pierced Traditional Tag Stax, if u have another tag die use that. If your do not have any tag dies, just cut a rectangle and cut the top corners off. 


I will be using the 3rd largest die for my tags, next place the die over your image, I like to use a small piece of tape to hold the die in place over my image so it doesn't move when I run it through my Cricut Cuttlebug (again if you have a different cutting machine this will work the same)


I have now run the image with the die through my Cuttlebug and popped it put of the die. Looking good so far, nearly finished :-) 

Now, because I have used Copic Markers, u can see where they have saturated  through the back of the tag, so I will cut another tag on white Cardstock and stick it to the back, I used my Towmbow Multi Mono Liquid Glue.

I will now use a small hole punch/Cropodile to pop a hole in the top, then pop some ribbon through and using some twine or skinny ribbon I will tie a bow around the ribbon. 


On the back of the tag, I have used my Merry a motifs stamps from Paper Dmooches to stamp to and from. I have used Versafine Onyx Black to stamp and I have used my stamp press from Fiskars to correctly place the sentiments. 


Lucky last, now that I am finished everything is to go back to the image and add glitter to the hat so it will have time to dry :-) I will be using Derivan Kindyglitz Crystalina, you can use whatever glitter product you choose. 


Hopefully you enjoyed my tutorial please leave some love here and on my personal blog 

These tags will be for sale on my facebook page, you can find the link on my blog

Thanks for stopping by Fitztown, and why not try out making some tags for your Christmas presents yourself, so much fun and a lot more personal then shop bought ones :-)

Deni x


Monday 10 February 2014

Fitztown anything goes GDT

Hi :-)
 
My Card today is a DT post for Fitztown :-) The Challenge is Anything Goes.
 
Today I have used Cutie 13, such an adorable image :-)

I have coloured the image using Copic Markers. 
 

Hope you like it :-)
 
Deni x
 

Sunday 9 February 2014

My Aussie Besties DT - Love is in the air

Hi and Welcome to my Blog,
 
My post today is a DT Post for My Aussie Besties, the theme this fortnight is Love is in the Air.

You can purchase this gorgeous stamp here.
 
I have printed the stamp on my X-Press it Blending Cardstock and used my MFT Dienamics Piereced Traditional Tag Stax to cut the tag shape. The sentiment is from Amy R.


Thanks for stopping by, and please come and check out the Aussie Besties Challenge Blog.
 
Deni

Saturday 8 February 2014

Love you - CC Designs

Hello,

The past few days my creative flow has dried up lol.

But I have managed to finally finish a card, I have been using some of my new stamps from CC Designs.

CC Designs Amy R Adoring You Sentiments
CC Designs Love Letter Lucy
CC Designs Mailbox
CC Designs Heart & Arrow Die


I have stamped the images on X-Press It Blending Cardstock using Memento Tuxedo Black.  Here you can see that I have masked my Love Letter Lucy Image to place the letterbox a bit closer to her. I have just used some post it notes to do this as I don't have any masking tape.


Image is now all coloured up ready to be made into a card. I have coloured the images using my Copic Markers purchased from Craft-a-Lot
 
My card is now complete, I have used American Crafts Cardstock and added some corner punchies using my EK Success Paper Shapers Corner Punch.  I have stamped the Sentiment using Versafine Onyx Black, I find this is a great ink for the finer sentiments and it is my go to ink for any sentiments. I had originally actually stamped it straight onto the image cardstock but I must have been a bit shaky as I moved as I was stamping and ruined it :-( I then had to restamp on a separate piece of cardstock and attach it over the top.


I really love this card and the new stamps from CC Designs, I had a lot of fun with them.

Look forward to seeing you stop by again soon. Please leave some love and if you are not a follower please follow me. You can also see this card and many more on my facebook page.


Glitter Text @ Glitterfy.com

Friday 7 February 2014

Sweet penguins

Hello!

How cute are these little penguins! I have been eyeing off this stamp set called Sweet Penguins from CC Designs for a while now but for some reason always forget to add it to my order :-)

Images have been coloured using Copic Markers purchased from Craft-a-Lot.
 
 
For this card I have used

X-press it Blending Cardstock
American Crafts Cardstock
Twiddleybitz Card Base
Spellbinders Standard Circles
Ribbon is Ribtex Favours by Vivaldi - 6mm
Christmas Papers are leftovers from a few other cards
Sentiment is from CC Designs Amy R Happy Christmas
Copic Markers Used

R24, R27
YR04, YR07
YR00, 0
C7, C9, 100
B0000, B24, B29


Deni x

Thursday 6 February 2014

Birthday Girl

Here is Another CC Designs Card I have been working on. For this card I was trying the no lines technique.
 
I stamped the image on x-press it using Memento Desert Sand. The image I have used is a rubber stamp from CC Designs called  Swiss Pixie Sunflower Birgitta. This link will take you to the digital version as it is no longer available in rubber.
 
I have coloured the image using Copic Markers. Papers are all from My stash. The sentiment is from Paper Xtra clear stamp. Sentiment was stamped using Versafine Onyx Black.


Wednesday 5 February 2014

Luka koala

Most of you will know that me and boy cards don't usually play nice lol.

Well this one and I did, it took me a while to colour up the image as I was teaching a friend by step by step pictures. But the card took me only 10 minutes to put together, and the papers just jumped at me, normally it takes me a while to find what im after.

This is Koala Luka from La La Land Crafts, isn't he just gorgeous!!

The papers are from Kaisercraft Timeless collection paper pad. I have also used Kraft Cardstock.

The sentiment is from Paper Xtra Item No. 45809


I have also used

Memento Tuxedo Black
Versafine Onyx

Copic Markers Used

Now before I start listing these, some of these blends I would normally use, but my friend doesn't have a lot of copic markers, so I have made blends up for her using only markers she had :-)
 
E000, E50, E53, R11
YG63, YG67
E21, 0
E21, E35, E37
E02, E11, E04
E21, E35
C1, C5, C7

Hope you like it :-)
 
Deni

Tuesday 4 February 2014

Thankyou

I have been very busy creating this past few weeks, my challenge is to get over 500 cards made this year lol. I need to beat a friend who posted how many she did last year. So I am very determined, I really need to be making atleast 2 cards a day.. not sure that is going to work lol. So far I have 1 card for each day as some days I made more than one and others I didn't make any.

Today I have made a Thankyou card.

Image has been sitting on my desk already coloured up with Copic Markers purchased from Craft-a-Lot.


Cc Designs Stamp
Kaisercraft Blossom Cardstock
Bella! My Romance Paperz - Floral
X-press it blending Cardstock
Versafine onyx black
Sentiment - CC Designs, Amy R stamps Thanks a bunch

Thanks for stopping by,

Deni

Monday 3 February 2014

Birthday Flowers

Here is another Blog post I had in my drafts but had not posted lol.
So again just a quick one :-)


Sunday 2 February 2014

I-Scream-You

Welcome to my blog,
 
Sorry I have no details on this card today, as it was another blog post that I had in my drafts but did not finish, I thought I would post it anyway to keep you all busy :-) This is another stamp from CC Designs :-) I love this stamp company as im sure you will realise lol.
 
Image was coloured using Copic Markers purchased from Craft-a-Lot


Sorry for the quick one, I will get back to my long blog posts soon :-)

Saturday 1 February 2014

Love owls

Welcome, yesterday I used an image from Pink Gem Designs, well today I have used another stamp from the set Love Owls, it is such an adorable set :-)


I have coloured the images using Copic Markers purchased from Craft-a-Lot. Papers are leftovers from some other cards I made this month, I have also used 2 spellbinders Die Sets, the Standard Circles and the Heart Circles.


Hope you like my cards today,

Thanks for stopping by :-)