Wednesday 29 July 2020

Helmar Worldwide, MFT Stamps - Freshly Picked For You


Today I am sharing a project I have created for Helmar Worldwide. 


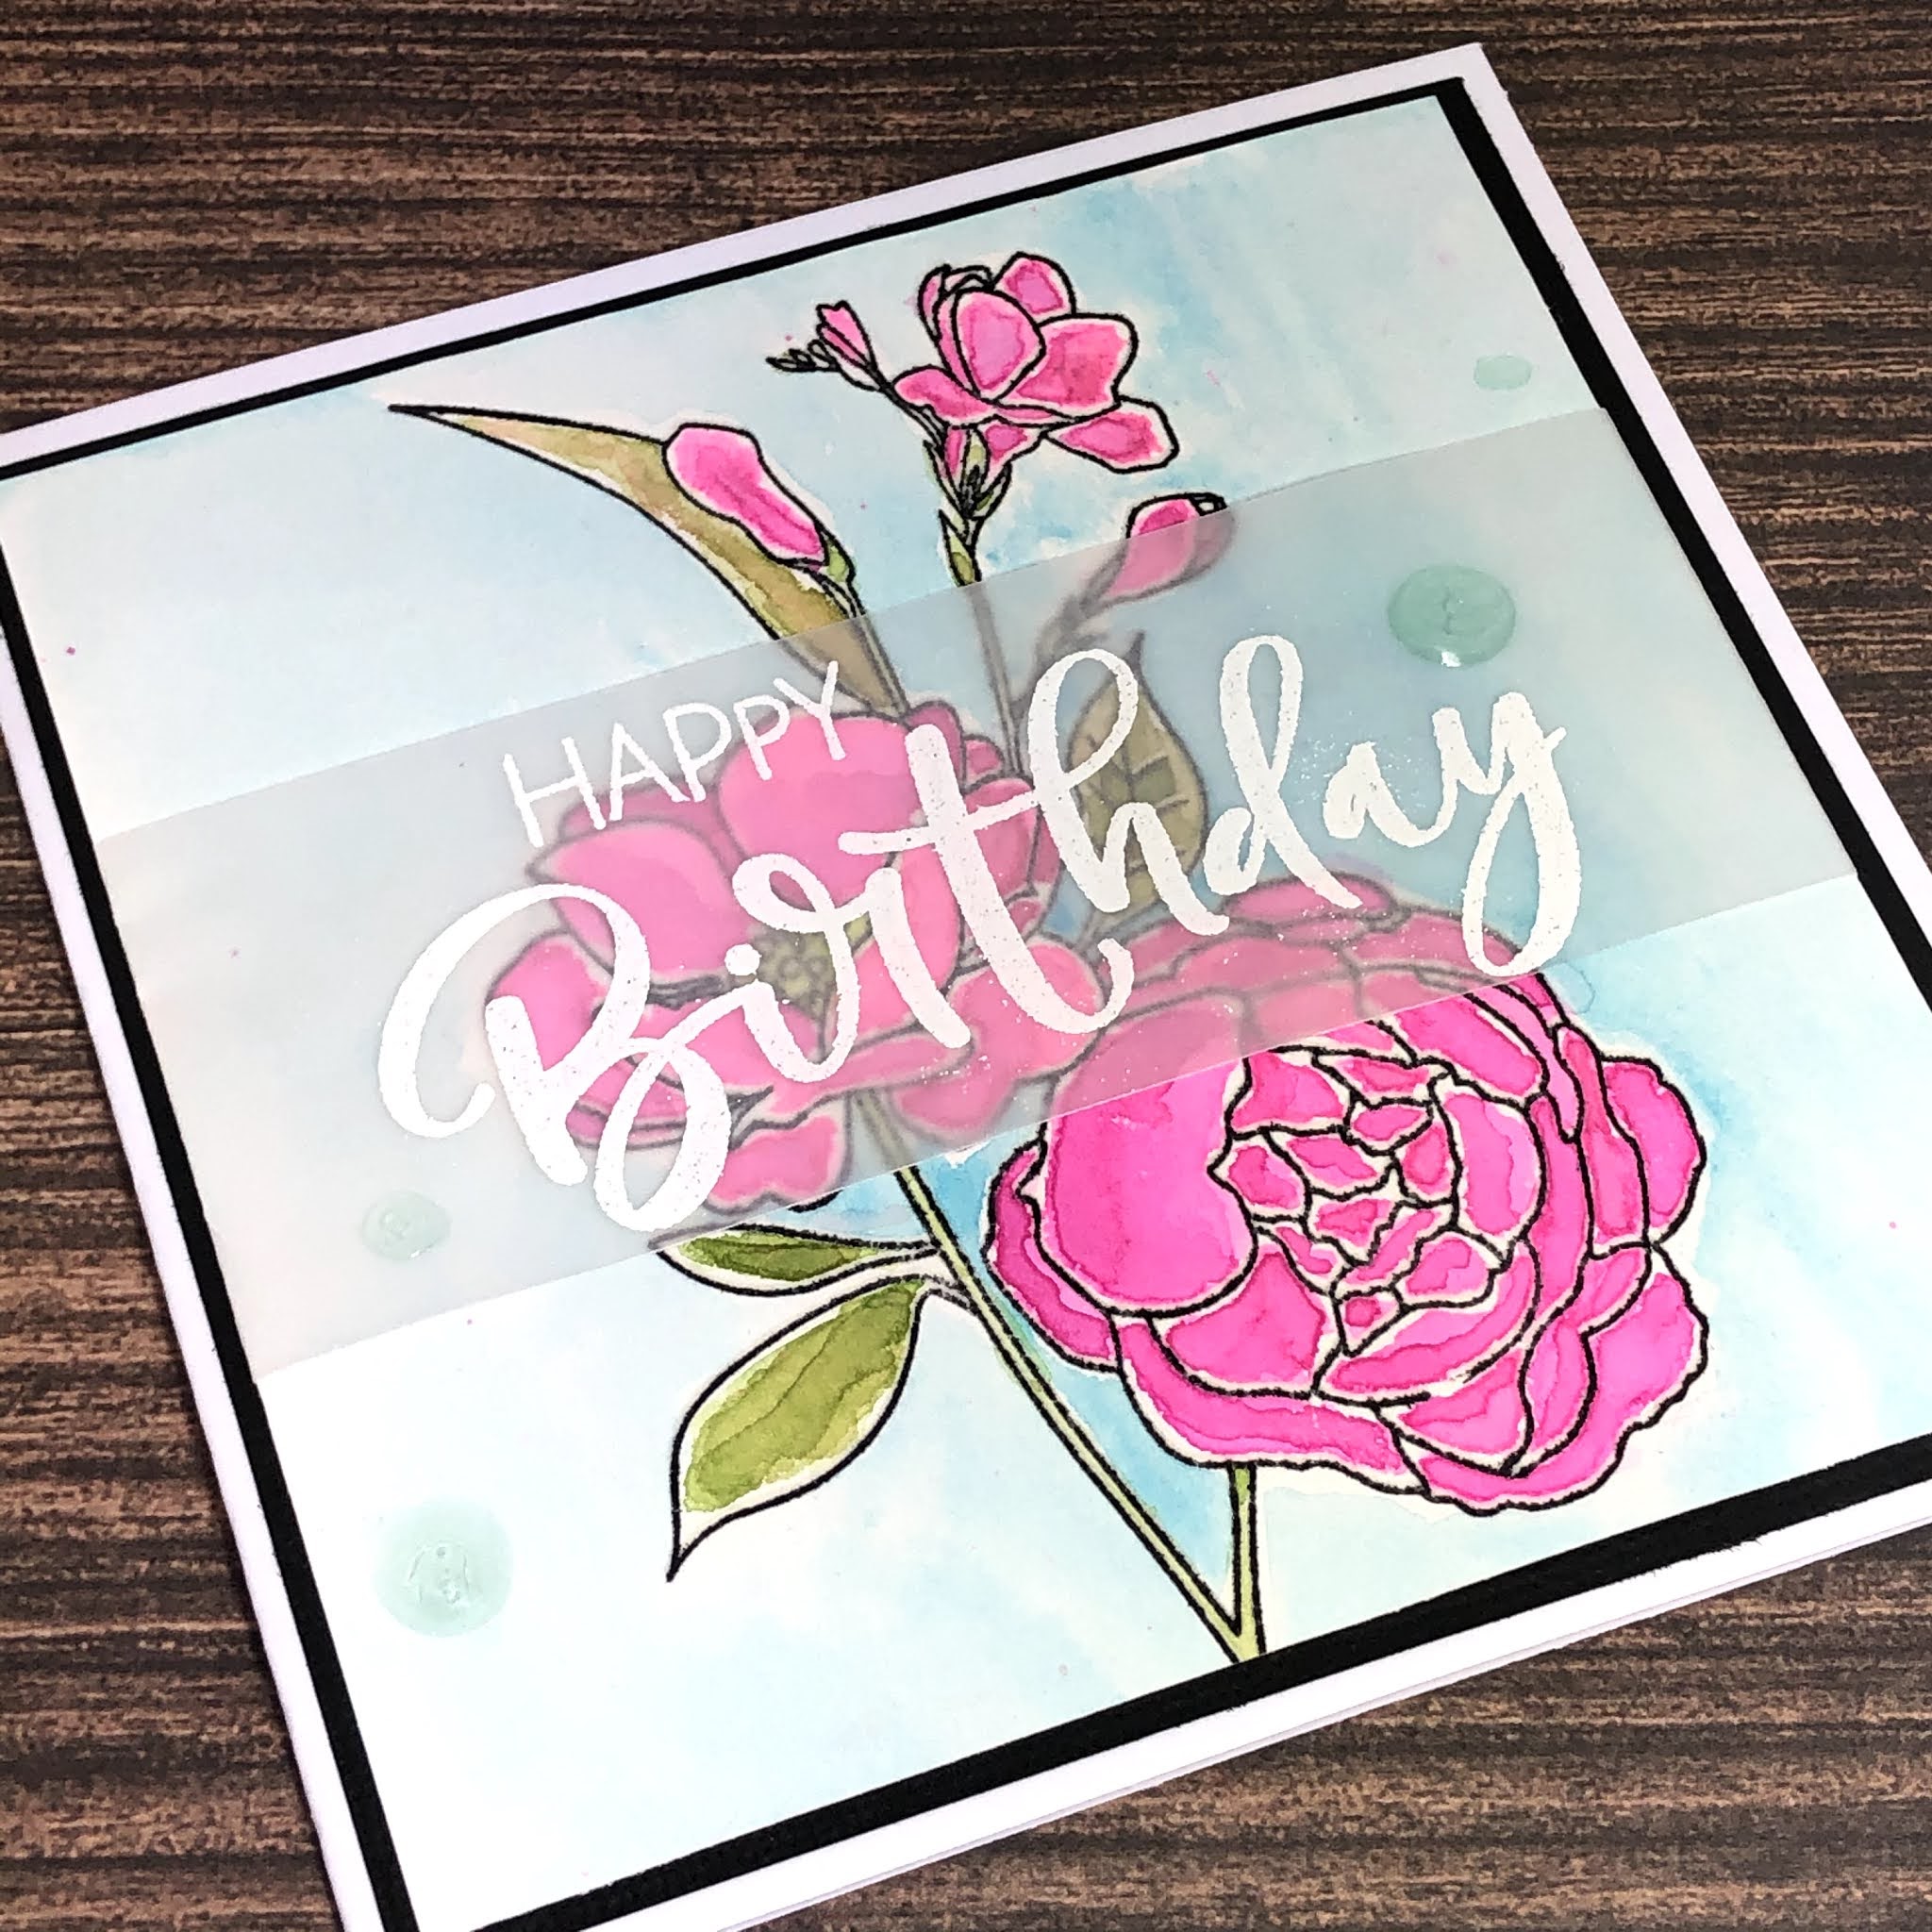
I had fun playing with my Altenew Watercolour pans today, I love the vibrancy of them. 


I used the Fresh Cut Flowers  image from MFT Stamps onto Mi Teintes Paper using Memento Tuxedo Black then restamped using Ink On 3 Embossing Ink, I added some Clear Embossing Powder then melted it using my Heat Gun. 


Using my Watercolours and a Silver Brush Company Round Brush I painted the image, drying inbetween to give the extra layers. 


I used Honey Bee Stamps Happy Birthday stamp set and stamped it out onto Vellum using Ink on 3 Embossing Ink and white embossing ink, and meted it using my Heat Tool, making sure to alternate between front and back to not burn the vellum. 


I layed the Vellum over the image and used my bone folder to carefully crease the sides of the vellum so I could fold it over the back and adhere. I used Helmar 450 Quick Dry to make sure the sides adhered quickly and I could move on with my card. I also added a small amount behind parts of the sentiment.


Since I already had the quick dry out I used it to finish putting my card together. I cut down a layer of black cardstock using American Crafts Black cardstock. I then adhered all the layers to a Couture Creations Card Base. 

I added some Nuvo Crystal Drops in Sea Breeze to finish the card off.


I hope you have enjoyed my post today, if you have any questions feel free to send me a message or contact me via facebook (all links can be found below).

Watch the You Tube Video Here


Products Used On My Card (Affiliate Links Used Where Possible)


Thanks for stopping by, Deni

CAMERA SET UP - FOR YOU TUBE VIDEOS ONLY
Blue Yeti Microphone
Sony Handycam HDR CX4-05
Tripod – Manfrotto MKCompactaCN-BK

S O C I A L MEDIA 
B L O G : https://ldli.co/e/3xky6x 
I N S T A G R A M : https://ldli.co/e/5dn20x
YOU TUBE: https://ldli.co/e/ej5l90 
F A C E B O O K: https://ldli.co/e/mjxn2r
PINTEREST: https://ldli.co/e/2l9zom


I was a 2018 Ambassador for Copic Marker Australia and NZ


Rachelle Anne Miller - up up and away Balloon Ride

Good Morning Everyone, 

My second post for Rachelle Anne Miller, today I am sharing with you Balloon Ride, another awesome Digital Stamp from her collection.


I printed the image onto X-Press It Blending Cardstock using my Brother Laser Printer then coloured her up using Copic Markers. 


I am really happy with the way the image turned out, and I love the pop of colour the balloons give to the card.


I used patterned papers from Kmart - Anko Whimsical Paper Pad, I trimmed them down and matted them using some Reflex copy paper as I didn't have any blue cardstock to match - you don't notice the thin-ness of the paper because there is so many layers to my card anyway. 


I ran a Hot Air Balloon Die from La La Land Crafts through my Big Shot using some white Cardstock and adhered it to the top left corner. 


I also used the Filigree heart dies from La La Land Crafts and scattered them around my card, I also used an EK Success Star Confetti punch to punch some smaller stars.


Using All Occasion Sentiments from MFT Stamps, I carefully cut the stamp in half so I could stamp each piece separately. I stamped them onto Vellum using Ink On 3 Embossing Ink, added Ranger Ink Super Fine White Embossing Powder then melted it using my Heat Tool. I then using my EK Success Cutterbee Scissors to fussy cut each piece. 


I added some details to the image using a Uni-Ball White Gel Pen, I think this finishes off an image. 


I used some leftovers to decorate the inside of the card then it was complete :-)


I hope you have enjoyed my post today, if you have any questions feel free to send me a message or contact me via facebook (all links can be found below).

Watch the You Tube Video Here


Products Used On My Card (Affiliate Links Used Where Possible)


Copic Markers Used

E000, E00, E21, E11, E04, R20
B00, B12, B14, B16
E74, E77, E79
Y04, Y15, Y19, YR27
R81, R83, R85, BV08
C0, C3

Thanks for stopping by, Deni

CAMERA SET UP - FOR YOU TUBE VIDEOS ONLY
Blue Yeti Microphone
Sony Handycam HDR CX4-05
Tripod – Manfrotto MKCompactaCN-BK

S O C I A L MEDIA 
B L O G : https://ldli.co/e/3xky6x 
I N S T A G R A M : https://ldli.co/e/5dn20x
YOU TUBE: https://ldli.co/e/ej5l90 
F A C E B O O K: https://ldli.co/e/mjxn2r
PINTEREST: https://ldli.co/e/2l9zom


I was a 2018 Ambassador for Copic Marker Australia and NZ


Monday 27 July 2020

Penguin Momma - Whimsy Stamps

Hi All,

Today I have created a gorgeous new baby card, I used Penguin Momma from Whimsy Stamps Digital Collection.


I began with printing the image onto X-Press It Blending Cardstock using my Brother Laser Printer.


I used my Copic Markers to colour the image, you will find a list of the markers I have used at the end of this blog post. I then ran the image through my Sizzix Big Shot using a Lawn Fawn Stitched Circle die.


I used a really old Fiskars feet punch to punch some little baby feet out. 


I wanted to try something new (to me anyway) on my card today. First I used my Ranger Distress Oxide Inks and a Round Blending Tool to blend ink over a sheet of X-Press It Blending Card, I then used my fingers to flick water over it, I layed a microfibre cloth over it to soak the water up. This left a really cool look to the cardstock. 


Once that was done I quickly ran my heat tool over it as I didn't have time to wait for it to dry. Next I layed out all different sizes of my Stitched Circle Dies out on the distressed paper and ran them through my Big Shot, I love the way it turned out. 

I added a sentiment from Whimsy Stamps Everyday Banner Sentiment - Congratulations, it was perfect for this card. 


I adhered all my layers to some American Crafts Cardstock then to a Couture Creations Card Base using Helmar Acid Free liquid Adhesive. 

I used leftovers to decorate the inside of the card. 


I hope you have enjoyed my post today, if you have any questions feel free to send me a message or contact me via facebook (all links can be found below).

Watch the You Tube Video Here 


I don't have a colouring video for this one, I have connected up the video of the boy card I made using the same image


Products Used On My Card (Affiliate Links Used Where Possible)


Copic Markers Used

N5, N8, N10, R20
C00, C2, C4, 0 Colorless Blender
R81, R83, R85
Y38, YR18
E09

Thanks for stopping by, Deni

CAMERA SET UP - FOR YOU TUBE VIDEOS ONLY
Blue Yeti Microphone
Sony Handycam HDR CX4-05
Tripod – Manfrotto MKCompactaCN-BK

S O C I A L MEDIA 
B L O G : https://ldli.co/e/3xky6x 
I N S T A G R A M : https://ldli.co/e/5dn20x
YOU TUBE: https://ldli.co/e/ej5l90 
F A C E B O O K: https://ldli.co/e/mjxn2r
PINTEREST: https://ldli.co/e/2l9zom


I was a 2018 Ambassador for Copic Marker Australia and NZ


Thursday 23 July 2020

There He Goes - Grad

Hi Everyone, 

Today. am sharing with you all a Graduation Card I have created using "Congradulations" from There She Goes Stamps, unfortunately this stamp set is an old retired stamp set so is no longer available. I merged this stamp set with MFT Stamps Tassel Time.


I stamped the sentiment onto X-Press It Blending Cardstock that I had already ran through my Sizzix Big Shot using a Lawn Fawn Stitched Circle die. I stamped the sentiment using my Misti Stamping Tool, Ink On 3 Embossing Ink, added some Gold Super Fine Embossing Powder, I then heated that using my heat tool to melt it.


I stamped the image onto some X-Press It Blending Cardstock using Memento Tuxedo Black using my Misti. 


I used some other retired stamp and die sets from from MFT Stamps - Graduation Accent, Count The Stars, Photo Booth. 

I layered the Graduation hat up using Helmar Quick Dry 450, then adhered it to the side of my circle.


I used Memento Tuxedo Black and some leftover X-Press It Blending Card, a Lawn Fawn Acrylic Block to create my own patterned paper. 


I ran the Class of 2020 through my Xyron Create A Sticker 1.5" to put adhesive onto the back and make it easier to adhere to my card. I used a white gel pen to write the 2020 onto the rectangle piece. I then adhered these to some vellum that I had trimmed down.  I used Helmar 450 Quick Dry to adhere the vellum.


I adhered all these layers to some American Crafts Cardstock using Helmar Acid Free Liquid Adhesive, then adhered this to a Couture Creations Card Base. 

I finished the card off using some Tonic Studios Nuvo Crystal Drops in Ebony Black.


I hope you have enjoyed my post today, if you have any questions feel free to send me a message or contact me via facebook (all links can be found below).

Watch the You Tube Video Here


Products Used On My Card (Affiliate Links Used Where Possible)


Copic Markers Used

E000, E00, E21, E11, E04, R20
N2, N5, N8, N10

Thanks for stopping by, Deni

CAMERA SET UP - FOR YOU TUBE VIDEOS ONLY
Blue Yeti Microphone
Sony Handycam HDR CX4-05
Tripod – Manfrotto MKCompactaCN-BK

S O C I A L MEDIA 
B L O G : https://ldli.co/e/3xky6x 
I N S T A G R A M : https://ldli.co/e/5dn20x
YOU TUBE: https://ldli.co/e/ej5l90 
F A C E B O O K: https://ldli.co/e/mjxn2r
PINTEREST: https://ldli.co/e/2l9zom


I was a 2018 Ambassador for Copic Marker Australia and NZ


Monday 20 July 2020

Dino Goes Romp a Stomp

I really enjoyed creating this card for a little boy's 4th Birthday using Dino T Rex from Whimsy Stamps


I printed the image onto X-Press It Blending Cardstock using my Brother Laser Printer, then coloured him up using Copic Markers. 

I ran the image through my Sizzix Big Shot using a Lawn Fawn Acrylic Block.


The Happy Birthday Sentiment is from an old retired Whimsy Stamps set called Retro Flowers, I stamped it out using Memento Tuxedo Black and a Lawn Fawn Acrylic Block.

I used patterned papers from Kaisercraft's Mountain Air Collection, the trees popped the image off the card.

The number Digit is from my leftovers stash, not sure what set it was from.


I hope you have enjoyed my post today, if you have any questions feel free to send me a message or contact me via facebook (all links can be found below).

Watch the You Tube Video Here


Products Used On My Card (Affiliate Links Used Where Possible)


Copic Markers Used

YR14, YR18
R17, R27, R37
C3, C0

Thanks for stopping by, Deni

CAMERA SET UP - FOR YOU TUBE VIDEOS ONLY
Blue Yeti Microphone
Sony Handycam HDR CX4-05
Tripod – Manfrotto MKCompactaCN-BK

S O C I A L MEDIA 
B L O G : https://ldli.co/e/3xky6x 
I N S T A G R A M : https://ldli.co/e/5dn20x
YOU TUBE: https://ldli.co/e/ej5l90 
F A C E B O O K: https://ldli.co/e/mjxn2r
PINTEREST: https://ldli.co/e/2l9zom


I was a 2018 Ambassador for Copic Marker Australia and NZ


Rachelle Anne Miller - My First Patient

Good Morning Everyone, 

Today I am super excited to tell you all that I have been invited to Create as a Design Team Member for Rachelle Anne Miller Creative Studios.


I am sharing with you today a card I have created using "My First Patient" which is a Digital Stamp. 


I have printed the image out onto X-Press It Blending Cardstock using my Brother Laser Printer. 


I ran the image through my Sizzix Big Shot using a Lawn Fawn Stitched Circle die, I then ran the die through a second time using Kraft cardstock.


I used patterned papers from a paper pad that I purchased from Kmart - Anko Whimsical Paper Stack. I trimmed some layers down then matted them using Kraft Cardstock.


Using some leftovers from other projects - MFT Stamps Puffy Clouds, some stars, and a sun (not sure where those came from I added those to my card. 


I used La La Land Crafts Club May 2019 - these items are now available to purchase separately so I will have them all linked up below. I used the Get Well Soon die, Heart Beat die, Pill Bottle Die. 


I ran the Get Well soon die through twice, using Kraft and white card stocks. The pill bottle was created using some greys, some pinks and some white cardstock.  Finally the heart beat I ran through twice using white and pink cardstock, I cut the heart from the pink and adhered it over the top of the white layer.


I stamped out a sentiment from Taylored Expressions Simple Strips with Memento Tuxedo Black and ran it through using the matching dies. 

I adhered all the layers using Helmar Liquid adhesive, this is my go to for liquid adhesives.


I hope you have enjoyed my post today, if you have any questions feel free to send me a message or contact me via facebook (all links can be found below).

Watch the You Tube Video Here


Products Used On My Card (Affiliate Links Used Where Possible)


Copic Markers Used

E44, E47, E49
E51, E53, E55, E57
T0, T2, T4, T6
R81, R83, R85
Y04, Y15, Y19
B93, B95, B97
E21, E23, E25
R35, R37, R39

Thanks for stopping by, Deni

CAMERA SET UP - FOR YOU TUBE VIDEOS ONLY
Blue Yeti Microphone
Sony Handycam HDR CX4-05
Tripod – Manfrotto MKCompactaCN-BK

S O C I A L MEDIA 
B L O G : https://ldli.co/e/3xky6x 
I N S T A G R A M : https://ldli.co/e/5dn20x
YOU TUBE: https://ldli.co/e/ej5l90 
F A C E B O O K: https://ldli.co/e/mjxn2r
PINTEREST: https://ldli.co/e/2l9zom


I was a 2018 Ambassador for Copic Marker Australia and NZ