Sunday 30 December 2018

Time For Tea Designs - Easter Chick

Good Morning All,

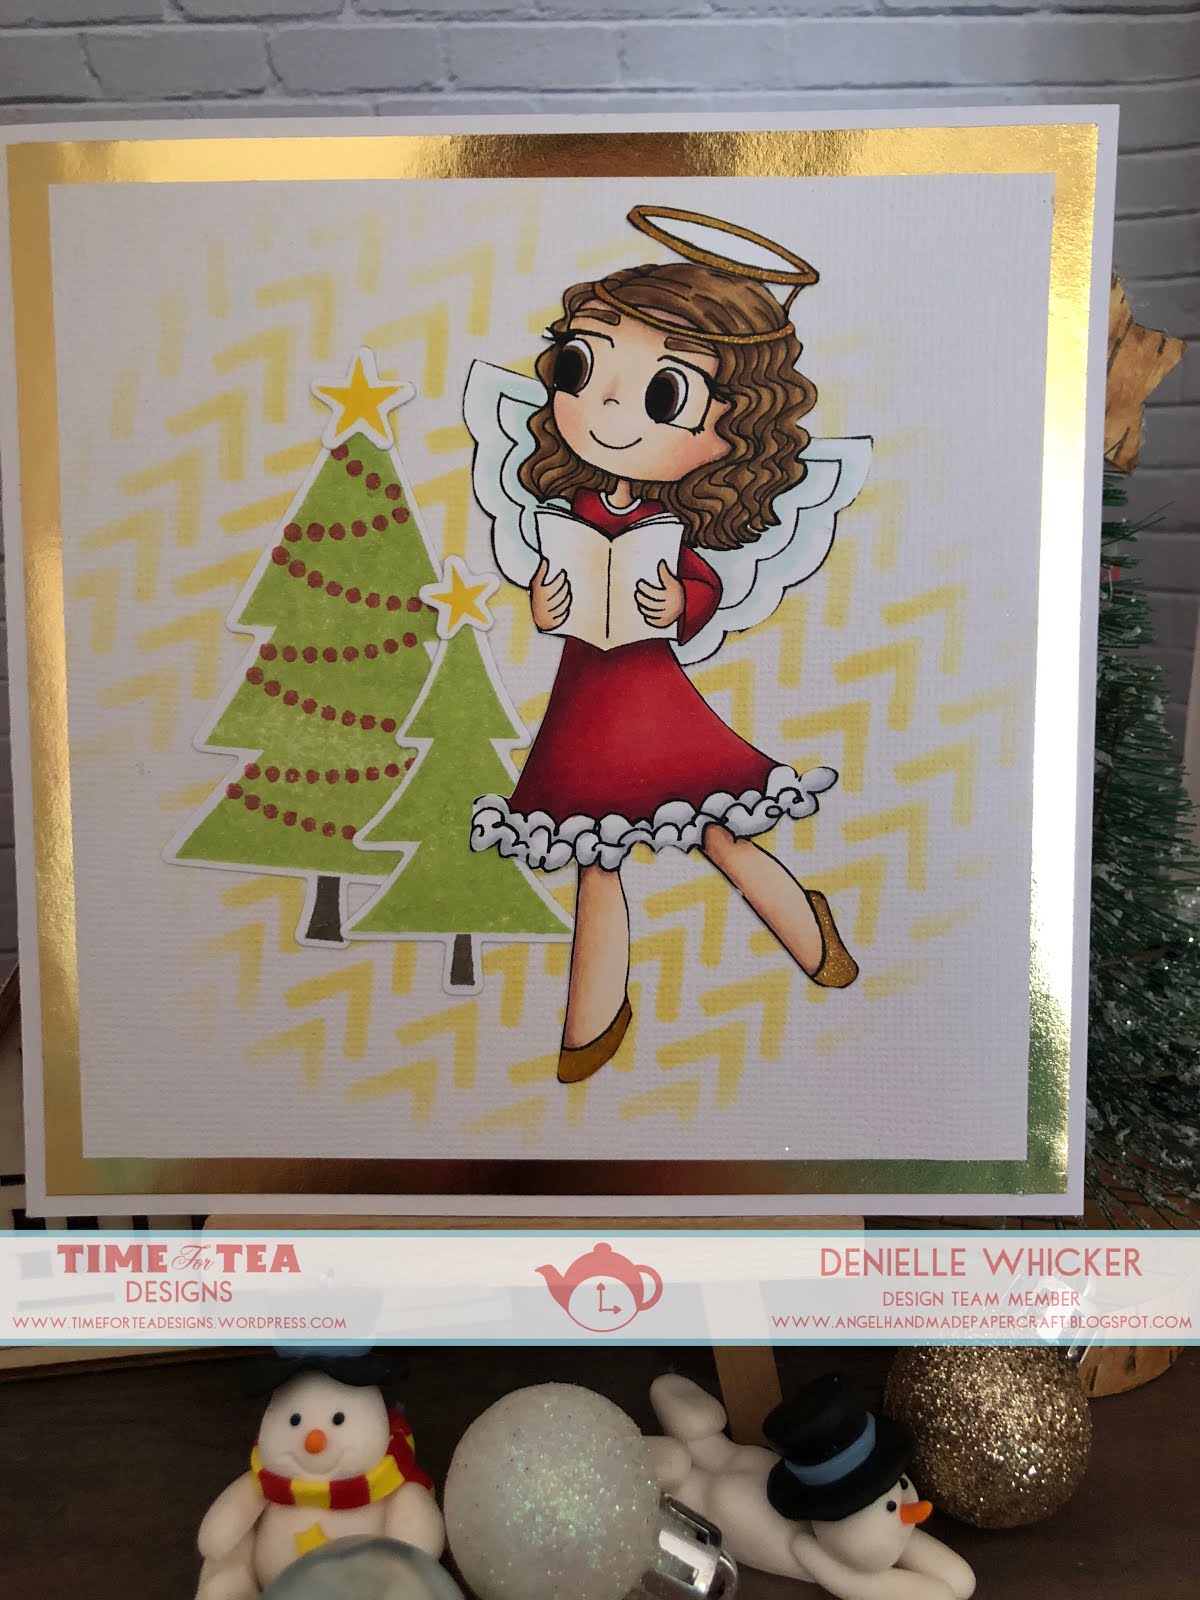
Today I am sharing with you my last Time For Designs card for 2018. I cannot believe how quickly this year has gone, it's crazy.

I have made an early Easter card haha.. or is it late Easter card... who knows.

Using Easter Chick, I printed it onto X-Press It Blending Card using my Brother Laser Printer.

Once I had the image printed I coloured it up using Copic Markers then ran it through my Sizzix Big Shot using a Stitched Rectangle Die from Lawn Fawn. I have linked up some other options incase you can't track this one down.


I ran a Poppy Stamps die called "Fuzzy Bunnies" (unfortunately this one is retired) through my Big Shot using some leftover X-Press It Blending Card. I added some Rosie cheeks using Copic Markers.

I used some patterned papers from The Craft Stall (purchased from Kmart) I love the patterned paper sheet, it reminds me of the sprinkles on a donut :-)


I ran some green card stock through my Big Shot using a Lawn Fawn Meadow Borders die.

The sentiment is from Lawn Fawn Eggstra Special Easter, I stamped it onto some leftover X-Press It Blending Cardstock using Memento Tuxedo Black, trimmed using EK Success Cutterbee Scissors.

All the plain card stock is from American Crafts and all the big layers were adhered using Scotch ATG, the die cuts were added using American Tombow Mono Multi.

I hope you have enjoyed my post today, if you have any questions feel free to send me a message or contact me via facebook (all links can be found below).


Products Used On My Card (Affiliate Links Used Where Possible)


Copic Markers Used

No list for this card sorry

Thanks for stopping by, Deni

CAMERA SET UP - FOR YOU TUBE VIDEOS ONLY
Blue Yeti Microphone
Sony Handycam HDR CX4-05
Tripod – Manfrotto MKCompactaCN-BK

S O C I A L MEDIA 
B L O G : http://angelhandmadepapercraft.blogspot.com.au/
I N S T A G R A M : http://instagram.com/angelhandmadepapercraft
YOU TUBE: http://www.youtube.com/c/AngelHandmadePapercraft
F A C E B O O K: http://www.facebook.com/angelhandmadepapercraft
PINTEREST: https://www.pinterest.com.au/angelhandmadepapercraft

PERSONAL BLOG 
ANGEL HANDMADE PAPERCRAFT: http://angelhandmadepapercraft.blogspot.com.au/

I am an Ambassador for Copic Marker Australia and NZ


Friday 28 December 2018

Stamping Bella - Fishing Squidgy

Hey Everyone!

Today I am sharing with you Stamping Bella's Fishing Squidgy, I have stamped him out onto X-Press It Blending Cardstock using Memento Tuxedo Black.


I then proceeded to colour him up using Copic Markers, Unfortunately it looks like I have lost some of my video however I have uploaded the skin colouring and the card process into the one video.

I really enjoyed colouring this image, it is super sweet and I love all the boy tones.

Once I had the image all coloured up I fussy cut him out using EK Success Cutterbee Scissors.


I used some of the leftover blending card and an MFT Stamps Stitched Rounded Square frame and ran them through my Gemini die-cutting machine. Once I had the frame cut I selected some patterned paper from Kaisercraft Mountain Air Paper Pad, this fishing paper was perfect. I ran the same die through again using the patterned paper so I would have an insert to the frame. So they didn't move as  I was putting card together I used some Scotch Magic Tape on the back to keep them together whilst I was working on my layout. You wouldn't see this as it would be on the reverse anyway..

I trimmed my sentiment down using my Fiskars Trimmer, then fishtailed the ends using EK Success Cutterbee Scissors.

I grabbed one of my Couture Creations Pre-Made card bases and used my bone folder to make sure it was folded noice and straight.

I adhered everything using Tombow Mono Multi, a little did leak out so I just used an eraser once it was dry to remove the excess and you now cannot see it.

I then cut many of the same and decorated the inside of the card.

You can see the whole colouring and card process on my You Tube Channel below. I would love for you to hit the thumbs up and Subscribe to my channel so you can see more of my videos.


I hope you have enjoyed my post today, if you have any questions feel free to send me a message or contact me via facebook (all links can be found below).


Products Used On My Card (Affiliate Links Used Where Possible)


Copic Markers Used

E000, E00, E21, E11, E04, R20
BG02, BG05
YG05, YG09
E57, E59
T2, T4
B91, B93, B95, B97, B99
E74, E77, E79
YG93, YG97
N1, N3
E31, E34, E37
W1, W3, 0

Thanks for stopping by, Deni

CAMERA SET UP - FOR YOU TUBE VIDEOS ONLY
Blue Yeti Microphone
Sony Handycam HDR CX4-05
Tripod – Manfrotto MKCompactaCN-BK

S O C I A L MEDIA 
B L O G : http://angelhandmadepapercraft.blogspot.com.au/
I N S T A G R A M : http://instagram.com/angelhandmadepapercraft
YOU TUBE: http://www.youtube.com/c/AngelHandmadePapercraft
F A C E B O O K: http://www.facebook.com/angelhandmadepapercraft
PINTEREST: https://www.pinterest.com.au/angelhandmadepapercraft

PERSONAL BLOG 
ANGEL HANDMADE PAPERCRAFT: http://angelhandmadepapercraft.blogspot.com.au/

I am an Ambassador for Copic Marker Australia and NZ


Saturday 22 December 2018

Whimsy Stamps - Welcome to The Snowy Mountains

I don't live in an area where we can snow unfortunately, which means it has been a very long time since I have seen snow, I would love to go up to the Blue Mountains to see the snow one day, but its usually too dangerous and slippery to drive up there.


I printed Snowy onto X-press It Blending Cardstock, and coloured her up using Copic Markers.

I cut a base layer using American Crafts Cardstock, then a white layer using Mondi Color Copy, and another layer using some red cardstock from American Crafts.

I used a patterned paper pad from American Crafts called Hollyday to cut some layers and fund some blue Christmas ribbon in my stash to bring in the blue of her jeans.

Everything was cut on Cutterpillar Pro and adhered using Scotch ATG. I then popped them all onto a Couture Creations Cardbase to finish off my card.

I hope you have enjoyed my post today, if you have any questions feel free to send me a message or contact me via facebook (all links can be found below).


Products Used On My Card (Affiliate Links Used Where Possible)


Copic Markers Used

E000, E00, E21, E11, E04, R20
B34, B37, B39
G02, G03, G09
R35, R37, R39
R81, R83, R85
E35, E37, E39
N3, 0

Thanks for stopping by, Deni

CAMERA SET UP - FOR YOU TUBE VIDEOS ONLY
Blue Yeti Microphone
Sony Handycam HDR CX4-05
Tripod – Manfrotto MKCompactaCN-BK

S O C I A L MEDIA 
B L O G : http://angelhandmadepapercraft.blogspot.com.au/
I N S T A G R A M : http://instagram.com/angelhandmadepapercraft
YOU TUBE: http://www.youtube.com/c/AngelHandmadePapercraft
F A C E B O O K: http://www.facebook.com/angelhandmadepapercraft
PINTEREST: https://www.pinterest.com.au/angelhandmadepapercraft

PERSONAL BLOG 
ANGEL HANDMADE PAPERCRAFT: http://angelhandmadepapercraft.blogspot.com.au/

I am an Ambassador for Copic Marker Australia and NZ


Monday 17 December 2018

Heartcraft Paper - Reindeer Cuppa

Hi Everyone,

Well I am very sad to share with you guys that I will not be continuing my Guest Design Team Post with Heartcraft Paper for the next term. It was a person choice as I am starting to realise I am taking on too much in both my person life and team life.


The right thing for me was to pass on my application spot to someone else who was wanting to have a chance, so I am happy within myself. One day I may be back if they will have me but for the moment this is my last post. As life starts getting too heavy it's time to step up and say so.

So now onto my last card, I am going out with a bang as I really love this card and the image I have used.

This is Rudolph Latte, isn't he just the cutest :-) I couldn't resist getting him onto a card. There is more parts to this image but I decided to leave them off on this one which is the great thing about this stamp set.. you can make him what you would like.

I printed the image onto XPress It Blending Cardstock, coloured him up using Copic Markers then fussy cut him using EK Success Cutterbee Scissors.


I added some Wink Of Stella Clear to his cute little nose because it needed to be the feature on this card of course.

I cut a few layers of cardstock for the matting, I think they are all American Crafts Cardstock. I then cut a layer of Christmas sentiment paper from Crafter's Choice Christmas Basics. I thought it was perfect because it meant that I didn't need to take away from my image by adding a sentiment on it somewhere.

Once I had all my layers ready to go I adhered the larger layers to a Couture Creations Cardbase using Scotch ATG, I then adhered the image using Scotch Foam Mounting Tape. I proceeded to also decorate the inside of the card in the same layers (minus the image of course).

Well this is it, me signing off from my last HCP card :-(


I hope you have enjoyed my post today, if you have any questions feel free to send me a message or contact me via facebook (all links can be found below).


Products Used On My Card (Affiliate Links Used Where Possible)


Copic Markers Used

R35, R37, R39, R49
E40, E41, E42
E47, E44, E49

Thanks for stopping by, Deni

CAMERA SET UP - FOR YOU TUBE VIDEOS ONLY
Blue Yeti Microphone
Sony Handycam HDR CX4-05
Tripod – Manfrotto MKCompactaCN-BK

S O C I A L MEDIA 
B L O G : http://angelhandmadepapercraft.blogspot.com.au/
I N S T A G R A M : http://instagram.com/angelhandmadepapercraft
YOU TUBE: http://www.youtube.com/c/AngelHandmadePapercraft
F A C E B O O K: http://www.facebook.com/angelhandmadepapercraft
PINTEREST: https://www.pinterest.com.au/angelhandmadepapercraft

PERSONAL BLOG 
ANGEL HANDMADE PAPERCRAFT: http://angelhandmadepapercraft.blogspot.com.au/

I am an Ambassador for Copic Marker Australia and NZ


Sunday 16 December 2018

Heartcraft Paper - Naughty List

Hi Everyone,

Well the countdown to Christmas is on and it is going way too fast! So I am trying to get in as many Christmas cards as I can. This is "Naughty List" from Heartcraft Paper.

Love this image :-) I love colouring reds so I may be a little bias with Santa hahah.


You can find links below to purchase the image (at the time of this blog post this image is actually free in the shop, but it is limited time only).

I printed the image onto X-Press It Blending Cardstock and coloured it up using Copic Markers which will all be listed below incase you need some inspiration.

Using Kaisercraft Mistletoe paper pad I ran a piece through my Sizzix Big Shot using Lawn Fawn Stitched Circle dies. While I had my Big Shot out I used some MFT Star Stax dies and some washi tape (I taped two of them together so that I could create a star frame. I then ran it through using some Glitter cardstock.


The sentiment is from Mama Elephant Christmas Spirit, I used a Lawn Fawn Acrylic Black to attach it, then I stamped it onto a scrap piece of XPress It Blending Cardstock using Memento Tuxedo Black. Using my Cutterpillar Pro I cut the sentiment down then using my EK Success Cutterbee Scissors I trimmed the edge of the strip.

I ran a Mama Elephant Merry Die through my Sizzix Big Shot using some American Crafts Black cardstock. I adhered the sentiment and the star to my circle using American Tombow Mono Multi Liquid Adhesive. All the larger pieces I adhered using Scotch ATG.

You can watch he video here on You Tube.


I hope you have enjoyed my post today, if you have any questions feel free to send me a message or contact me via facebook (all links can be found below).


Products Used On My Card (Affiliate Links Used Where Possible)


Copic Markers Used

Eooo, E00, E21, E11, E04, R20
C4, C2, 0
C6, C8, C10
E81, 0
YR21, YR24, YR27
R35, R37, R56

Thanks for stopping by, Deni

CAMERA SET UP - FOR YOU TUBE VIDEOS ONLY
Blue Yeti Microphone
Sony Handycam HDR CX4-05
Tripod – Manfrotto MKCompactaCN-BK

S O C I A L MEDIA 
B L O G : http://angelhandmadepapercraft.blogspot.com.au/
I N S T A G R A M : http://instagram.com/angelhandmadepapercraft
YOU TUBE: http://www.youtube.com/c/AngelHandmadePapercraft
F A C E B O O K: http://www.facebook.com/angelhandmadepapercraft
PINTEREST: https://www.pinterest.com.au/angelhandmadepapercraft

PERSONAL BLOG 
ANGEL HANDMADE PAPERCRAFT: http://angelhandmadepapercraft.blogspot.com.au/

I am an Ambassador for Copic Marker Australia and NZ


Time For Tea Designs - Happy Santa Baby

Hi Everyone,

Today I am showcasing for you "Santa Baby" from Time For Tea Designs. This is one of my all time favourite stamps from Jo and I love when Christmas comes around and I can use her again.


I stamped her onto X-Press It Blending Cardstock using Memento Tuxedo Black and coloured her up using Copic Markers. If you search my blog for Time For Tea Designs you can watch a video where I have previously coloured her up.

I fussy cut her out using EK Success Cutterbee Scissors, I then used a Tombow marker to go around the edges carefully and tidy it up. (always run around the edge from the back so as to not get ink on the image)


For my card base I have used a pre-made card base from Couture Creations, they come creased but not folded so I run my bone folder over it once I fold it up to give it a nice crease.

Using patterned papers from Kaisercraft Mistletoe 6x6 Paper Pad I cut a strip on my Cutterpillar Pro and a nice square layer I adhered them both down to the card base using Scotch ATG.

I then used a Lawn Fawn Stitched Circle die which I ran through my Sizzix Big Shot using some Glitter Cardstock. I layered this down onto the patterned papers using the Scotch ATG.

I ran the Happy Trio die from W Plus 9 through my Sizzix Big Shot using American Crafts black cardstock (just some leftovers I had on my desk which is always a bonus). I ran the die cut through my Xyron Sticker Maker (the small one) to add the adhesive to the back.

I cut a sentiment from the Kaisercraft Paper Pad then fussy cut the big border off as it wasn't going to fit my layout. I adhered the happy die cut to the sentiment cut out then adhered them both to my card base.

Finally instead of making a mess with liquid adhesive I ran the image through my Xyron Sticker Maker Max then adhered it to my card.

Finishing touches I added some At you Spica Clear to all the fluffy parts of my image, and gold to her shoes and belt.


I hope you have enjoyed my post today, if you have any questions feel free to send me a message or contact me via facebook (all links can be found below).


Products Used On My Card (Affiliate Links Used Where Possible)


Copic Markers Used

E000, E00, E21, E11, E04, R20
R24, R27, R29
YR21, YR24, YR27
C6, C8
C2,C4, C0, 0
E55, E57, E59
E23

Thanks for stopping by, Deni

CAMERA SET UP - FOR YOU TUBE VIDEOS ONLY
Blue Yeti Microphone
Sony Handycam HDR CX4-05
Tripod – Manfrotto MKCompactaCN-BK

S O C I A L MEDIA 
B L O G : http://angelhandmadepapercraft.blogspot.com.au/
I N S T A G R A M : http://instagram.com/angelhandmadepapercraft
YOU TUBE: http://www.youtube.com/c/AngelHandmadePapercraft
F A C E B O O K: http://www.facebook.com/angelhandmadepapercraft
PINTEREST: https://www.pinterest.com.au/angelhandmadepapercraft

PERSONAL BLOG 
ANGEL HANDMADE PAPERCRAFT: http://angelhandmadepapercraft.blogspot.com.au/

I am an Ambassador for Copic Marker Australia and NZ


Saturday 15 December 2018

I See Candy - Whimsy Stamps

I am a big fan of Candy Canes, but only the traditions red and white mint ones, I don't do all those new weird flavours lol.

Meet Candy from Whimsy Stamps, she is super adorable. I have printed her onto X-Press It Blending Card and Coloured her up using Copic Markers.


I used some red cardstock from American Crafts and some pink Reflex Paper, I couldn't find any cardstock in the right tone I was after and I new I was going to be adding lots of layers so I decided o use some of this pink paper.

Patterned Papers are from American Crafts Hollyday paper pad and I cut them up using Cutterpillar Pro, I created a banner using EK Success Cutterbee Scissors. I then adhered the patterned papers to the plain cardstock and Paper using Scotch ATG. I layered a doily over the top using American Tombow Mono Multi Liquid Adhesive. I mainly use the liquid glue on the doily because I have a habit of tearing my doilies with tape runners.

Once I had all my layers done I then cut the image down to the size I needed, created a mat layer using the Pink Paper, and added her to the doily layer using Scotch ATG.

Finally I adhered all my layers to a Couture Creations Card base using the Scotch ATG and decorated the inside of the card using leftovers from the front of the card.


I hope you have enjoyed my post today, if you have any questions feel free to send me a message or contact me via facebook (all links can be found below).


Products Used On My Card (Affiliate Links Used Where Possible)


Copic Markers Used

E000, E00, E21, E11, E04, R20
R81, R83, R85
YG61, YG45, YG67, G29
R35, R37, R39
C4, C2, C0, 0

Thanks for stopping by, Deni

CAMERA SET UP - FOR YOU TUBE VIDEOS ONLY
Blue Yeti Microphone
Sony Handycam HDR CX4-05
Tripod – Manfrotto MKCompactaCN-BK

S O C I A L MEDIA 
B L O G : http://angelhandmadepapercraft.blogspot.com.au/
I N S T A G R A M : http://instagram.com/angelhandmadepapercraft
YOU TUBE: http://www.youtube.com/c/AngelHandmadePapercraft
F A C E B O O K: http://www.facebook.com/angelhandmadepapercraft
PINTEREST: https://www.pinterest.com.au/angelhandmadepapercraft

PERSONAL BLOG 
ANGEL HANDMADE PAPERCRAFT: http://angelhandmadepapercraft.blogspot.com.au/

I am an Ambassador for Copic Marker Australia and NZ


Sunday 9 December 2018

Time For Tea Designs - You Are My Christmas Angel

Singing Christmas Carols is such a big thing at this time of year, I am always adding to my Christmas CD's as I love them.

This little lady spoke to me when I see her and I love adding her to Christmas Cards. I merged her with some Christmas tree images from MFT Stamps and had the perfect Christmas layout.


I printed the image onto X-Press it Blending Card and coloured her up Using Copic Markers I will have all these listed in the links below. I then fussy cut her out using EK Success Cutterbee Scissors.

I used a Couture Creations Card base to begin my card, I then cut a layer of gold cardstock (I die cut the centre to use on another project so I didn't waste so much).

I cut a layer of American Crafts white cardstock, I used the weaved side as I wanted to stencil over it. I grabbed an MFT Wonky Chevron stencil and some Squeezed Lemonade Distress Ink. I used a Ranger Mini Ink Distress Tool to blend the ink over the stencil.

The Christmas Trees were from MFT Stamps Oh Christmas Tree, I also used the matching die set. I used Lawn Fawn Acrylic Blocks and some MFT Inks - Sour Apple, Lemon Drop and Red Hot.

I added some Wink Of Stella to the Angel Wings, her halo and the stars on the trees. The small pieces were adhered to the Couture Creations Card Base using American Tombow Mono Multi Liquid Adhesive and the bigger sections were adhered using Scotch ATG.

I hope you have enjoyed my post today, if you have any questions feel free to send me a message or contact me via facebook (all links can be found below).


Products Used On My Card (Affiliate Links Used Where Possible)


Copic Markers Used

R35, R37,R39, R89
YR21, YR24, YR27
E55, E57, E59
C1, C3, 0
BG10
E51
W4, 0

Thanks for stopping by, Deni

CAMERA SET UP - FOR YOU TUBE VIDEOS ONLY
Blue Yeti Microphone
Sony Handycam HDR CX4-05
Tripod – Manfrotto MKCompactaCN-BK

S O C I A L MEDIA 
B L O G : http://angelhandmadepapercraft.blogspot.com.au/
I N S T A G R A M : http://instagram.com/angelhandmadepapercraft
YOU TUBE: http://www.youtube.com/c/AngelHandmadePapercraft
F A C E B O O K: http://www.facebook.com/angelhandmadepapercraft
PINTEREST: https://www.pinterest.com.au/angelhandmadepapercraft

PERSONAL BLOG 
ANGEL HANDMADE PAPERCRAFT: http://angelhandmadepapercraft.blogspot.com.au/

I am an Ambassador for Copic Marker Australia and NZ


Saturday 8 December 2018

Fill My Santa Sack Please - Whimsy Stamps

Santa Sacks, such a memorable item when it comes to Christmas, what are your favourite items to find in your santa sack?

This gorgeous little girl Cinnamon from Whimsy Stamps is getting her santa sack ready to put out for Christmas Eve, hoping for all those things she dreams of.

I printed her out on X-Press It Blending Card and coloured her up using Copic Markers.


Patterned papers are from American Crafts Hollyday paper pad I cut all the layers up using Cutterpillar Pro, grabbed a doily and started layering up. I grabbed a doily from my stash and adhered the papers using Scotch ATG and on the doily I used American Tombow Mono Multi Liquid Adhesive.

I then adhered all the layers to a Twiddleybitz Card base using Scotch ATG.


I hope you have enjoyed my post today, if you have any questions feel free to send me a message or contact me via facebook (all links can be found below).


Products Used On My Card (Affiliate Links Used Where Possible)


Copic Markers Used

E000, E00, E21, E11, E04, R20
R35, R37, R39
R81, R83, R85
E31, E35, E37
Y13, Y15, Y18
YG21, YG25
G24, G46, G28
N3, N0, 0


Thanks for stopping by, Deni

CAMERA SET UP - FOR YOU TUBE VIDEOS ONLY
Blue Yeti Microphone
Sony Handycam HDR CX4-05
Tripod – Manfrotto MKCompactaCN-BK

S O C I A L MEDIA 
B L O G : http://angelhandmadepapercraft.blogspot.com.au/
I N S T A G R A M : http://instagram.com/angelhandmadepapercraft
YOU TUBE: http://www.youtube.com/c/AngelHandmadePapercraft
F A C E B O O K: http://www.facebook.com/angelhandmadepapercraft
PINTEREST: https://www.pinterest.com.au/angelhandmadepapercraft

PERSONAL BLOG 
ANGEL HANDMADE PAPERCRAFT: http://angelhandmadepapercraft.blogspot.com.au/

I am an Ambassador for Copic Marker Australia and NZ


Friday 7 December 2018

La La Land Crafts - Christmas Frenchie

I love doing personalised cards, this is another of those.

A friend had asked me if I could make her a card to gift someone, a Christmas Card with a dog on it, well of course this little Frenchie from La La Land Crafts came straight to mind and of course she loved the image and gave me the go ahead.


I purchased the Digital Stamp because I needed to get the card done rather quickly, La La Land Crafts digs are pretty much instant download which is awesome. Once your payment clears (pretty instantly if you pay by PayPal)you will receive an email to download the images. I have linked up both the rubber and digis at the bottom of this post.

I printed the image onto X-Press It Blending Card, after merging it with a personalised sentiment, I then ran it through my Sizzix Big Shot using a Lawn Fawn Stitched Square die.


I hope you have enjoyed my post today, if you have any questions feel free to send me a message or contact me via facebook (all links can be found below).


Products Used On My Card (Affiliate Links Used Where Possible)


Copic Markers Used

R35, R37, R56
N4, N0, 0
E40, E43, E44, E47, E49

Thanks for stopping by, Deni

CAMERA SET UP - FOR YOU TUBE VIDEOS ONLY
Blue Yeti Microphone
Sony Handycam HDR CX4-05
Tripod – Manfrotto MKCompactaCN-BK

S O C I A L MEDIA 
B L O G : http://angelhandmadepapercraft.blogspot.com.au/
I N S T A G R A M : http://instagram.com/angelhandmadepapercraft
YOU TUBE: http://www.youtube.com/c/AngelHandmadePapercraft
F A C E B O O K: http://www.facebook.com/angelhandmadepapercraft
PINTEREST: https://www.pinterest.com.au/angelhandmadepapercraft

PERSONAL BLOG 
ANGEL HANDMADE PAPERCRAFT: http://angelhandmadepapercraft.blogspot.com.au/

I am an Ambassador for Copic Marker Australia and NZ


La la Land Crafts - Thoughtful Critter Bookmarks

My son was doing a project on China this week and I remembered I had these Critter Stamps from La La Land Crafts and thought they would be perfect to make some bookmarks for when my son presents his project to his class.

Little did I think about the fact that he has 30 kids in his class haha. Oh well it's a labour of love and he is totally worth the effort.


I ran the MFT Stamps Tall Tag Duo through my Sizzix Big Shot using XPress It Blending card (because I knew I was going to colour them using Copic Markers) many times over to get fronts and backs for the bookmarks. I then stamped all the images and sentiments using Lawn Fawn Acrylic Blocks and Memento Tuxedo Black.

I coloured the images using Copic Markers, I didn't list these as I was in my element colouring away.

When I was finished the colouring I moved onto creating the tassels.. something else that I had only done once before.. I think i've got the knack of them now haha. I just used crochet twine for them as that's all I had in colours that would match.


I hope you have enjoyed my post today, if you have any questions feel free to send me a message or contact me via facebook (all links can be found below).


Products Used On My Card (Affiliate Links Used Where Possible)


Copic Markers Used

Sorry no list on these :-(


Thanks for stopping by, Deni

CAMERA SET UP - FOR YOU TUBE VIDEOS ONLY
Blue Yeti Microphone
Sony Handycam HDR CX4-05
Tripod – Manfrotto MKCompactaCN-BK

S O C I A L MEDIA 
B L O G : http://angelhandmadepapercraft.blogspot.com.au/
I N S T A G R A M : http://instagram.com/angelhandmadepapercraft
YOU TUBE: http://www.youtube.com/c/AngelHandmadePapercraft
F A C E B O O K: http://www.facebook.com/angelhandmadepapercraft
PINTEREST: https://www.pinterest.com.au/angelhandmadepapercraft

PERSONAL BLOG 
ANGEL HANDMADE PAPERCRAFT: http://angelhandmadepapercraft.blogspot.com.au/

I am an Ambassador for Copic Marker Australia and NZ


Thursday 6 December 2018

You're Perfect - Blog Hop Collaboration Kindred Stamps & BDD

Hey Everyone,

Today I am super excited to be part of a Blog Hop Collaboration between Kindred Stamps and Beth Duff Designs.

Thank you for joining us on the Kindred Stamps/Beth Duff Designs collaboration hop! We hope you've enjoyed the pairing of these sets. 
For joining us, we have a little gift for you! Kindred Stamps has a free digital downloadable passport available. Then you will want to visit each blog on this hop, download the free digi, color it, add it your passport, and submit it to the album in the Kindred Stamps Fan Club and Unicorn Crafts Facebook groups to be entered into our giveaways! Each company will be hosting a different giveaway. The opportunity to play will end December 30th for each company!

Unfortunately, due to the closure of Beth Duff Designs, the physical sets may be out of stock but all of the sets used will be offered in a digital bundle from Dec 8-11! Be sure to join the Kindred Stamps Fan Cluband Unicorn Crafts to see more from our teams.  

Here is your free image to colour up and add to your passport.


I was lucky enough to work with Perfect Nanny from Kindred Stamps and Adventure's Abroad from BDD.


I fussy cut the images using EK Success Cutterbee Scissors and coloured them up using Copic Markers. I will have all those listed below the blog post.

Watch the You Tube Video Here


I cut a few elements - a road die and some clouds, using some leftover card stock the other images are part of the stamp sets.

I created the flag myself so please excuse the non perfectness haha.. I did my best :-)

The card base is from Couture Creations, I layered a stencil over the top of the card base and used Ranger Distress Inks in Broken China and Squeezed Lemonade and some Mini Blending Tools to blend the ink over top. I did use some post it notes to mask off the bottom section of the card before I blended.

All the elements I added to the card using American Tombow Mono Multi Liquid Adhesive.

Finally using some Wink Of Stella Clear to add some glitter to the umbrella, bag, flower and bow tie.


I hope you have enjoyed my post today, if you have any questions feel free to send me a message or contact me via facebook (all links can be found below).


Products Used On My Card (Affiliate Links Used Where Possible)


Copic Markers Used

B21, B24, B26
R35, R37, R39
E50, E51, E53, E55
E55, E57, E59
E31, E33, E35
YR27
C3, C5
C6, C8, C10
0
R22, R24
R20
B37, B39
E74, E77, E79

Thanks for stopping by, Deni

CAMERA SET UP - FOR YOU TUBE VIDEOS ONLY
Blue Yeti Microphone
Sony Handycam HDR CX4-05
Tripod – Manfrotto MKCompactaCN-BK

S O C I A L MEDIA 
B L O G : http://angelhandmadepapercraft.blogspot.com.au/
I N S T A G R A M : http://instagram.com/angelhandmadepapercraft
YOU TUBE: http://www.youtube.com/c/AngelHandmadePapercraft
F A C E B O O K: http://www.facebook.com/angelhandmadepapercraft
PINTEREST: https://www.pinterest.com.au/angelhandmadepapercraft

PERSONAL BLOG 
ANGEL HANDMADE PAPERCRAFT: http://angelhandmadepapercraft.blogspot.com.au/

I am an Ambassador for Copic Marker Australia and NZ


Monday 3 December 2018

Heartcraft Paper - Hedgehog Love

Can you believe it is December already, this is crazy.

Today I have a card to share with you for Heartcraft Paper, I have used the new Hedgehugs image from the December release.


I printed the image onto XPress It Blending card then coloured the image using Copic Markers. I used a pencil to trace the bottom of the frame so i could fussy cut his feet as I didn't want to chop them off. I then ran a Lawn Fawn Stitched squares die through my sizzix big shot.
Once I ran the die through I erased all the pencil lines.

Using a Uniball white gel pen I added some details to my hedgehog.

I cut some Kraft cardstock and some patterned papers from my stash and used Scotch ATG to adhere them to a Couture Creations Card base.

I hope you have enjoyed my post today, if you have any questions feel free to send me a message or contact me via facebook (all links can be found below).


Products Used On My Card (Affiliate Links Used Where Possible)


Copic Markers Used

(list to come)

Thanks for stopping by, Deni

CAMERA SET UP - FOR YOU TUBE VIDEOS ONLY
Blue Yeti Microphone
Sony Handycam HDR CX4-05
Tripod – Manfrotto MKCompactaCN-BK

S O C I A L MEDIA 
B L O G : http://angelhandmadepapercraft.blogspot.com.au/
I N S T A G R A M : http://instagram.com/angelhandmadepapercraft
YOU TUBE: http://www.youtube.com/c/AngelHandmadePapercraft
F A C E B O O K: http://www.facebook.com/angelhandmadepapercraft
PINTEREST: https://www.pinterest.com.au/angelhandmadepapercraft

PERSONAL BLOG 
ANGEL HANDMADE PAPERCRAFT: http://angelhandmadepapercraft.blogspot.com.au/

I am an Ambassador for Copic Marker Australia and NZ


Sunday 2 December 2018

Let It Snow Friends - Time For Tea Designs

Hey Everyone,

Today I am sharing another card that I made using the Time For Tea Designs images that you cannot download for free if you purchase the Simply Cards & Papercraft Magazine.
If you purchase the current issue of the magazine you will find a link to download the images, if you are unable to access the magazine he stamps will be available to purchase in the shop soon.


I printed the image onto XPress It Blending Cardstock then coloured them up using Copic Markers. 


I ran the image through my Sizzix Big Shot using an MFT Stamps Scallop Rectangle Frame Die, I then ran the die through again using Kraft Cardstock. (Before I ran the image through I traced the frame using a Mechanical Pencil then carefully fussy cut the edges using EK Success Cutterbee Scissors, once I ran the image through I carefully erased all the pencil lines. 

I grabbed some patterned papers from American Crafts Hollyday Paper Pad 6x6 paper pad, I cut some smaller strips that I had leftover from other projects using my EK Success Cutterbee Scissors to create the banners.  I used a bone folder to flatten out my Couture Creations Cardbase and starting cutting all my layers and adhering them using Scotch ATG.

I adhered a doily from my stash and a sentiment from the same patterned paper pad. 

I hope you have enjoyed my post today, if you have any questions feel free to send me a message or contact me via facebook (all links can be found below).


Products Used On My Card (Affiliate Links Used Where Possible)


Copic Markers Used

E000, E00, E21, E11, E04, R20
V20, V22, V25
N6, N8, N10
RV32, RV34
W4, 0
C2, C0, 0
E30, E31, E33, E34
E25, E27, E29
E74, E77, E79
YR12, YR18
R35, R27, R39, R89
YR18, R35, E30, C3, 0

Thanks for stopping by, Deni

CAMERA SET UP - FOR YOU TUBE VIDEOS ONLY
Blue Yeti Microphone
Sony Handycam HDR CX4-05
Tripod – Manfrotto MKCompactaCN-BK

S O C I A L MEDIA 
B L O G : http://angelhandmadepapercraft.blogspot.com.au/
I N S T A G R A M : http://instagram.com/angelhandmadepapercraft
YOU TUBE: http://www.youtube.com/c/AngelHandmadePapercraft
F A C E B O O K: http://www.facebook.com/angelhandmadepapercraft
PINTEREST: https://www.pinterest.com.au/angelhandmadepapercraft

PERSONAL BLOG 
ANGEL HANDMADE PAPERCRAFT: http://angelhandmadepapercraft.blogspot.com.au/

I am an Ambassador for Copic Marker Australia and NZ


Saturday 1 December 2018

Jolly Puppy - Whimsy Stamps

Hi Everyone,

So excited to share this new Digital Stamp from Whimsy Stamps. It is so cute and I was super excited to get it coloured up and onto a card.


This is Jolly Puppy, isn't he just adorable :-)


I printed the image out onto X-Press It Blending Cardstock then coloured it up using Copic Markers, I am an avid Copic Marker user because this is where my comforts are. I merged the image with a sentiment as a friend had actually asked me for a card and I thought this image would be perfect.

I will have a list of Copic Markers used at the end of this blog post and will also include them all in the linkages below. The links will take you directly to each marker you click on. I have tried to add a few options for you to shop.

Once I had the image coloured up I ran it through Sizzix Big Shot using a MFT Stamps Stitched Rounded Rectangle die.

I used a few patterned paper sheets I had leftover from a paper pad, and cut them in all different sizes.  I cut a mat layer from American Crafts cardstock pack and adhered using Scotch ATG.
Once I had all my layers sorted I adhered them all to a Couture Creations Card Base.

I hope you have enjoyed my post today, if you have any questions feel free to send me a message or contact me via facebook (all links can be found below).


Products Used On My Card (Affiliate Links Used Where Possible)


Copic Markers Used

E51, E53, E55, E57, R21
E000, E00, E21, E11, E04, R20, R21
C1, C3, C4, 0
YR21, YR24, YR27
R35, R37, R59
T4, T6, T8, T10
RV55, RV66
C1, 0
E97, E99
W1, W4, 0

Thanks for stopping by, Deni

CAMERA SET UP - FOR YOU TUBE VIDEOS ONLY
Blue Yeti Microphone
Sony Handycam HDR CX4-05
Tripod – Manfrotto MKCompactaCN-BK

S O C I A L MEDIA 
B L O G : http://angelhandmadepapercraft.blogspot.com.au/
I N S T A G R A M : http://instagram.com/angelhandmadepapercraft
YOU TUBE: http://www.youtube.com/c/AngelHandmadePapercraft
F A C E B O O K: http://www.facebook.com/angelhandmadepapercraft
PINTEREST: https://www.pinterest.com.au/angelhandmadepapercraft

PERSONAL BLOG 
ANGEL HANDMADE PAPERCRAFT: http://angelhandmadepapercraft.blogspot.com.au/

I am an Ambassador for Copic Marker Australia and NZ


Friday 30 November 2018

Kindred Stamps - Family Bookmarks

Hey Everyone,

Today I am working with Kindred Stamps Family Is Forever, how cute is this stamp set :-) You may remember me using it recently to do  a No Line Colouring Technique card, today I am making some bookmarks.


I started by cutting the bookmark shapes using MFT Stamps Tall Tag Duo dienamics, I used X-Press It Blending Cardstock and ran the dies through my Gemini Machine.

I popped the stamps onto Lawn Fawn Acrylic Blocks and inked them up using Memento Tuxedo Black ink, then stamped them onto the bookmarks I had created.

Using Copic Markers I coloured the images up, I will add a list at the end of my blog post of all the Copic Markers I had used. I cut a second set of the bookmarks and added them to the back of the ones I had coloured so that you wouldn't see the Copic Markers through the back.

I added some Washi Tape from my stash, I grabbed some patterned ribbons from the On The Go set I had in my stash and used some Silver Twine to tie around the ribbon, that was my bookmarks completed. They were nice and easy to create, the colouring is probably the part that took the longest haha.

You Can Watch The Video Here


I hope you have enjoyed my post today, if you have any questions feel free to send me a message or contact me via facebook (all links can be found below).


Products Used On My Card (Affiliate Links Used Where Possible)


Copic Markers Used
E50, E51, E53, E55, R20
B21, B24, B26, B28, B29
C7
E71, E74, E77, E79
R35, R37

Thanks for stopping by, Deni

CAMERA SET UP - FOR YOU TUBE VIDEOS ONLY
Blue Yeti Microphone
Sony Handycam HDR CX4-05
Tripod – Manfrotto MKCompactaCN-BK

S O C I A L MEDIA 
B L O G : http://angelhandmadepapercraft.blogspot.com.au/
I N S T A G R A M : http://instagram.com/angelhandmadepapercraft
YOU TUBE: http://www.youtube.com/c/AngelHandmadePapercraft
F A C E B O O K: http://www.facebook.com/angelhandmadepapercraft
PINTEREST: https://www.pinterest.com.au/angelhandmadepapercraft

PERSONAL BLOG 
ANGEL HANDMADE PAPERCRAFT: http://angelhandmadepapercraft.blogspot.com.au/

I am an Ambassador for Copic Marker Australia and NZ


Sunday 25 November 2018

Jolly Presents - Time For Tea Designs

Hi Everyone,

Today is my inspiration day for Time For Tea Designs, how sweet is this little birdie from the Season's Tweetings Collection.

I merged the image with the Jolly Script and the Tis The Season sentiments, I then printed the sentiments and images onto X-Press It Blending Card using my laser printer.


I ran them through my Sizzix Big Shot using a Lawn Fawn Stitched Circle Die to give it that faux stitching look, I love adding this to my cards.

Using patterned papers from Kaisercraft Mistletoe Collection I cut some a layer from Christmas Tree Paper and used some small leftover pieces to cut into banners. I used EK Success Cutterbee Scissors to cut the banners into them.

I love adding a doily to my card, so once again I added one onto this card, I also added some punch outs from the patterned paper pad that I used previously.

Now that I had all my layers cut I adhered them all to a Couture Creations Card Base using Scotch ATG.


I hope you have enjoyed my post today, if you have any questions feel free to send me a message or contact me via facebook (all links can be found below).


Products Used On My Card (Affiliate Links Used Where Possible)


Copic Markers Used

W4, 0
YR20, YR24, YR27
R35, R37, R39
C3, C0,0
E71, E74, E77, E79, R20
YR68, R08

Thanks for stopping by, Deni

CAMERA SET UP - FOR YOU TUBE VIDEOS ONLY
Blue Yeti Microphone
Sony Handycam HDR CX4-05
Tripod – Manfrotto MKCompactaCN-BK

S O C I A L MEDIA 
B L O G : http://angelhandmadepapercraft.blogspot.com.au/
I N S T A G R A M : http://instagram.com/angelhandmadepapercraft
YOU TUBE: http://www.youtube.com/c/AngelHandmadePapercraft
F A C E B O O K: http://www.facebook.com/angelhandmadepapercraft
PINTEREST: https://www.pinterest.com.au/angelhandmadepapercraft

PERSONAL BLOG 
ANGEL HANDMADE PAPERCRAFT: http://angelhandmadepapercraft.blogspot.com.au/

I am an Ambassador for Copic Marker Australia and NZ


Saturday 24 November 2018

Evie and Frankie Do Christmas - Whimsy Stamps

Can you believe how quickly Christmas is coming, its crazy really how fast the year of 2018 has gone.

I have had so much fun with Whimsy Stamps for my Design Team Term, and these are just yet more of my favourite images, honestly I can say there has never been one of their images I haven't been able to create with.


I printed the images onto X-Press It blending card and coloured them with Copic Markers.

I grabbed some plain coloured card stocks from American Crafts and Kaisercraft and some patterned papers from American Crafts Hollyday Collection to create my card and finished them off with doily, quite a simplicity of a design, just lots of layers.

Everything was adhered using Scotch ATG and American Tombow Mono Multi Liquid Adhesive for the doily. I cut all the layers using Cutterpillar Pro Trimmer.

Finally I adhered the layers to a Couture Creations Card base.


I hope you have enjoyed my post today, if you have any questions feel free to send me a message or contact me via facebook (all links can be found below).


Products Used On My Card (Affiliate Links Used Where Possible)


Copic Markers Used

E000, E00, E21, E11, E04, R20
G21, G24, G28
R35, R37, R39
G40, G43
T6, T8, T10
C1, C3, 0
E27
E53, E55, E57
B52
Thanks for stopping by, Deni

CAMERA SET UP - FOR YOU TUBE VIDEOS ONLY
Blue Yeti Microphone
Sony Handycam HDR CX4-05
Tripod – Manfrotto MKCompactaCN-BK

S O C I A L MEDIA 
B L O G : http://angelhandmadepapercraft.blogspot.com.au/
I N S T A G R A M : http://instagram.com/angelhandmadepapercraft
YOU TUBE: http://www.youtube.com/c/AngelHandmadePapercraft
F A C E B O O K: http://www.facebook.com/angelhandmadepapercraft
PINTEREST: https://www.pinterest.com.au/angelhandmadepapercraft

PERSONAL BLOG 
ANGEL HANDMADE PAPERCRAFT: http://angelhandmadepapercraft.blogspot.com.au/

I am an Ambassador for Copic Marker Australia and NZ


Friday 23 November 2018

Kindred Stamps - Family Is Forever

Today I have made a card using a stamp set from Kindred Stamps called Family Is Forever.

I stamped the images onto X-Press It Blending Cardstock using Lawn Fawn Acrylic Blocks and Memento Desert Sand (I have other similar colour ink pads linked up) and coloured the images up using Copic Markers.


I fussy cut the images using EK Success Cutterbee Scissors, the tip to fussy cutting is to move the card not the scissors so much.

I ran a MFT Rounded Rectangle die through my Gemini to create the stitched look on the background. I then grabbed a Ranger Mini Blending Tool and blended some Distress Inks. I ran MFT Puffy Clouds Die through my Gemini using some leftover white cardstock and adhered them using American Tombow Mono Multi Liquid Adhesive.

If you are interested you can see me colouring up the images here on my You Tube Channel.


The patterned papers I actually created myself using X-Press it Blending Cardstock, Lawn Fawn Acrylic Block, some of the stamps from the set and some Memento Tuxedo Black.
The little flowers I coloured using Distress Inks and a Roymac Revolution Taklon, these brushes are no longer available so I have linked some other brushes that I have and use.

I added some Nuvo Crystal Drops in Red Berry to the bottom of my card. Finally adhering all the layers to a Couture Creations Card Base using Scotch ATG.

I hope you have enjoyed my post today, if you have any questions feel free to send me a message or contact me via facebook (all links can be found below).


Products Used On My Card (Affiliate Links Used Where Possible)


Copic Markers Used

B21, B24, B26, B28, B29
E44, E47, E49
Y18, YR04
YG05, YG45
E51, E53, E55, E57, R20
N6
R35, R37
T5, W3

Thanks for stopping by, Deni

CAMERA SET UP - FOR YOU TUBE VIDEOS ONLY
Blue Yeti Microphone
Sony Handycam HDR CX4-05
Tripod – Manfrotto MKCompactaCN-BK

S O C I A L MEDIA 
B L O G : http://angelhandmadepapercraft.blogspot.com.au/
I N S T A G R A M : http://instagram.com/angelhandmadepapercraft
YOU TUBE: http://www.youtube.com/c/AngelHandmadePapercraft
F A C E B O O K: http://www.facebook.com/angelhandmadepapercraft
PINTEREST: https://www.pinterest.com.au/angelhandmadepapercraft

PERSONAL BLOG 
ANGEL HANDMADE PAPERCRAFT: http://angelhandmadepapercraft.blogspot.com.au/

I am an Ambassador for Copic Marker Australia and NZ


Monday 19 November 2018

Penguin Night Masking - Whimsy Stamps

I am loving blending with Distress Inks so much lately, which is great because I have had the bigger ink pads for so long and very rarely used them. I pulled out a mixture of Mini Ink Pads and the larger ones to create this night scene with Whimsy Stamps Penguin Campfire.


I used Seedless Preserves, Mowed Lawn, Squeezed Lemonade, Dusty Concord, and Black Soot and a Mini Distress Ink Tool to blend around my image. I used post it notes to help me get the look I was after.

Papers are all from Doodlebug Design and I used American Crafts for the black piece. I ran a piece of the patterned paper through my Sizzix Big Shot using a Lawn Fawn Stitched Circle Die.

Everything was adhered using Scotch ATG then adhered to a Twiddleybitz Card Base.


I hope you have enjoyed my post today, if you have any questions feel free to send me a message or contact me via facebook (all links can be found below).


Products Used On My Card (Affiliate Links Used Where Possible)


Copic Markers Used

W6, W3, 0
T1, T3, 0
R20, 0
YR15, E97, YR24
E44, E47, E49
B02, B04, B06
G82, G24, G28
C8, C10, 100
W2, W4, W6
YR15, Y18
G82, G12, G28
W3, 0

Thanks for stopping by, Deni

CAMERA SET UP - FOR YOU TUBE VIDEOS ONLY
Blue Yeti Microphone
Sony Handycam HDR CX4-05
Tripod – Manfrotto MKCompactaCN-BK

S O C I A L MEDIA 
B L O G : http://angelhandmadepapercraft.blogspot.com.au/
I N S T A G R A M : http://instagram.com/angelhandmadepapercraft
YOU TUBE: http://www.youtube.com/c/AngelHandmadePapercraft
F A C E B O O K: http://www.facebook.com/angelhandmadepapercraft
PINTEREST: https://www.pinterest.com.au/angelhandmadepapercraft

PERSONAL BLOG 
ANGEL HANDMADE PAPERCRAFT: http://angelhandmadepapercraft.blogspot.com.au/

I am an Ambassador for Copic Marker Australia and NZ


Sunday 18 November 2018

Milkshake or an Iced Coffee - Time For Tea Designs

Milkshake or an Iced Coffee that is the question..

For my card today I have gone with exactly that and decided how can you choose between the two.. well you can' t actually.


I printed the image out onto X-Press It Blending Cardstock, coloured her up using Copic Markers then fussy cut her using EK Success Cutterbee Scissors.

Patterned papers were from a paper pad from The Craft Stall - one of the mini stacks. I used some Reflex Colour Paper in the pink to mat it as it was the closest colour I could find in my stash.

I cut everything to size using Fiskars Surecut Trimmer and adhered them using Scotch ATG.

Using a Stitched Circle die from Lawn Fawn I cut on piece of the patterned paper then ran a smaller one through using some Mondi Color Copy white cardstock.

I was in the middle of another project using the Kindred Stamps Gday stamp set so used the Happy Birthday from that and a Lawn Fawn Acrylic Block to stamp the sentiment out with Memento Tuxedo Black.

Finally I adhered all the layers onto a Couture Creations card base which I had creased using a bone folder.


I hope you have enjoyed my post today, if you have any questions feel free to send me a message or contact me via facebook (all links can be found below).


Products Used On My Card (Affiliate Links Used Where Possible)


Copic Markers Used

E000, E00, E21 E11, E04, R20
E33, E35, E37
R81, R83
R35, R37, R39
B41

Thanks for stopping by, Deni

CAMERA SET UP - FOR YOU TUBE VIDEOS ONLY
Blue Yeti Microphone
Sony Handycam HDR CX4-05
Tripod – Manfrotto MKCompactaCN-BK

S O C I A L MEDIA 
B L O G : http://angelhandmadepapercraft.blogspot.com.au/
I N S T A G R A M : http://instagram.com/angelhandmadepapercraft
YOU TUBE: http://www.youtube.com/c/AngelHandmadePapercraft
F A C E B O O K: http://www.facebook.com/angelhandmadepapercraft
PINTEREST: https://www.pinterest.com.au/angelhandmadepapercraft

PERSONAL BLOG 
ANGEL HANDMADE PAPERCRAFT: http://angelhandmadepapercraft.blogspot.com.au/

I am an Ambassador for Copic Marker Australia and NZ