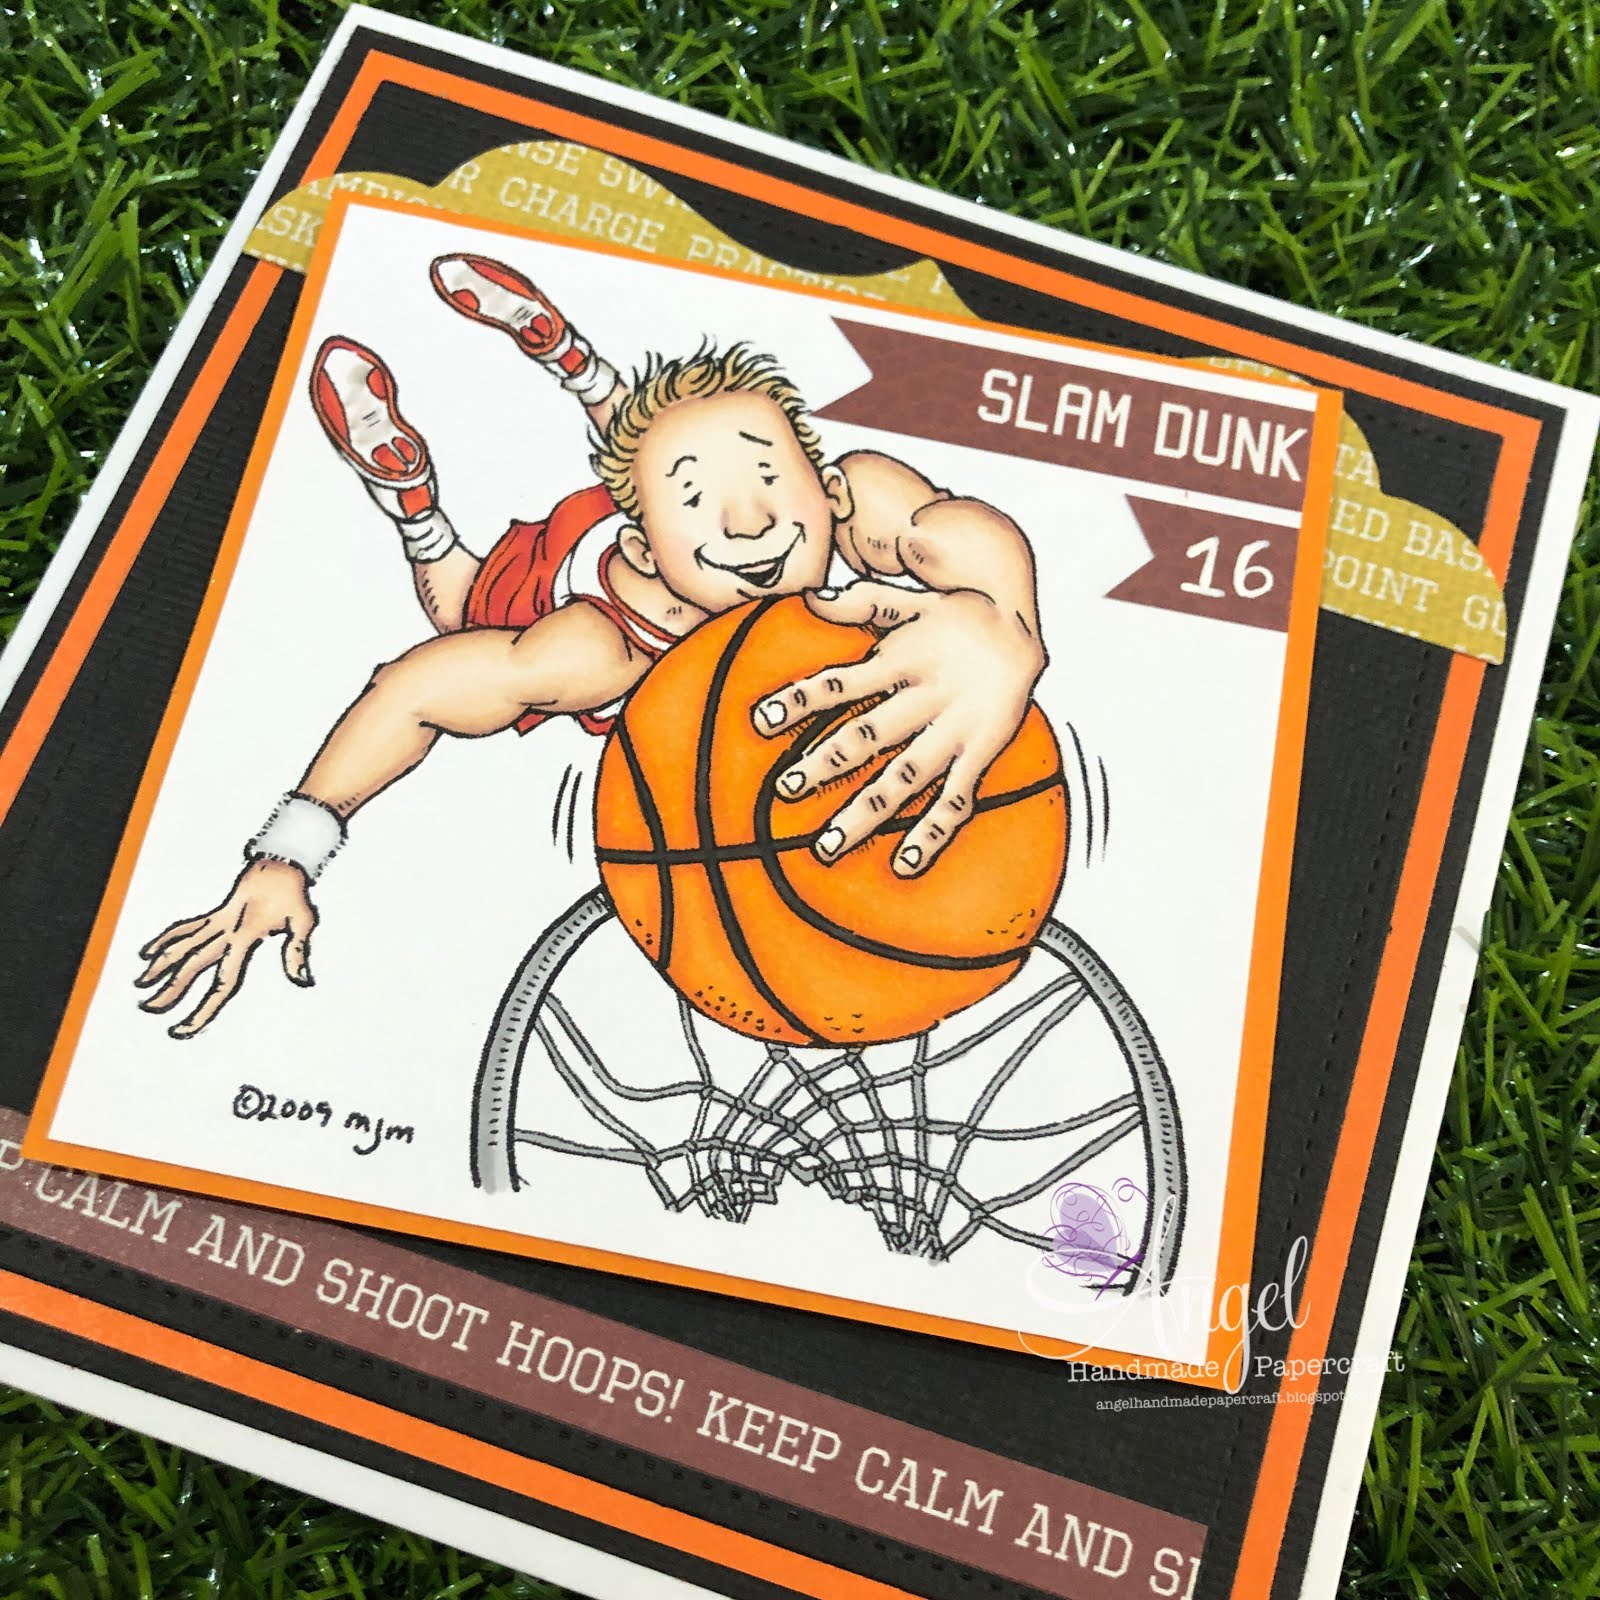
Today I am working on a boy card, it doesn't happen too often but this one was an order from a friend for her son's 16th Birthday.
I absolutely love this image from Mo Manning called Slam Dunk and can't wait to create more cards with it.
I wasn't sure what I was going to do background wise but ended up walking into a Kaisercraft Shop and finding the Game On - Basketball Sticker Sheet on Clearance. I didn't use a lot of the stickers but was happy with what I have used.
I printed the image onto X-Press It Blending Card Stock using my Brother Laser Printer, this is a Copic Safe printer so I don't get any bleeding with my Copic Markers.
I used American Crafts Cardstock for the black, I think the orange is from another company.
Everything was adhered to a Couture Creations Card Base using Scotch ATG.
I hope you have enjoyed my post today, if you have any questions feel free to send me a message or contact me via facebook (all links can be found below).
Watch the You Tube Video Here
No Video on this one sorry
Products Used On My Card (Affiliate Links Used Where Possible)
CAMERA SET UP - FOR YOU TUBE VIDEOS ONLY
Blue Yeti Microphone
Sony Handycam HDR CX4-05
Tripod – Manfrotto MKCompactaCN-BK
S O C I A L MEDIA
B L O G : http://angelhandmadepapercraft.blogspot.com.au/
I N S T A G R A M : http://instagram.com/angelhandmadepapercraft
YOU TUBE: http://www.youtube.com/c/AngelHandmadePapercraft
F A C E B O O K: http://www.facebook.com/angelhandmadepapercraft
PINTEREST: https://www.pinterest.com.au/angelhandmadepapercraft
I was a 2018 Ambassador for Copic Marker Australia and NZ
Today I am sharing with you a Halloween Card I made for Whimsy Stamps using Penguin Spooky Night.
This image is available as both a Digital Stamp and a Rubber Stamp, both of the links are below, I have used the Digital version on this card.
I printed the image onto X-Press It Blending Cardstock using my Brother Laser Printer and coloured him up using Copic Markers.
Patterned papers are from DCWV Spooky Halloween, and I used American Crafts Black Cardstock for my matting. I also used some paper from Sugar & Spice Happy Halloween 12x12 Paper Pad.
I used the Halloween Word die from La La Land Crafts and ran it through my Sizzix Big Shot using Black and orange American Crafts Cardstocks, I layered them using American Tombow Mono Multi Liquid Adhesive. The Dangling spider, and the bats are both retired dies from Memory Box, and the fence is a retired die from CC Designs called Witches Fence.
I adhered all the layers to a Couture Creations card base and added final touches using Wink Of Stella Clear and Uni-ball white gel pen.
I hope you have enjoyed my post today, if you have any questions feel free to send me a message or contact me via facebook (all links can be found below).
Watch the You Tube Video Here
No Video on this one sorry
Products Used On My Card (Affiliate Links Used Where Possible)
CAMERA SET UP - FOR YOU TUBE VIDEOS ONLY
Blue Yeti Microphone
Sony Handycam HDR CX4-05
Tripod – Manfrotto MKCompactaCN-BK
S O C I A L MEDIA
B L O G : http://angelhandmadepapercraft.blogspot.com.au/
I N S T A G R A M : http://instagram.com/angelhandmadepapercraft
YOU TUBE: http://www.youtube.com/c/AngelHandmadePapercraft
F A C E B O O K: http://www.facebook.com/angelhandmadepapercraft
PINTEREST: https://www.pinterest.com.au/angelhandmadepapercraft
I was a 2018 Ambassador for Copic Marker Australia and NZ
Currently working on Teacher cards as the year starts to come to an end, can't believe its almost September!
I have used a stamp set from Avery Elle called Little Minds, and I have added a Teacher die cut from Simon Says Stamp Hey Teacher die.
I stamped the image out using Memento Tuxedo Black and coloured the image up using Copic Markers then ran it through my Big Shot using the matching die set.
I ran the word die through my Sizzix Big Shot using two card stocks - first American Crafts and then X-Press It Blending card so I could layer it up.
I ran some patterned paper from Little Yellow Bicycle's Makin The Grade paper pad through my Big Shot using Lawn Fawn Stitched Circle die.
I cut some other paper sheets down to create my card using Cutterpillar Pro, I cut down a piece of black cardstock from American Crafts, I then adhered them to a Couture Creations Card Base using Scotch ATG.
I added some stars from EK Success Star Confetti Punch, I punched these out of some scraps from the paper pad.
I hope you have enjoyed my post today, if you have any questions feel free to send me a message or contact me via facebook (all links can be found below).
Watch the You Tube Video Here
Products Used On My Card (Affiliate Links Used Where Possible)
Copic Markers Used
R05, R35, R37
YG05, G07
N8, N10
Thanks for stopping by, Deni
CAMERA SET UP - FOR YOU TUBE VIDEOS ONLY
Blue Yeti Microphone
Sony Handycam HDR CX4-05
Tripod – Manfrotto MKCompactaCN-BK
S O C I A L MEDIA
B L O G : http://angelhandmadepapercraft.blogspot.com.au/
I N S T A G R A M : http://instagram.com/angelhandmadepapercraft
YOU TUBE: http://www.youtube.com/c/AngelHandmadePapercraft
F A C E B O O K: http://www.facebook.com/angelhandmadepapercraft
PINTEREST: https://www.pinterest.com.au/angelhandmadepapercraft
I was a 2018 Ambassador for Copic Marker Australia and NZ
A few weeks ago I sat down and coloured this Tractor up from Woodware Craft Collection, I hadn't had a chance to get it onto a card until today.
I stamped the image onto X-Press It Blending Card using my Misti Stamping Tool and Memento Tuxedo Black, the proceeded to colour using Copic Markers.
I ran the image through my Sizzix Big Shot using a Lawn Fawn Stitched Square die.
Using patterned papers from Kaisercraft Cock-a-Doodle-Doo 6.5" Paper Pad I began to put my card together.
I cut trees from MFT Stamps Tee-Mendous dies and some leftover card stocks from my bucket, I adhered them together using American Tombow Mono Multi Liquid Adhesive.
With some leftover X-Press It Blending Cardstock I cut a fence using MFT Stamps Prairie Fence die and adhered it to my patterned paper using the liquid adhesive.
I cut a layer of American Crafts cardstock just slightly larger than the tartan paper layer just to break up all the colours a little bit.
I then adhered the image to my card using Scotch ATG, added the trees and finally adhered all the layers to a Couture Creations Card base using the same tape runner.
I hope you have enjoyed my post today, if you have any questions feel free to send me a message or contact me via facebook (all links can be found below).
Watch the You Tube Video Here
Products Used On My Card (Affiliate Links Used Where Possible)
CAMERA SET UP - FOR YOU TUBE VIDEOS ONLY
Blue Yeti Microphone
Sony Handycam HDR CX4-05
Tripod – Manfrotto MKCompactaCN-BK
S O C I A L MEDIA
B L O G : http://angelhandmadepapercraft.blogspot.com.au/
I N S T A G R A M : http://instagram.com/angelhandmadepapercraft
YOU TUBE: http://www.youtube.com/c/AngelHandmadePapercraft
F A C E B O O K: http://www.facebook.com/angelhandmadepapercraft
PINTEREST: https://www.pinterest.com.au/angelhandmadepapercraft
I was a 2018 Ambassador for Copic Marker Australia and NZ
I've been a busy little bee pumping out cards lately, which is fantastic, I love these kind of crafty weeks.
For my card today I am using Art Impressions Girlfriends Series - Giant Cake, I love this stamp - I remember when Amy Rysavy used it in one of her videos and I had to have it - then I hoarded it til now hahah.
I stamped the image using my Misti Stamping Tool (with the black foam mat removed) and some Memento Tuxedo Black ink onto X-Press It Blending Card - this is my go to card stock for Copic Markers.
I coloured the image in then cut it down to size using my Cutterpillar Pro.
The patterned papers are from Hampton Art Celebrate 6x6 Paper Pad I cut them down to size and used adhered them all to a Couture Creations Card Base using Scotch ATG.
I added a doily on top then layered the image over that just using the ATG again. Once I was done I added some Wink Of Stella to the candles and my card was complete.
I hope you have enjoyed my post today, if you have any questions feel free to send me a message or contact me via facebook (all links can be found below).
Watch the You Tube Video Here
no video for this one sorry
Products Used On My Card (Affiliate Links Used Where Possible)
CAMERA SET UP - FOR YOU TUBE VIDEOS ONLY
Blue Yeti Microphone
Sony Handycam HDR CX4-05
Tripod – Manfrotto MKCompactaCN-BK
S O C I A L MEDIA
B L O G : http://angelhandmadepapercraft.blogspot.com.au/
I N S T A G R A M : http://instagram.com/angelhandmadepapercraft
YOU TUBE: http://www.youtube.com/c/AngelHandmadePapercraft
F A C E B O O K: http://www.facebook.com/angelhandmadepapercraft
PINTEREST: https://www.pinterest.com.au/angelhandmadepapercraft
I was a 2018 Ambassador for Copic Marker Australia and NZ
Today I am super excited to share with you a Halloween Project for Whimsy Stamps Digital Team.
We are lucky enough that not only are both of the images I have used available in Digital but they are both available as Rubber Stamps, so I will have both of them linked up in the picture links below.
I have used Penguin Spooky Night and Penguin Super Hero from Crissy Armstrong's designs on my project. Using Microsoft Word I combined the two images and then I printed them onto X-Press It Blending Cardstock using my Brother Laser Printer.
Here's a close up of the images coloured up :-)
I coloured the images up using Copic Markers which was super fun, I used so many colours it was so amazing to see at the end of a project how many you actually use.
I've been trying to remember to always take photos of my images with the Copic Markers I have used so that even though you can see a list of them you can actually get more of an idea of how many iv'e used.
When I was colouring up the SP on the Superhero Penguin one of my Copic Markers had a bleed, I was frazzled for a few seconds until I remembered that I printed an extra, so I carefully used my EK Success Cutterbee Scissors to fussy cut the SP logo out of the new image. I then coloured it up using the same colours and I added some Scotch Foam Tape and adhered it directly onto the original image.
It turned out really great and I am really happy with it.
Once I had the images all coloured up I used my Uni-Ball White Gel Pen to add some details to the image. Once I was happy I moved onto putting my card together.
I have a draw full of all my Halloween Stamp Sets and Dies, I have drawers for a few other themes too, this makes it a lot easier when it comes to needing something for a specific design like this one.
I pulled out a few things - a spider web die, a spider die, a Halloween Fence and the little bats, I will have them all linked up below. I cut all of them out using American Crafts Cardstock and my Sizzix Big Shot.
Once I had all the bits and pieces cut out I adhered them to my card using American Tombow Mono Multi, because they were such small pieces I added the glue to my Glass Media Mat and used my finger to carefully dab the glue onto the back of the die cuts.
I used a sentiment from the rubber stamp set on my card as I thought it was perfect.
I then realised I hadn't grounded the images so I grabbed some of my W Markers and added ground, I also used one of the fluro markers to give the images a glow. This was about the stage where I decided I wanted to ink the background. I grabbed my Distress Oxide Inks and A mini ink blending tool or two to add the ink.
Silly me got some ink on the left hand side so I couldn't do my moon, I ran a Lawn Fawn Stitched Circle Die through my Big Shot and some scraps of yellow card stock to create the moon.
I used a red glitter marker to add a red stripe on the spider and a white gel pen to add some eyes.
I am so happy with the way my card turned out :-)
I hope you have enjoyed my post today, if you have any questions feel free to send me a message or contact me via facebook (all links can be found below).
Watch the You Tube Video Here
Products Used On My Card (Affiliate Links Used Where Possible)
CAMERA SET UP - FOR YOU TUBE VIDEOS ONLY
Blue Yeti Microphone
Sony Handycam HDR CX4-05
Tripod – Manfrotto MKCompactaCN-BK
S O C I A L MEDIA
B L O G : http://angelhandmadepapercraft.blogspot.com.au/
I N S T A G R A M : http://instagram.com/angelhandmadepapercraft
YOU TUBE: http://www.youtube.com/c/AngelHandmadePapercraft
F A C E B O O K: http://www.facebook.com/angelhandmadepapercraft
PINTEREST: https://www.pinterest.com.au/angelhandmadepapercraft
I was a 2018 Ambassador for Copic Marker Australia and NZ
A few weeks ago I made this gorgeous baby card using MFT Stamps Hello, Little One stamp set and the matching dies.
I used my Misti Stamping Tool, layed the dies down first and then inlayed all the stamps inside the dies, I then closed the Misti to pick up all the stamps, removed the dies and that made sure all the stamps were in the correct alignment so I couldn't have to cut my dies apart, I stamped the images onto X-Press It Blending Cardstock, I ran all the images through my Sizzix Big Shot at the same time.
I coloured all the images using Copic Markers and added detail to them using Uni-Ball White Gel Pen.
I used patterned papers from Crafter's Choice Kids Play Paper Pad, I ran the clouds paper through my Sizzix Big Shot through my Big Shot using Lawn Fawn Stitched Circle Dies.
The stars paper is also from the same paper pad, and I used some plain colours of cardstock to create the layers, which I cut down using my Cutterpillar Pro, and adhered them to a Couture Creations Card Base.
I layed all the images out and glued them to the circles using American Tombow Mono Multi.
I ran the Lawn Fawn Congrats word die through my Big Shot using some leftover great card stock, and Lawn Fawn It's A Girl Border die using some leftover pink card stock.
The sentiment was created using MS Word and then printed onto X-Press It Blending Cardstock.
I hope you have enjoyed my post today, if you have any questions feel free to send me a message or contact me via facebook (all links can be found below).
Watch the You Tube Video Here
Products Used On My Card (Affiliate Links Used Where Possible)
Copic Markers Used
sorry don't have a list of these for this project
Thanks for stopping by, Deni
CAMERA SET UP - FOR YOU TUBE VIDEOS ONLY
Blue Yeti Microphone
Sony Handycam HDR CX4-05
Tripod – Manfrotto MKCompactaCN-BK
S O C I A L MEDIA
B L O G : http://angelhandmadepapercraft.blogspot.com.au/
I N S T A G R A M : http://instagram.com/angelhandmadepapercraft
YOU TUBE: http://www.youtube.com/c/AngelHandmadePapercraft
F A C E B O O K: http://www.facebook.com/angelhandmadepapercraft
PINTEREST: https://www.pinterest.com.au/angelhandmadepapercraft
I was a 2018 Ambassador for Copic Marker Australia and NZ
Today I would like to share with you Penguin's Cake, a new release Digital Stamp for Whimsy Stamps. I was previously a rubber stamp and has now been released as Digital.. I have linked both of the options below.
I wanted to make a birthday card with the image today, I printed it onto X-Press It Blending Cardstock using my Brother Laser Printer then coloured the image using Copic Markers.
Once I had the image all coloured I added Nuvo Crystal Drops to the cake to make it look like icing, it turned out exactly as I had expected.
I used patterned papers from my stash and added a doily. I ran the image through my Sizzix Big Shot using a Lawn Fawn Stitched Square die. I added some Nuvo Crystal Drops to the outside of the image.
I used a MFT Stamps Puffy Clouds Die and some leftover X-Press It Blending Cardstock, when I am using white on white I try to make sure that they are the same cardstock so one doesn't end up looking off white.
I added some stars from EK Success Star Confetti punch, just using some American Crafts Black leftover cardstock. I have 2 small baskets on my desk - one for white and one for black off cuts. I then keep a big tub under my desk for everything else. I adhered the stars using American Tombow Mono Multi liquid adhesive.
For the bigger layers I adhered them all to a Couture Creations Card Base using Scotch ATG. I added some final details using Uni-ball white gel pen.
I hope you have enjoyed my post today, if you have any questions feel free to send me a message or contact me via facebook (all links can be found below).
Watch the You Tube Video Here
Sorry no video on this one
Products Used On My Card (Affiliate Links Used Where Possible)
Copic Markers Used
sorry I don't have list of these for this project
Thanks for stopping by, Deni
CAMERA SET UP - FOR YOU TUBE VIDEOS ONLY
Blue Yeti Microphone
Sony Handycam HDR CX4-05
Tripod – Manfrotto MKCompactaCN-BK
S O C I A L MEDIA
B L O G : http://angelhandmadepapercraft.blogspot.com.au/
I N S T A G R A M : http://instagram.com/angelhandmadepapercraft
YOU TUBE: http://www.youtube.com/c/AngelHandmadePapercraft
F A C E B O O K: http://www.facebook.com/angelhandmadepapercraft
PINTEREST: https://www.pinterest.com.au/angelhandmadepapercraft
I was a 2018 Ambassador for Copic Marker Australia and NZ
I was asked by a friend to make her daughter a Graduation as she finishes off her last year of High School, I thought i'd keep it simple for this one.
I stamped out the little girl image from There She Goes Congradulations (I apologise but this company is no longer around so I am unable to tag the stamp set) onto some X-Press It Blending Cardstock using my Misti Stamping Tool using Memento Tuxedo Black.
I punched some stars from American Crafts Black Card Stock using my new EK Success Star Confetti Punch, I really love this paper punch it so smooth and clean when it punches.
I grabbed a pre-made Couture Creations card case and layed out the start of my design so I could work out where to adhere everything. I adhered the stars using American Tombow Mono Multi Liquid Adhesive. I also added the image using the same liquid adhesive.
For the sentiment I used a new to me die from Honey Bee Stamps called Congrats, it's a 3 layer die, the top layer I cut from American Crafts black cardstock, second layer I used some leftover X-Press It Blending Cardstock and the bottom layer I used vellum, I used American Tombow Mono Multi to adhere all the layers together and then the same to adhere it to the card, making sure I only applied glue to the white sections so it wouldn't show through the vellum.
Once my card was completed I added some Wink Of Stella Clear to the stars.
I hope you have enjoyed my post today, if you have any questions feel free to send me a message or contact me via facebook (all links can be found below).
Watch the You Tube Video Here
Products Used On My Card (Affiliate Links Used Where Possible)
CAMERA SET UP - FOR YOU TUBE VIDEOS ONLY
Blue Yeti Microphone
Sony Handycam HDR CX4-05
Tripod – Manfrotto MKCompactaCN-BK
S O C I A L MEDIA
B L O G : http://angelhandmadepapercraft.blogspot.com.au/
I N S T A G R A M : http://instagram.com/angelhandmadepapercraft
YOU TUBE: http://www.youtube.com/c/AngelHandmadePapercraft
F A C E B O O K: http://www.facebook.com/angelhandmadepapercraft
PINTEREST: https://www.pinterest.com.au/angelhandmadepapercraft
I was a 2018 Ambassador for Copic Marker Australia and NZ
A friend of mine commissioned me to make a 20th Wedding Anniversary card for her to give to her husband.
I really love this image from Mo Manning, it is not easy to find an Anniversary type of image but this one is perfect.
20th Wedding Anniversary is represented as Platinum so I have used Ranger Ink Platinum embossing powder to emboss the Wine Glasses which are from Your Next Stamp Mr and Mrs Stamp Set on the patterned paper and I also embossed a square on to a scrap piece of paper by just smooshing the embossing ink pad onto it. I then ran Lawn Fawn Quinn's 123's dies in the number 2 and 0 to create the 20 using that embossed piece.
I cut a piece of American Crafts Black Card Stock to create the bottom mat layer, I used some Bella Wedding (I think) paper for the background, which I then stamped over and embossed.
I ran the image through my Sizzix Big Shot using a Lawn Fawn Stitched Circle Die - I forgot to mention I traced the die out over my image before I cut it and fussy cut his legs and the bottom of her shoe, when I put the die back on slid it under those sections so as to not cut them when I ran the die through.
The Anniversary word is from Hero Arts - called Anniversary Fancy Die, I ran it through my Big Shot a few times so I could layer it up, I somehow lost every dot from the I when I did it but decided to layer some little hearts I had sitting on my desk to give the same about of dimension. The hearts are from Martha Stewart Heart Confetti Punch.
I stamped the sentiment from the Mr & Mrs Stamp set using Memento Tuxedo Black and also embossed the rings from the same stamp set using Versamark Embossing Ink and the Platinum embossing powder. I really love the way the rings finished off the card.
I hope you have enjoyed my post today, if you have any questions feel free to send me a message or contact me via facebook (all links can be found below).
Watch the You Tube Video Here
No Video on this one, sorry
Products Used On My Card (Affiliate Links Used Where Possible)
CAMERA SET UP - FOR YOU TUBE VIDEOS ONLY
Blue Yeti Microphone
Sony Handycam HDR CX4-05
Tripod – Manfrotto MKCompactaCN-BK
S O C I A L MEDIA
B L O G : http://angelhandmadepapercraft.blogspot.com.au/
I N S T A G R A M : http://instagram.com/angelhandmadepapercraft
YOU TUBE: http://www.youtube.com/c/AngelHandmadePapercraft
F A C E B O O K: http://www.facebook.com/angelhandmadepapercraft
PINTEREST: https://www.pinterest.com.au/angelhandmadepapercraft
I was a 2018 Ambassador for Copic Marker Australia and NZ
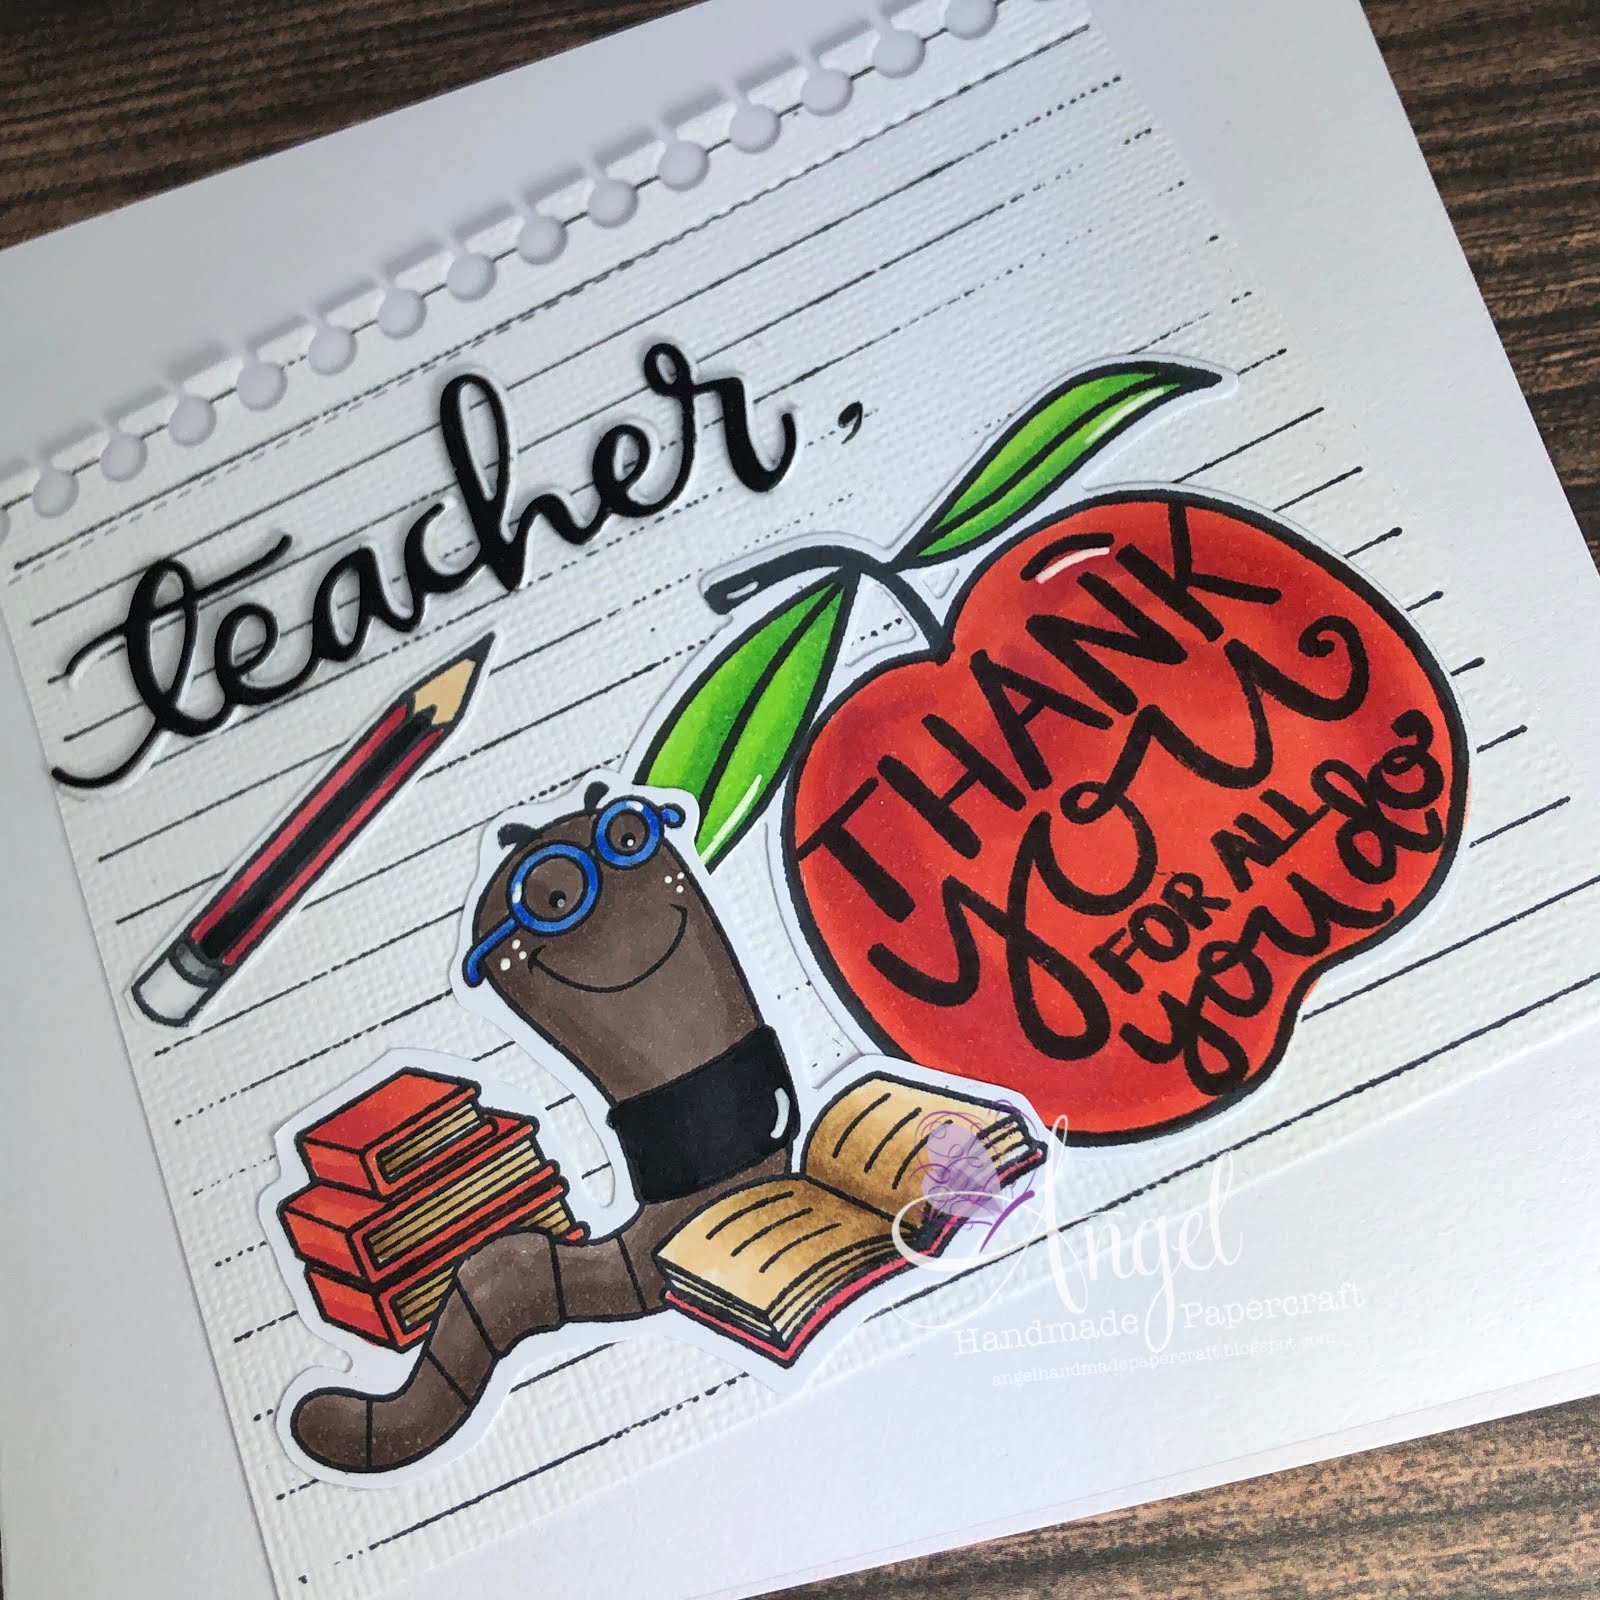
Today I am sharing with you a Teacher Card that I have made using two different stamp sets, Avery Elle Little Minds and Your Next Stamp Get Your Fiction On.
I stamped the Apple stamp from Little Minds and the Reading Worm from Get Your Fiction on using my Misti Stamping Tool onto X-Press It Blending Cardstock using Memento Tuxedo Black.
I ran the apple image through my Sizzix Big Shot using the matching die set, the worm I fussy cut using my EK Success Cutterbee Scissors as I do not have the matching dies.
I used Notebook Paper Background from CC Designs (this is a retired stamp however I was able to find a link), I stamped it onto American Crafts White card stock directly from the stamp using Memento Tuxedo Black, I just stuck the stamp straight to my Tim Holtz Glass Media Mat.
Using MFT Stamps Notebook Edge Dienamics I ran the notebook paper through my Big Shot. This die is unfortunately retired but there is some punches out there from other companies that are very similar.
The last thing I used on my card is the Teacher word which I cut from SSS Teacher die using American Crafts Black and White Card Stock, I then layered them up using American Tombow Mono Multi.
I adhered everything to my Couture Creations Card Base using American Tombow Mono Multi Liquid Adhesive.
I finally added details to my images using Uni-Ball White Gel Pen.
I hope you have enjoyed my post today, if you have any questions feel free to send me a message or contact me via facebook (all links can be found below).
Watch the You Tube Video Here
Products Used On My Card (Affiliate Links Used Where Possible)
CAMERA SET UP - FOR YOU TUBE VIDEOS ONLY
Blue Yeti Microphone
Sony Handycam HDR CX4-05
Tripod – Manfrotto MKCompactaCN-BK
S O C I A L MEDIA
B L O G : http://angelhandmadepapercraft.blogspot.com.au/
I N S T A G R A M : http://instagram.com/angelhandmadepapercraft
YOU TUBE: http://www.youtube.com/c/AngelHandmadePapercraft
F A C E B O O K: http://www.facebook.com/angelhandmadepapercraft
PINTEREST: https://www.pinterest.com.au/angelhandmadepapercraft
I was a 2018 Ambassador for Copic Marker Australia and NZ
Today I am sharing with you a quick card I made using My Favorite Things Stamps Cute Chemists, I stamped the images out onto X-Press It Blending Card using my Misti Stamping Tool and Memento Tuxedo Black.
I coloured the images up using Copic Markers I then fussy cut them out as I don't own the dies, I did link them up at a few shops for you below.
I used a piece of white leftover Blending Card (so that it would all match up) and a Lawn Fawn Acrylic Block and stamped out the images using some Memento London Fog, I stamped the sentiment out using Memento Tuxedo Black. The Thankyou word actually didn't stamp out nicely and I ended up having to stamp it onto some black cardstock using Ink On 3 Embossing Ink, Ranger Ink Super Fine white detail embossing powder and melted it using my Heat Gun.
I decided to stamp up a piece of gray card stock using the same grey ink to give it a tone on tone look. I then using some Scotch Foam Mounting Tape to adhere the white piece to the gray piece.
I adhered the images using American Tombow Mono Multi Liquid Adhesive. I used a white gel pen to add details to all the images.
I hope you have enjoyed my post today, if you have any questions feel free to send me a message or contact me via facebook (all links can be found below).
Watch the You Tube Video Here
Products Used On My Card (Affiliate Links Used Where Possible)
Copic Markers Used
Thanks for stopping by, Deni
CAMERA SET UP - FOR YOU TUBE VIDEOS ONLY
Blue Yeti Microphone
Sony Handycam HDR CX4-05
Tripod – Manfrotto MKCompactaCN-BK
S O C I A L MEDIA
B L O G : http://angelhandmadepapercraft.blogspot.com.au/
I N S T A G R A M : http://instagram.com/angelhandmadepapercraft
YOU TUBE: http://www.youtube.com/c/AngelHandmadePapercraft
F A C E B O O K: http://www.facebook.com/angelhandmadepapercraft
PINTEREST: https://www.pinterest.com.au/angelhandmadepapercraft
I was a 2018 Ambassador for Copic Marker Australia and NZ