Showing posts with label Ranger. Show all posts

Saturday, 6 July 2019

Whimsy Stamps - Life Preserver Kitty

Hi Everyone,

Today I am sharing with you Life Preserver Kitty, he is from the Ahoy Matey Digital Set from Whimsy Stamps July Release.

My idea was to make the kitty look like he was in a picture frame, so I ran a piece of X-Press It Blending Cardstock through my Sizzix Big Shot using the MFT Stamps Stitched Rounded Square Frames. I then used Vintage Photo Distress Ink to ink up the frame , I used the edge of the ink pad in some places just to antique it up a bit.


I traced the frame die onto my image so I could make sure nothing important was going to get trimmed off, once I was happy with the placement I traced it out using a Mechanical Pencil then coloured up the image using Copic Markers. Once I had the image all coloured up I ran it through my Big Shot with the die.


I cut a piece of cardboard up to fit underneath the image and the frame to make it a little more 3D rather than using foam squares.

Patterned papers are from Pebbles Inc - Party with Amy Locurto - Poolside Collection, I cut the little sentiment for the bottom of the frame and the thongs from the same paper pad and cut some strips of the patterned paper to run down the right hand side.

I then adhered all the layers to a Couture Creations Card Base using Scotch ATG.


I hope you have enjoyed my post today, if you have any questions feel free to send me a message or contact me via facebook (all links can be found below).

Watch the You Tube Video Here


Products Used On My Card (Affiliate Links Used Where Possible)



Copic Markers Used


Thanks for stopping by, Deni

CAMERA SET UP - FOR YOU TUBE VIDEOS ONLY
Blue Yeti Microphone
Sony Handycam HDR CX4-05
Tripod – Manfrotto MKCompactaCN-BK

S O C I A L MEDIA 
B L O G : http://angelhandmadepapercraft.blogspot.com.au/
I N S T A G R A M : http://instagram.com/angelhandmadepapercraft
YOU TUBE: http://www.youtube.com/c/AngelHandmadePapercraft
F A C E B O O K: http://www.facebook.com/angelhandmadepapercraft
PINTEREST: https://www.pinterest.com.au/angelhandmadepapercraft


I was a 2018 Ambassador for Copic Marker Australia and NZ


Sunday, 30 June 2019

MFT Stamps - Cute Chemists

Hi Everyone,

Well this is the second card I have made using the MFT Stamps Cute Chemists, as with the last card I stamped the images out onto X-Press It Blending Cardstock using my Lawn Fawn Acrylic Blocks and Memento Tuxedo Black ink. I also stamped out the cloud of smoke inbetween the characters.


I coloured the images up using Copic Markers. I added some Mod Podge Dimensional Magic to both the glasses to give them the glassy effect.

I stamped out the sentiment from the same stamp set "You Make My Heart Go Boom" using Ink on 3 Embossing Ink and Ranger Ink Super Fine White Embossing Powder, I melted this using my Heat Gun onto American Crafts Cardstock, I then trimmed it down and bannered the end.


I used a white gel pen to add a few details to the images.

The patterned papers are from a Kmart Paper Pad, I cut them down using my Cutterpillar Pro and adhered them all using Scotch ATG to a Couture Creations Card Base.


I hope you have enjoyed my post today, if you have any questions feel free to send me a message or contact me via facebook (all links can be found below).

Watch the You Tube Video Here


Products Used On My Card (Affiliate Links Used Where Possible)


Copic Markers Used

E000, E00, E21, E11, E04, R20
N7, N9, N10
YG11, YG13
V04, V06, V09
BG10, BG15
BG0000,
B01, B02, B04
B91, B93, B95, W2
B95, B97, B99
N0, N3, N5
RV02, RV04
E07, E09

Thanks for stopping by, Deni

CAMERA SET UP - FOR YOU TUBE VIDEOS ONLY
Blue Yeti Microphone
Sony Handycam HDR CX4-05
Tripod – Manfrotto MKCompactaCN-BK

S O C I A L MEDIA 
B L O G : http://angelhandmadepapercraft.blogspot.com.au/
I N S T A G R A M : http://instagram.com/angelhandmadepapercraft
YOU TUBE: http://www.youtube.com/c/AngelHandmadePapercraft
F A C E B O O K: http://www.facebook.com/angelhandmadepapercraft
PINTEREST: https://www.pinterest.com.au/angelhandmadepapercraft


I was a 2018 Ambassador for Copic Marker Australia and NZ


Sunday, 23 June 2019

MFT Stamps - Penguins In Paradise

I am so excited to share with you my first 1 layer card, Lots of masking and hard work went into this one, and I won't be doing it anytime soon haha.

On all seriousness it was really great to do this card as I have wanted to do one for a while.


I started by preparing my X-Press It Blending Cardstock and laying out all my stamps to work out what I was going to do. I then cut down a piece of scrap paper around the same size and I stamped everything out using a Lawn Fawn acrylic block. I put my X-Press it Blending card into my Misti Stamping Tool and layed the piece of scrap that I stamped on in over the top of the Blending Card.

I looked at the scrap piece of stamping and worked out what needed to be stamped first, everything that is at the front needs to be stamped first, you then mask those off and stamp the next layer back.


So first of all I knew that the three penguins and the ball all needed to be stamped out first. I then worked out what I would need to create masks for to do the rest of my stamping. I knew I wanted the trees behind the penguins so I would need to create masks for all the penguins, thinking ahead I also realised I would need masks for the trees and the ball so I would be able to ink over the top of them to create my background.

I stamped the images that would need masks out onto another piece of scrap paper and used my EK Success Cutterbee scissors to fussy cut (right on the line) all of the images. I then used American Tombow Mono Multi to add adhesive to the backs. With Mono Multi it is permanent straight away and temporary if you leave it to dry.

With the masks for the trees I actually stamped those onto some post it notes because I realised I would need two, I left two post it notes stuck together and fussy cut them at the same time. I then added some more Mono Multi to the bottoms of those so I could completely adhered and create masks from them.

I stamped all my images out onto my X-Press It Blending Card, I left the masks on all the images then used another piece of scrap copy paper to tear and create a mask and give the separation between water and sand for my background.

I layed the mask down and inked up the sky first using Tumbled Glass and Salty Ocean Distress Inks, I then removed the mask from the background and blended the sand, I used Antique Linen and Tea Dye for this, with the Tea Dye I didn't blend it more just pounced it on to create the texture of the sand.

Finally I removed all the masks using my EK Success Cutterbee Scissors, I love the point of my scissors it allows me to carefully pull the masks up.

I coloured the images up using Copic Markers, careful not to touch the Distress Ink too much with my Copic tips. I added some details using Uni-Ball White Gel Pen.

I stamped the sentiment out onto the layout using Memento Tuxedo Black. I decided at this stage to cut my project down and add some layers behind it just using some plain card stocks from my stash.


I hope you have enjoyed my post today, if you have any questions feel free to send me a message or contact me via facebook (all links can be found below).

Watch the You Tube Video Here


Products Used On My Card (Affiliate Links Used Where Possible)


Copic Markers Used

N6, N8, N10, R20
YR12, YR16
N2, N0, 0
YG17, YG45, YG67
Y02, Y06, Y08
R81, R85
W1, W5
E23, E25, E27, E29
RV14, RV19
Y38, YR18
YG21, YG25, YG17
BG13, BG15, BG18
V04, V06, V09

Thanks for stopping by, Deni

CAMERA SET UP - FOR YOU TUBE VIDEOS ONLY
Blue Yeti Microphone
Sony Handycam HDR CX4-05
Tripod – Manfrotto MKCompactaCN-BK

S O C I A L MEDIA 
B L O G : http://angelhandmadepapercraft.blogspot.com.au/
I N S T A G R A M : http://instagram.com/angelhandmadepapercraft
YOU TUBE: http://www.youtube.com/c/AngelHandmadePapercraft
F A C E B O O K: http://www.facebook.com/angelhandmadepapercraft
PINTEREST: https://www.pinterest.com.au/angelhandmadepapercraft


I was a 2018 Ambassador for Copic Marker Australia and NZ


Wednesday, 22 May 2019

Paper Nest Dolls - Blonde Lulu


Good Morning Everyone,

A few days ago I shared with you my colouring of Paper Nest Dolls Princess Butterfly Lulu, today I am sharing with you the card process.


I wanted to die cut my image with a spellbinders die but I did not want it to cut my image off so using a Mechanical pencil I traced out the die onto my image so I could see where it was going to cut. I used my EK Success Cutterbee scissor to carefully fussy cut the left side of the image and around the legs and the top of her head. I then put the die onto my Big Shot plates so that it was hanging off the edge and would only cut some of the image.


I then ran it through my Sizzix Big Shot and it turned out exactly as I had planned. I used an eraser to get rid of all the pencil lines.

I ran the next size up die through my Big Shot with some patterned paper from Basic Grey Mint Julep Paper Pad. I layered the image die cut over the patterned paper then used my Cutterpillar Pro to cut down another piece of the patterned paper pad and layered that underneath. I used Scotch ATG to adhere the layers.

Finally I adhered all the layers to a Couture Creation Card Base and added some little hearts to the top of the wand using MFT Stamps Cute Chemists stamp set with Memento Tuxedo Black and an acrylic block from Lawn Fawn.


I added some Mod Podge Dimensional Magic to the hearts, wand and her crown.

At this stage I still wasn't sure what sentiment I wanted to add so I left it to dry and came back to it later. I used Mama Elephant Happy Everything Stamp Set and Happy die to finish it off.


I hope you have enjoyed my post today, if you have any questions feel free to send me a message or contact me via facebook (all links can be found below).

Watch the You Tube Video Here


Products Used On My Card (Affiliate Links Used Where Possible)


Copic Markers Used

E000, E00, E21, E11, E04, R20
Y21, Y23, Y26
YR21, YR24, YR27
RV14, RV17, RV19
V12, V15
RV000, RV00, BG000

Thanks for stopping by, Deni

CAMERA SET UP - FOR YOU TUBE VIDEOS ONLY
Blue Yeti Microphone
Sony Handycam HDR CX4-05
Tripod – Manfrotto MKCompactaCN-BK

S O C I A L MEDIA 
B L O G : http://angelhandmadepapercraft.blogspot.com.au/
I N S T A G R A M : http://instagram.com/angelhandmadepapercraft
YOU TUBE: http://www.youtube.com/c/AngelHandmadePapercraft
F A C E B O O K: http://www.facebook.com/angelhandmadepapercraft
PINTEREST: https://www.pinterest.com.au/angelhandmadepapercraft


I was a 2018 Ambassador for Copic Marker Australia and NZ


Friday, 10 May 2019

MFT Stamps Cute Chemists

Good Evening All,

Today I have been having fun playing with MFT Stamps Cute Chemists stamp set, I stamped quite a few of them out onto X-Press It Blending Card using my Misti Stamping Tool and Memento Tuxedo Black.

I will be featuring each of the cards over the next week so I hope I don't bother you too much :-p

For this first card I stamped the images together in a scene including the heart stamp set and the glasses onto their faces, I then coloured the images up using Copic Markers. I used a white gel pen to add details to the images.


I added some Mod Podge Dimensional Magic onto the glasses, I think this is like Glossy Accents..

I was doing a few things at the time which gave the glasses time to dry and I was able to get the card finished on the same time.


I cut a piece of American Crafts Black Cardstock down on my Cutterpillar Pro. Using MFT Stamps Lots of Heart Stencil I layed it over the black cardstock and using a Mini Blending Tool and Distress Oxide Ink in Picked Raspberry. This is the first time i've used the Oxide Ink over a stencil, It doesn't bring out the colour very well but I still love softness of it. The ink dried really quickly which is cool.

I stamped out the sentiment using a Lawn Fawn Acrylic Block onto an excess piece of the blending card and cut it down to fit the front of my card.

I really love the way this card turned out and can't wait to show you the rest of the cards I have created with this stamp set.


I hope you have enjoyed my post today, if you have any questions feel free to send me a message or contact me via facebook (all links can be found below).

Watch the You Tube Video Here (Video to Come)


  Products Used On My Card (Affiliate Links Used Where Possible)


Copic Markers Used

E000, E00, E21, E11, E04. R20
E00, E21, E11, E13, R20
YG11, YG13
N0, N3, N5
V04, V06, V09
R81, R83, R85
B91, B93, B95, W2
B95, B97, B99
BG11, BG15
Y02
E74, E77, E79
E47, E49

Thanks for stopping by, Deni

CAMERA SET UP - FOR YOU TUBE VIDEOS ONLY
Blue Yeti Microphone
Sony Handycam HDR CX4-05
Tripod – Manfrotto MKCompactaCN-BK

S O C I A L MEDIA 
B L O G : http://angelhandmadepapercraft.blogspot.com.au/
I N S T A G R A M : http://instagram.com/angelhandmadepapercraft
YOU TUBE: http://www.youtube.com/c/AngelHandmadePapercraft
F A C E B O O K: http://www.facebook.com/angelhandmadepapercraft
PINTEREST: https://www.pinterest.com.au/angelhandmadepapercraft


I was a 2018 Ambassador for Copic Marker Australia and NZ


Wednesday, 8 May 2019

Bulk Batch Baby Cards - Mama Elephant Flying with friends

Hi Everyone,

Something a little different for me today, I don't have a video for you just wanted to share what I have been working on.


I needed some baby cards for my stash so I pulled out my Mama Elephant Flying with friends stamp set, I love the little elephants. I needed a few sentiments so I grabbed my Neat and Tangled Itty Bitty Welcoming Committee Stamp Set.

For the "Baby" die cut I used MFT Stamps Oh Baby dies, I ran it through multiple times using X-Press It Blending Card off cuts, this was everything was all matching.

I ran the MFT Stamps Puffy Clouds through using more excess X-Press It and my Sizzix Big Shot.

I stamped out Welcome and Congrats multiple times using Memento Tuxedo Black and acrylic blocks onto X-Press It Blending Card.

I stamped out many difference colours of Distress Ink onto my glass media mat and sprayer water onto them, I then used some excess stamp packaging to smudge from the media mat onto my card bases.

I stamped out a heap of the images using Memento Tuxedo Black and my Misti Stamping Tool, I stamped them onto X-Press It Blending Card and used my EK Success Cutterbee Scissors to fussy cut all the images out. I then coloured them all up using Copic Markers.

I used American Tombow Mono Multi and Scotch ATG to put my cards together, finally I used Tonic Studios Nuvo Crystal Drops to finish my cards off.


I hope you have enjoyed my post today, if you have any questions feel free to send me a message or contact me via facebook (all links can be found below).


Products Used On My Card (Affiliate Links Used Where Possible)


Copic Markers Used

W1, W4
Y00, Y11
B00, B01
G000, G12
R00, R11
V20, V22
N0, N2, N4, R20

Watch The You Tube Video Here 


Thanks for stopping by, Deni

CAMERA SET UP - FOR YOU TUBE VIDEOS ONLY
Blue Yeti Microphone
Sony Handycam HDR CX4-05
Tripod – Manfrotto MKCompactaCN-BK

S O C I A L MEDIA 
B L O G : http://angelhandmadepapercraft.blogspot.com.au/
I N S T A G R A M : http://instagram.com/angelhandmadepapercraft
YOU TUBE: http://www.youtube.com/c/AngelHandmadePapercraft
F A C E B O O K: http://www.facebook.com/angelhandmadepapercraft
PINTEREST: https://www.pinterest.com.au/angelhandmadepapercraft


I was a 2018 Ambassador for Copic Marker Australia and NZ


Wednesday, 24 April 2019

La La Land Crafts - Knight Luka

Good Morning Everyone,

Today I am here to share with you a new to me image from La La Land Crafts, this is Knight Luka he is available as a Digital Stamp and as a Rubber Stamp.

I purchased the Digital Stamp during the last sale, such a great image to colour up. I printed the image and the sentiment onto X-Press It Blending Card using Copic Markers.


I fussy cut the image using EK Success Cutterbee Scissors then ran around the outside using a Tombow black dual end marker holding the marker from back to the front so as to not accidentally get any ink on the actual image.

I grabbed a pre-made card base from my stash and using a Mini Ink Blending Tool and Tim Holtz Ranger Wilted Violet Oxide Ink I made a circular motion to the centre of the card.

I used Club La La Land Crafts July 2016 Kit, these items are now available to purchase separately so have linked them all up. I used the Castle Border Die and the Bricks die which I ran through my Sizzix Big Shot using American Crafts Cardstock. I ran them through a couple of times in black and grey cardstock.


I adhered one grey on top of one black castle using American Tombow Mono Multi Liquid Adhesive, then adhered it to the back of my image. I then adhered two of the brick dies together just using some washing tape so I could get them aligned before adhering.

I inlayed some of the black bricks to the grey die cut using the liquid adhesive.

I then used the liquid adhesive to adhered the die cuts, the image and sentiment to the card base.

I also used some Wink Of Stella Clear to bling up my card.

I hope you have enjoyed my post today, if you have any questions feel free to send me a message or contact me via facebook (all links can be found below).

Watch the You Tube Video Here


  Products Used On My Card (Affiliate Links Used Where Possible)


Copic Markers Used

E000, E00, E21, E11, E04, R20
N1, N3, N5
R24, R27, R29
V04, V06, V09
E55, E57, E59
0 Colorless Blender

Thanks for stopping by, Deni

CAMERA SET UP - FOR YOU TUBE VIDEOS ONLY
Blue Yeti Microphone
Sony Handycam HDR CX4-05
Tripod – Manfrotto MKCompactaCN-BK

S O C I A L MEDIA 
B L O G : http://angelhandmadepapercraft.blogspot.com.au/
I N S T A G R A M : http://instagram.com/angelhandmadepapercraft
YOU TUBE: http://www.youtube.com/c/AngelHandmadePapercraft
F A C E B O O K: http://www.facebook.com/angelhandmadepapercraft
PINTEREST: https://www.pinterest.com.au/angelhandmadepapercraft


I was a 2018 Ambassador for Copic Marker Australia and NZ


Saturday, 6 April 2019

Whimsy Stamps - Pig's Fly

Today I am here to share with you When Pig's Fly from Whimsy Stamps. I was totally in love with this image as soon as I had seen it and knew I wanted to use it as a Sympathy Card.


I printed the image onto Brother Laser Printer using X-Press It Blending Cardstock and then coloured the image up in blue combinations of Copic Markers.

I used patterned paper from The Craft Stall Mini Stack and plain cardstock from American Crafts as the matting layers. I added all the layers to a Couture Creations Card Base.


I ran a Puffy Clouds die from MFT Stamps die through Sizzix Big Shot, and I also ran the image through using Lawn Fawn Stitched Circle Die. I used my EK Success Cutterbee Scissors to carefully cut the edge of the bird wings so that I could pop them outside the die and didn't cut them off.

I added Wink Of Stella Clear to the Pig's Wings.

Finally I used some vellum to stamp onto using a sentiment from MFT Stamps All Occasion Sentiments, I used Ink On 3 Embossing Ink and my Fiskars Stamp Press (because the sentiment was so big I didn't have an acrylic block big enough). I used Ranger Super Fine White Embossing Powder and heated it using my heat tool. I adhered the sentiment strip to my card using some Tombow mono multi liquid adhesive.


I hope you have enjoyed my post today, if you have any questions feel free to send me a message or contact me via facebook (all links can be found below).

Watch the You Tube Video Here


Products Used On My Card (Affiliate Links Used Where Possible)


Copic Markers Used

YR20, YR16
R00, R01, R12, R32
B0000, B000, B00
B12, B14, B16

Thanks for stopping by, Deni

CAMERA SET UP - FOR YOU TUBE VIDEOS ONLY
Blue Yeti Microphone
Sony Handycam HDR CX4-05
Tripod – Manfrotto MKCompactaCN-BK

S O C I A L MEDIA 
B L O G : http://angelhandmadepapercraft.blogspot.com.au/
I N S T A G R A M : http://instagram.com/angelhandmadepapercraft
YOU TUBE: http://www.youtube.com/c/AngelHandmadePapercraft
F A C E B O O K: http://www.facebook.com/angelhandmadepapercraft
PINTEREST: https://www.pinterest.com.au/angelhandmadepapercraft


I was a 2018 Ambassador for Copic Marker Australia and NZ


Sunday, 3 March 2019

Time For Tea Designs - Beats Bella Blue Jeans

So crazy, its mid month already! It does mean there is a new release over at Time For Tea Designs though, we have a brand new challenge and brand new images ready on the new website.

I will have all the links below in the clickable links for you to check everything out.

But for now, let me introduce you to Beats Bella, she is one of the new Feb releases.


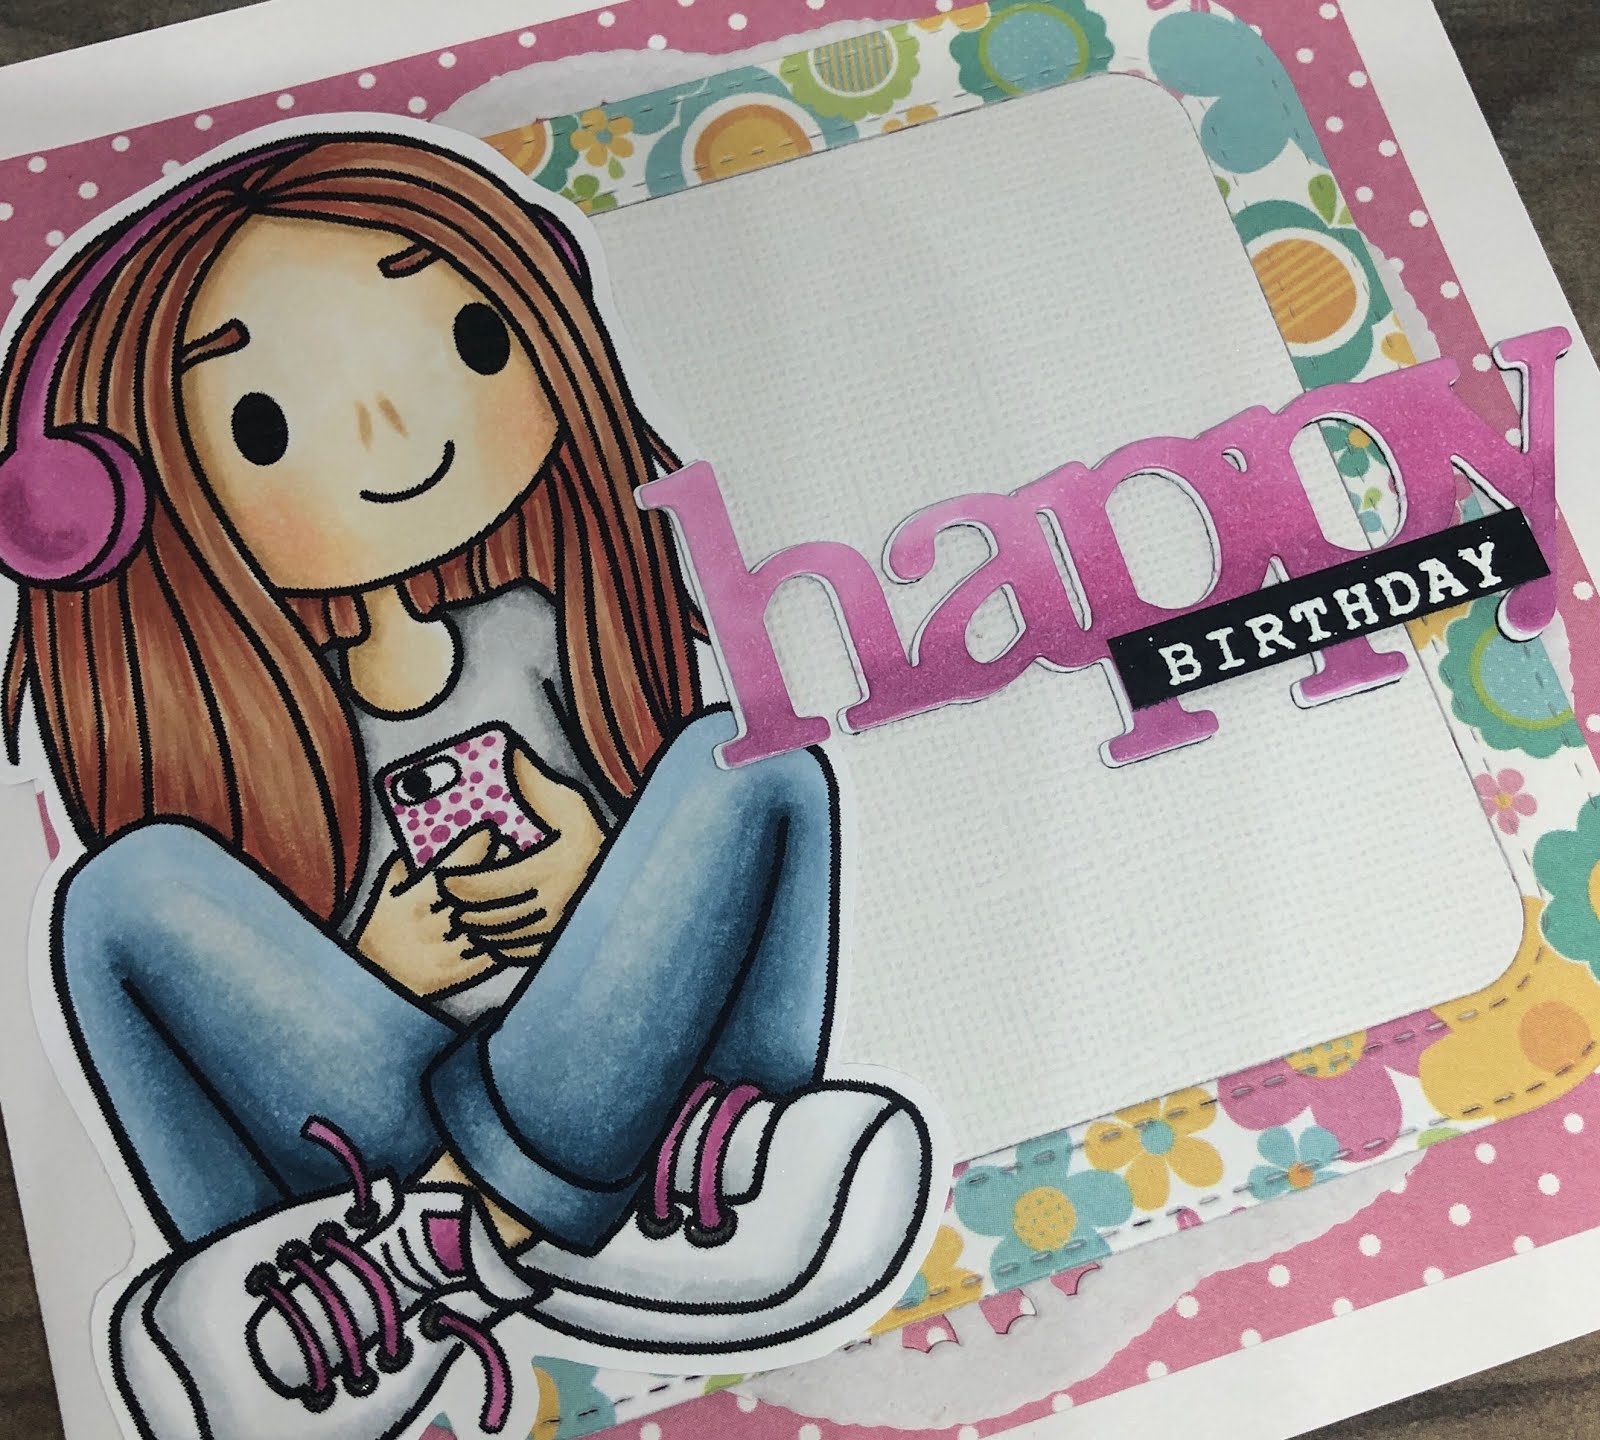
I printed the image onto X-Press It Blending Cardstock and coloured her up using Copic Markers, I am totally in love with this new image and was super excited to actually make two cards. I decided to share just one at a time so let's get started with this one.


I also have a video for you to watch with the Copic Colouring. I do apologise in advance I was so excited to be colouring her up that some of it is off screen, I have tried to speed those sections up so that you aren't watching too much of an empty desk.


Once I had the image coloured up I used my EK Success Cutterbee Scissors to fussy cut her out, I do have some of the fancy machines but fussy cutting I enjoy.


Using an MFT Stamps rounded square frame die I cut out some plain white cardstock, then ran it through again with some of the patterned paper. I used the leftover pieces on the other card that I made so nothing went to waste.


The patterned papers are from Pebbles Amy Locurto Poolside. I have a couple of these paper pads and they are all on their last sheets. I try to keep all my offcuts and put them back into the pad also.


I added another sheet of the patterned paper then adhered them to a Couture Creations Card Base.


When I was done, I ran one of the W Plus 9 Happy Trio dies through my Sizzix Big show using some  of the patterned paper I had leftover, i then ran it through again using some white cardstock to add behind it and just slightly off aligned them so u could just see the white poking through. I stamped a sentiment from Mama Elephant Happy Everything stamp set using Versamark Watermark Ink Pad, added some white embossing powder and melted it (I also prepped the cardstock beforehand using a powder tool). I cut the sentiment down to size using my Tim Holtz Guillotine.
I hope you have enjoyed my post today, if you have any questions feel free to send me a message or contact me via facebook (all links can be found below).

Watch the You Tube Video Here Of Same image coloured up for another card


Products Used On My Card (Affiliate Links Used Where Possible)


Copic Markers Used
E50, E51, E53, E55, R20
E000, E00, E21, E11, E04, R20
E13, E15, E08
RV11, RV17
RV55, RV66
B91, B93, B95, B97, B99, W00
N0, N3, N5
C1, C3, 0
C6, C8, C9

Thanks for stopping by, Deni

CAMERA SET UP - FOR YOU TUBE VIDEOS ONLY
Blue Yeti Microphone
Sony Handycam HDR CX4-05
Tripod – Manfrotto MKCompactaCN-BK

S O C I A L MEDIA 
B L O G : http://angelhandmadepapercraft.blogspot.com.au/
I N S T A G R A M : http://instagram.com/angelhandmadepapercraft
YOU TUBE: http://www.youtube.com/c/AngelHandmadePapercraft
F A C E B O O K: http://www.facebook.com/angelhandmadepapercraft
PINTEREST: https://www.pinterest.com.au/angelhandmadepapercraft


I was a 2018 Ambassador for Copic Marker Australia and NZ


Friday, 1 March 2019

Kindred Stamps - The Horror Masculine Card

Hi Everyone, 
I would like to share with you a card I created using The Horror stamp set from Kindred Stamps. I will have a clickable image link below the blog post for you to purchase the stamp set and any other products I have used

I started by stamping down my sentiment using Memento Tuxedo Black onto X-Press It Blending Cardstock, I then stamped the same sentiment onto some full adhesive post it notes (this is what I use for my masking technique) I used my EK Success Cutterbee Scissors to cut the sentiment out of the post it note.

I popped the mask of the sentiment down over the one I had stamped then stamped both my images over the top, it did mean the sides of the two images you could not see because they are masked off but It's exactly what I wanted. 


Once I had the images stamped out I coloured them using Copic Markers.
I cut a smaller piece of white cardstock and repeat stamped "The Horror" sentiment to create my own patterned paper, so easy to do and I just did it by sight rather than ruling it up. 
I ran the image through my Sizzix Big Shot using a Stitched Circle die, I actually carefully cut around the knife first and popped it to the outside of the die so it did not get cut off when I ran it through. 
I used Ranger Tea Dye Distress Ink, just the normal ink not the Oxide and a mini ink blending tool to carefully ink around the outside of the image piece and the hand made patterned paper. I also had this black patterned piece in my leftovers tray which I had cut to size and I inked the edge of that also. 

I cut a piece of American Crafts Black Cardstock to use as my bottom mat layer.
Once I was done I folded down a Couture Creations Card Base using a bone folder. I wrapped a piece of black ribbon around the patterned papers using Scotch ATG, then adhered those layers to the black and then adhered them all to the card base. This is my Card complete. I did decorate the inside to match but I don't film all that :-)

I hope you have enjoyed my post today, if you have any questions feel free to send me a message or contact me via facebook (all links can be found below).

Watch the You Tube Video Here


Products Used On My Card (Affiliate Links Used Where Possible)


Copic Markers Used

E50, E51, E53, E55, R20
R46, E09
W00, W2, W5
T6, T8, T10
N1, N3
E40, E42, E44

Thanks for stopping by, Deni

CAMERA SET UP - FOR YOU TUBE VIDEOS ONLY
Blue Yeti Microphone
Sony Handycam HDR CX4-05
Tripod – Manfrotto MKCompactaCN-BK

S O C I A L MEDIA 
B L O G : http://angelhandmadepapercraft.blogspot.com.au/
I N S T A G R A M : http://instagram.com/angelhandmadepapercraft
YOU TUBE: http://www.youtube.com/c/AngelHandmadePapercraft
F A C E B O O K: http://www.facebook.com/angelhandmadepapercraft
PINTEREST: https://www.pinterest.com.au/angelhandmadepapercraft


I was a 2018 Ambassador for Copic Marker Australia and NZ


Thursday, 21 February 2019

AT Crafts - Haul Video

Hi Everyone,

I was so excited to get my latest package from Auzz Trinklets N Crafts today that I actually got a Haul Video done and uploaded in the same day :-) Watch the video below and check out all the cool stuff I ordered.


Watch the You Tube Video Here


Products In Package


Thanks for stopping by, Deni

CAMERA SET UP - FOR YOU TUBE VIDEOS ONLY
Blue Yeti Microphone
Sony Handycam HDR CX4-05
Tripod – Manfrotto MKCompactaCN-BK

S O C I A L MEDIA 
B L O G : http://angelhandmadepapercraft.blogspot.com.au/
I N S T A G R A M : http://instagram.com/angelhandmadepapercraft
YOU TUBE: http://www.youtube.com/c/AngelHandmadePapercraft
F A C E B O O K: http://www.facebook.com/angelhandmadepapercraft
PINTEREST: https://www.pinterest.com.au/angelhandmadepapercraft


I was a 2018 Ambassador for Copic Marker Australia and NZ


Kindred Stamps - Bon Appetit Planner Layout

New Release week previews for Kindred Stamps have begun.

I was lucky enough to work with Bon Appetit, how super cute is this stamp set :-)


I stamped the images onto PPS Sticker Paper using Memento Tuxedo Black and a Lawn Fawn Acrylic Block. I then fussy cut the images out using EK Success Cutterbee Scissors

I am using my Erin Condren Vertical Planner my planner layout today, If you are interested in purchasing one please use my Affiliate Link here https://www.erincondren.com/referral/invite/deniellewhicker0324

Using an MFT Stamps die I ran it through my Sizzix Big Shot with some full adhesive post it notes, so i could use the pattern to create some cheese looking backgrounds. I used Fossilized Amber Distress Oxide Ink and a mini ink blending tool to create this.

I ran some white cardstock through my Big Shot with a Lawn Fawn Stitched circle die, I did this twice then on one of them I ran it through again with some of the smaller circles.


I added some patterned papers and a doily to the corner.

Please check out my blog post where you can see my planner layout come to life.

I hope you have enjoyed my post today, if you have any questions feel free to send me a message or contact me via facebook (all links can be found below).

Watch the You Tube Video Here


Products Used On My Card (Affiliate Links Used Where Possible)


Thanks for stopping by, Deni

CAMERA SET UP - FOR YOU TUBE VIDEOS ONLY
Blue Yeti Microphone
Sony Handycam HDR CX4-05
Tripod – Manfrotto MKCompactaCN-BK

S O C I A L MEDIA 
B L O G : http://angelhandmadepapercraft.blogspot.com.au/
I N S T A G R A M : http://instagram.com/angelhandmadepapercraft
YOU TUBE: http://www.youtube.com/c/AngelHandmadePapercraft
F A C E B O O K: http://www.facebook.com/angelhandmadepapercraft
PINTEREST: https://www.pinterest.com.au/angelhandmadepapercraft


I was a 2018 Ambassador for Copic Marker Australia and NZ


Sunday, 17 February 2019

Time For Tea Designs - Beats Bella

So crazy, its mid month already! It does mean there is a new release over at Time For Tea Designs though, we have a brand new challenge and brand new images ready on the new website.

I will have all the links below in the clickable links for you to check everything out.

But for now, let me introduce you to Beats Bella, she is one of the new Feb releases.


I printed the image onto X-Press It Blending Cardstock and coloured her up using Copic Markers, I am totally in love with this new image and was super excited to actually make two cards. I decided to share just one at a time so let's get started with this one.


I also have a video for you to watch with the Copic Colouring. I do apologise in advance I was so excited to be colouring her up that some of it is off screen, I have tried to speed those sections up so that you aren't watching too much of an empty desk.


Once I had the image coloured up I used my EK Success Cutterbee Scissors to fussy cut her out, I do have some of the fancy machines but fussy cutting I enjoy.


Using an MFT Stamps rounded square frame die I cut out some plain white cardstock, then ran it through again with some of the patterned paper. I used the leftover pieces on the other card that I made so nothing went to waste.

The patterned papers are from Pebbles Amy Locurto Poolside. I have a couple of these paper pads and they are all on their last sheets. I try to keep all my offcuts and put them back into the pad also.

I added another sheet of the patterned paper then adhered them to a Couture Creations Card Base.

When I was done, I ran one of the W Plus 9 Happy Trio dies through my Sizzix Big show using some  of the patterned paper I had leftover, i then ran it through again using some white cardstock to add behind it and just slightly off aligned them so u could just see the white poking through. I stamped a sentiment from Mama Elephant Happy Everything stamp set using Versamark Watermark Ink Pad, added some white embossing powder and melted it (I also prepped the cardstock beforehand using a powder tool). I cut the sentiment down to size using my Tim Holtz Guillotine.
I hope you have enjoyed my post today, if you have any questions feel free to send me a message or contact me via facebook (all links can be found below).

Watch the You Tube Video Here


Products Used On My Card (Affiliate Links Used Where Possible)


Copic Markers Used
E50, E51, E53, E55, R20
E000, E00, E21, E11, E04, R20
E13, E15, E08
RV11, RV17
RV55, RV66
B91, B93, B95, B97, B99, W00
N0, N3, N5
C1, C3, 0
C6, C8, C9

Thanks for stopping by, Deni

CAMERA SET UP - FOR YOU TUBE VIDEOS ONLY
Blue Yeti Microphone
Sony Handycam HDR CX4-05
Tripod – Manfrotto MKCompactaCN-BK

S O C I A L MEDIA 
B L O G : http://angelhandmadepapercraft.blogspot.com.au/
I N S T A G R A M : http://instagram.com/angelhandmadepapercraft
YOU TUBE: http://www.youtube.com/c/AngelHandmadePapercraft
F A C E B O O K: http://www.facebook.com/angelhandmadepapercraft
PINTEREST: https://www.pinterest.com.au/angelhandmadepapercraft


I was a 2018 Ambassador for Copic Marker Australia and NZ


Tuesday, 22 January 2019

It's A Little Town - Kindred Stamps

Hey Everyone!

I am super excited to share with you my post this week for Kindred Stamps Video Team.
It has got to be one of my most favourite stamp sets yet.

This is Little Town Life, it is the sweetest most gorgeous stamp set. ** Products will be released soon and links will be updated.

                                     
I stamped the images out onto X-Press It Blending Cardstock using Memento Tuxedo Black and Lawn Fawn Acrylic Blocks. I then coloured the images up using Copic Markers and fussy cut them using EK Success Cutterbee Scissors.


I always love seeing the pile of all the markers I used in a project, makes me laugh actually.

I decided I wanted to create a Pop up card with the images. I grabbed my Lawn Fawn Pop up box die that I still hadn't used yet. Can I just say how much I actually love making Pop up cards hehe. This is my very first one, no trials or anything.

I used some old Magnolia Doohickey dies that i've had in my stash since forever, I used the Castle and the fence dies, I will have them all linked up below.

I ran the die box die through my Sizzix Big Shot first using some yellow Canson Cardstock, I ran the die through twice as you need to join two of them together. I used some ATG to adhere the two together creating the box. I then ran through the next piece (the one that goes inside the box to hold the images) through twice once again, I then added some ATG to the tabs and carefully added them to the inside of the box.


I ran the Magnolia dies through using some leftover American Crafts Cardstock, making sure the patterned side was to the front.

Next I ran the square and rectangle pieces through my Big Shot using some leftover X-Press It Blending card, I just wanted them to match up with the images. On the front piece I stamped the sentiment directly on, on the sides I used the sentiments I had stamped and fussy cut out already.


On the back rectangle I used some Ranger Distress Inks to blend a sky.

I then adhered a few images around and popped the others inside with the fence and the castle.


I really love this card and am so glad that I finally took the plunge and got myself a pop up box die.

I hope you have enjoyed my post today, if you have any questions feel free to send me a message or contact me via facebook (all links can be found below).

Watch the You Tube Video Here


  Products Used On My Card (Affiliate Links Used Where Possible)


Copic Markers Used

E50, E51, E53, E55, R20
E47, E49
E33, E35, E37
E30
YR20, YR24
Y11, Y13, Y15
Y28
V04, V06
B21, B24, B28
R35, R37, R89
C0, C2, C5, C6, C8, C10, 0
YG07

Thanks for stopping by, Deni

CAMERA SET UP - FOR YOU TUBE VIDEOS ONLY
Blue Yeti Microphone
Sony Handycam HDR CX4-05
Tripod – Manfrotto MKCompactaCN-BK

S O C I A L MEDIA 
B L O G : http://angelhandmadepapercraft.blogspot.com.au/
I N S T A G R A M : http://instagram.com/angelhandmadepapercraft
YOU TUBE: http://www.youtube.com/c/AngelHandmadePapercraft
F A C E B O O K: http://www.facebook.com/angelhandmadepapercraft
PINTEREST: https://www.pinterest.com.au/angelhandmadepapercraft

PERSONAL BLOG 
ANGEL HANDMADE PAPERCRAFT: http://angelhandmadepapercraft.blogspot.com.au/

I am an Ambassador for Copic Marker Australia and NZ