I received my Club La La Land Crafts for July 2019 yesterday and it is one of my favourite ones yet.
I have an "unboxing" video for you including colouring up of all the images, you can find the link below.
Here is a quick view of the Club, Lots of awesome stamps and dies in this one :-)
I stamped all the images out onto X-Press It Blending Cardstock using my Misti Stamping Tool (I took the foam mat out) and used Memento Tuxedo Black ink. I coloured up all the images using Copic Markers.
I hope you have enjoyed my post today, if you have any questions feel free to send me a message or contact me via facebook (all links can be found below).
Watch the You Tube Video Here
Products Used On My Card (Affiliate Links Used Where Possible)
CAMERA SET UP - FOR YOU TUBE VIDEOS ONLY
Blue Yeti Microphone
Sony Handycam HDR CX4-05
Tripod – Manfrotto MKCompactaCN-BK
S O C I A L MEDIA
B L O G : http://angelhandmadepapercraft.blogspot.com.au/
I N S T A G R A M : http://instagram.com/angelhandmadepapercraft
YOU TUBE: http://www.youtube.com/c/AngelHandmadePapercraft
F A C E B O O K: http://www.facebook.com/angelhandmadepapercraft
PINTEREST: https://www.pinterest.com.au/angelhandmadepapercraft
I was a 2018 Ambassador for Copic Marker Australia and NZ
This little gorgeousness has been sitting on my desk waiting to be shared, meet PC Sweetheart from Whimsy Stamps PC Collection.
She is a Digital Stamp that I have printed onto X-Press It Blending Card using my Brother Laser Printer.
I coloured her up using Copic Markers then added some Kindyglitz to the balloons and her hair clip.
Using some little stars I had leftover from another project I adhered them using my Pick Me Up Tool and some American Tombow Mono Multi Liquid Adhesive.
Patterned papers are from Crafter's Choice Princess Paper Pad (available to purchase from Spotlight here in Australia) I matted the patterned papers using some American Crafts Cardstocks with Scotch ATG.
I added a doily using some liquid adhesive, the sentiment is from Neat and Tangled Cottontail Cuties and I ran it through my Big Shot using MFT Stamps Stitched Sentiment Strips.
Once I had all my layers complete I adhered them all to a Couture Creations Cardbase using Scotch ATG.
I hope you have enjoyed my post today, if you have any questions feel free to send me a message or contact me via facebook (all links can be found below).
Products Used On My Card (Affiliate Links Used Where Possible)
CAMERA SET UP - FOR YOU TUBE VIDEOS ONLY
Blue Yeti Microphone
Sony Handycam HDR CX4-05
Tripod – Manfrotto MKCompactaCN-BK
S O C I A L MEDIA
B L O G : http://angelhandmadepapercraft.blogspot.com.au/
I N S T A G R A M : http://instagram.com/angelhandmadepapercraft
YOU TUBE: http://www.youtube.com/c/AngelHandmadePapercraft
F A C E B O O K: http://www.facebook.com/angelhandmadepapercraft
PINTEREST: https://www.pinterest.com.au/angelhandmadepapercraft
I was a 2018 Ambassador for Copic Marker Australia and NZ
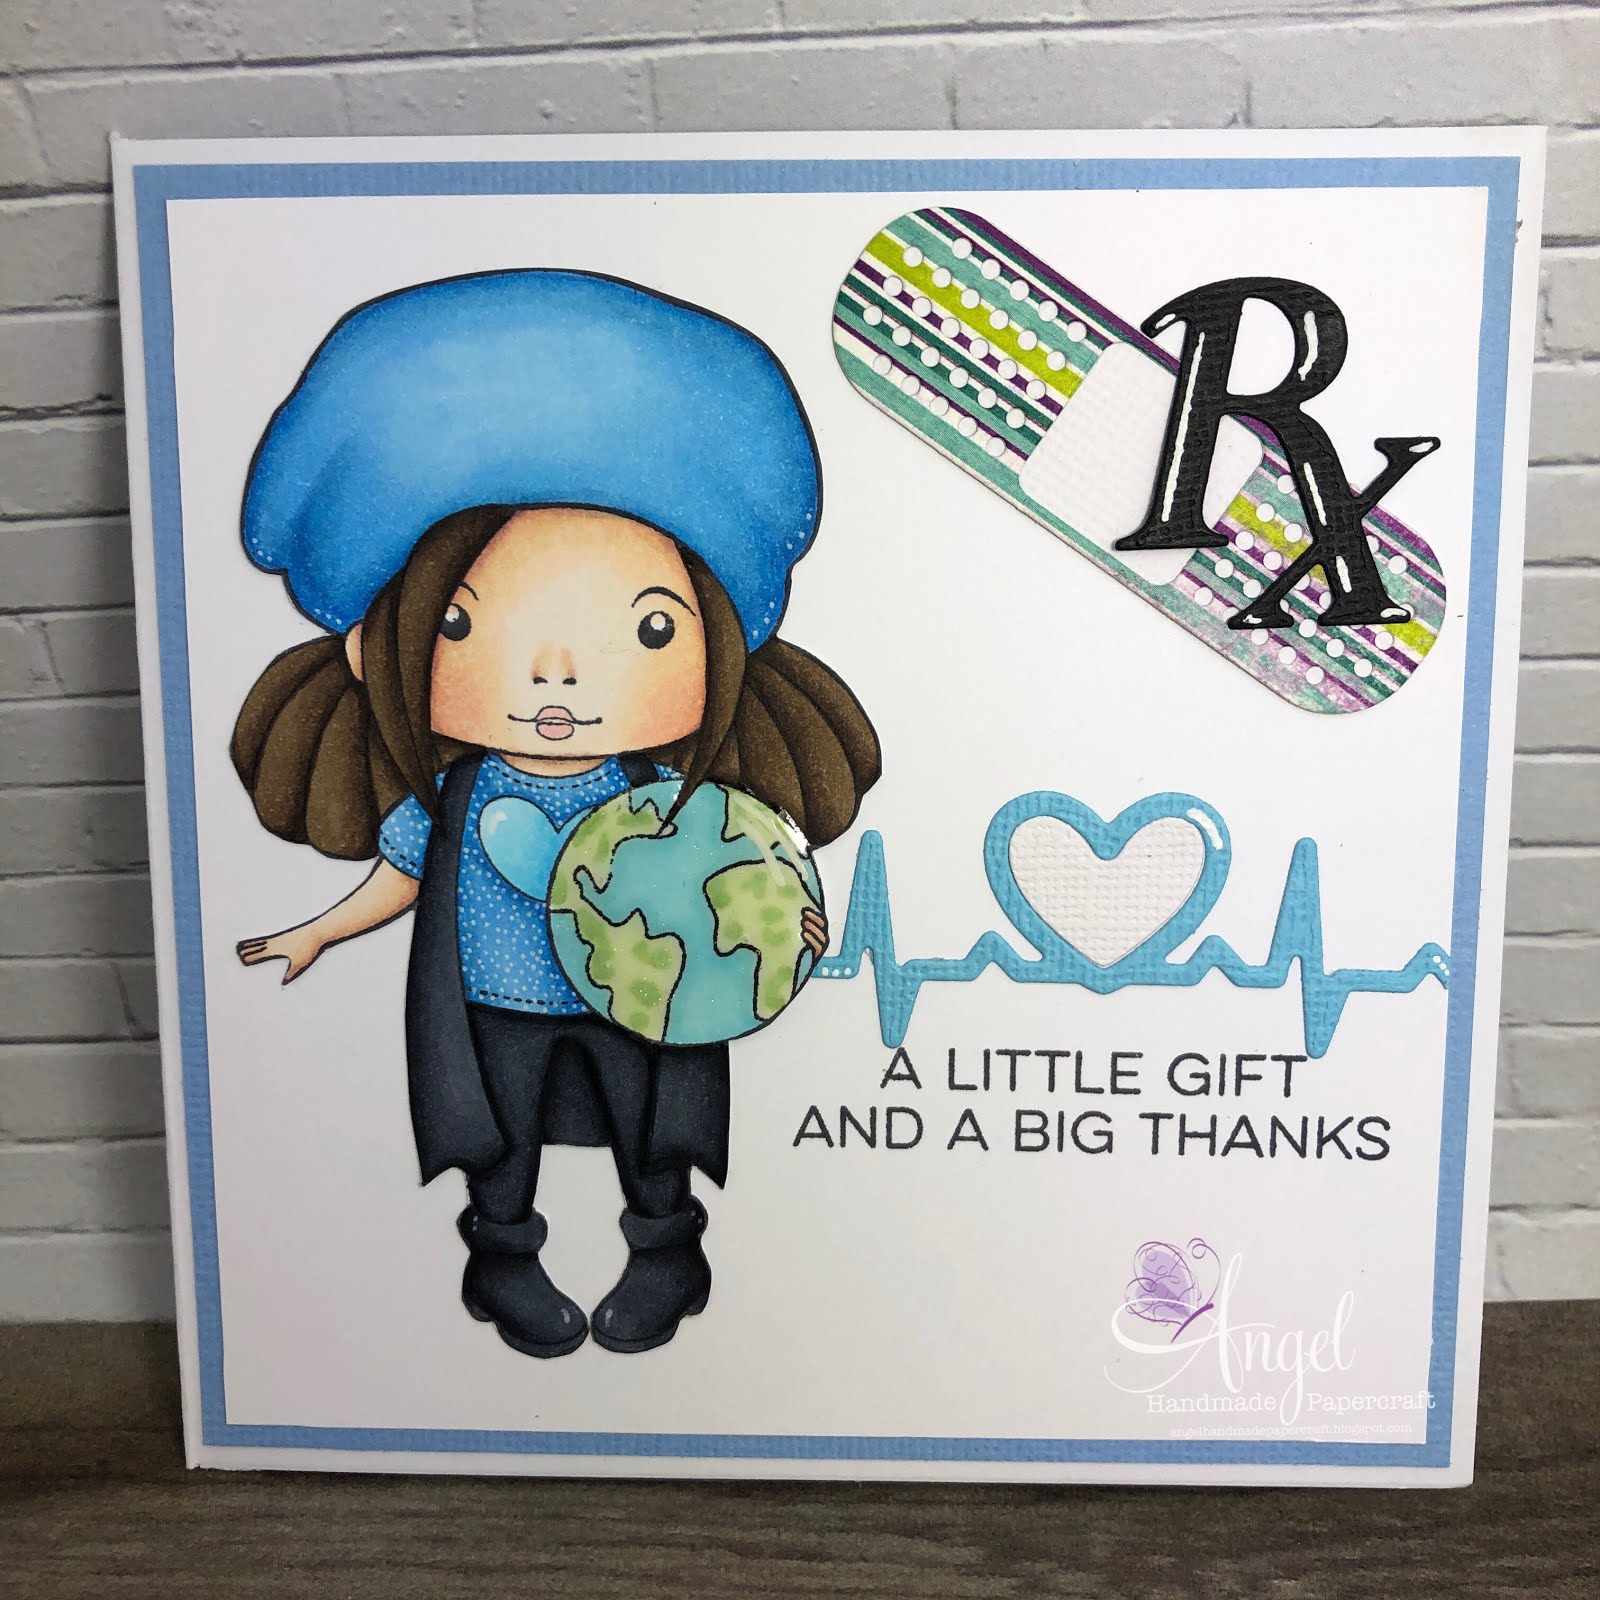
Today I would like to share with you a card I have created for one of the ladies at work who is leaving. I thought World Marci from La La Land Crafts would fit what I had in my mind.
I used a few different bits and pieces for this card which I will have listed in the picture links below.
I started by stamping the image out onto X-Press It Blending Cardstock using Memento Tuxedo Black using my Fiskars Stamping Press.
I then coloured the image up using Copic Markers and fussy cut it out right on the line using my EK Success Cutterbee Scissors. I used Wink Of Stella on the World Globe, added some details to the image and the globe using Uni-Ball Signo White Gel Pen. I then used Mod Podge Dimensional Magic to coat the globe. (I think this is the same as glossy accents for those of you who don't have this product).
I ran the Heart Beat Die from the May Club La La Land Crafts kit through my Sizzix Big Shot using some leftover card stocks from my stash. The band aid and the RX are from the Feb 2016 Club but are now available to purchase separately so I will have those linked up below, I had already previously cut some extras of these so they were just kept inside the stamp packet. The World Marci stamp is from the December 2016 Club.
I used a sentiment from MFT Stamps Gift Card Greetings, I popped it onto a Lawn Fawn Acrylic Block and stamped it onto my card using Memento Tuxedo Black.
I added some detail to the Heart beat and to the RX using my white gel pen, I added the layer to a piece of blue card stock and then adhered everything to a Couture Creations Card Base using Scotch ATG, for the smaller die cuts etc I used American Tombow Mono Multi.
I really love the way that my card turned out and hope my work colleague loves it.
I hope you have enjoyed my post today, if you have any questions feel free to send me a message or contact me via facebook (all links can be found below).
Watch the You Tube Video Here
Products Used On My Card (Affiliate Links Used Where Possible)
CAMERA SET UP - FOR YOU TUBE VIDEOS ONLY
Blue Yeti Microphone
Sony Handycam HDR CX4-05
Tripod – Manfrotto MKCompactaCN-BK
S O C I A L MEDIA
B L O G : http://angelhandmadepapercraft.blogspot.com.au/
I N S T A G R A M : http://instagram.com/angelhandmadepapercraft
YOU TUBE: http://www.youtube.com/c/AngelHandmadePapercraft
F A C E B O O K: http://www.facebook.com/angelhandmadepapercraft
PINTEREST: https://www.pinterest.com.au/angelhandmadepapercraft
I was a 2018 Ambassador for Copic Marker Australia and NZ
Today I am here to share with you a card I made for Whimsy Stamps, we are in the final days of May which means the last few days to share the newest release before we begin a new month.
I am working with PC Fleur, she is from the Pollycraft Collection. I really want to colour her in some softer colours so pulled out more of my Apricot Copic Markers.
Once I had in my mind what I wanted to do a printed my image up onto X-Press It Blending Card and got to work on colouring her up.
After I had coloured her up I ran the image through my Sizzix Big Shot using Spellbinders Nestabilities Labels Eighteen, this is one of my older dies, I did manage to find some to link up to but your best bet would be to look on destash pages in your location.
I cut patterned papers from Pebbles Spring Fling Paper Pad, I loved the soft flowers in these papers, I also cut the sentiment from one of the papers, I also added a doily to break the layers up.
Using American Crafts Cardstock I also cut some mat layers to break the patterns up a little, I adhered all the layers to a Couture Creation Card base using Scotch ATG and American Tombow Mono Multi.
Once I had all my layers togethers I added them to a Couture Creations Card Base. I used Wink Of Stella to finish off my card.
I hope you have enjoyed my post today, if you have any questions feel free to send me a message or contact me via facebook (all links can be found below).
Watch the You Tube Video Here
Products Used On My Card (Affiliate Links Used Where Possible)
CAMERA SET UP - FOR YOU TUBE VIDEOS ONLY
Blue Yeti Microphone
Sony Handycam HDR CX4-05
Tripod – Manfrotto MKCompactaCN-BK
S O C I A L MEDIA
B L O G : http://angelhandmadepapercraft.blogspot.com.au/
I N S T A G R A M : http://instagram.com/angelhandmadepapercraft
YOU TUBE: http://www.youtube.com/c/AngelHandmadePapercraft
F A C E B O O K: http://www.facebook.com/angelhandmadepapercraft
PINTEREST: https://www.pinterest.com.au/angelhandmadepapercraft
I was a 2018 Ambassador for Copic Marker Australia and NZ
A few days ago I shared with you my colouring of Paper Nest Dolls Princess Butterfly Lulu, today I am sharing with you the card process.
I wanted to die cut my image with a spellbinders die but I did not want it to cut my image off so using a Mechanical pencil I traced out the die onto my image so I could see where it was going to cut. I used my EK Success Cutterbee scissor to carefully fussy cut the left side of the image and around the legs and the top of her head. I then put the die onto my Big Shot plates so that it was hanging off the edge and would only cut some of the image.
I then ran it through my Sizzix Big Shot and it turned out exactly as I had planned. I used an eraser to get rid of all the pencil lines.
I ran the next size up die through my Big Shot with some patterned paper from Basic Grey Mint Julep Paper Pad. I layered the image die cut over the patterned paper then used my Cutterpillar Pro to cut down another piece of the patterned paper pad and layered that underneath. I used Scotch ATG to adhere the layers.
Finally I adhered all the layers to a Couture Creation Card Base and added some little hearts to the top of the wand using MFT Stamps Cute Chemists stamp set with Memento Tuxedo Black and an acrylic block from Lawn Fawn.
I added some Mod Podge Dimensional Magic to the hearts, wand and her crown.
At this stage I still wasn't sure what sentiment I wanted to add so I left it to dry and came back to it later. I used Mama Elephant Happy Everything Stamp Set and Happy die to finish it off.
I hope you have enjoyed my post today, if you have any questions feel free to send me a message or contact me via facebook (all links can be found below).
Watch the You Tube Video Here
Products Used On My Card (Affiliate Links Used Where Possible)
CAMERA SET UP - FOR YOU TUBE VIDEOS ONLY
Blue Yeti Microphone
Sony Handycam HDR CX4-05
Tripod – Manfrotto MKCompactaCN-BK
S O C I A L MEDIA
B L O G : http://angelhandmadepapercraft.blogspot.com.au/
I N S T A G R A M : http://instagram.com/angelhandmadepapercraft
YOU TUBE: http://www.youtube.com/c/AngelHandmadePapercraft
F A C E B O O K: http://www.facebook.com/angelhandmadepapercraft
PINTEREST: https://www.pinterest.com.au/angelhandmadepapercraft
I was a 2018 Ambassador for Copic Marker Australia and NZ
We are now into Week 3 of Whimsy Stamps New Releases, today I am working with Penguin Birthday Party, he is one of Crissy Armstrong's images and he is totally adorable.
I printed the image onto X-Press It Blending Cardstock using my Brother laser Printer, this image is also actually available as a rubber stamp so I have linked both up in the picture links below. I then coloured the image up using Copic Markers.
I ran the image through my Sizzix Big Shot using Spellbinders Nestabilities Labels Twenty Two, I have had these dies forever so I have linked up what I could find however you may need to check a destash page to find some available to you.
I cut papers from Party with Amy Locurto - Rainbow 6x6 Paper Pad using my Cutterpillar Pro, I also cut a piece of black cardstock from American Crafts to mat the patterned paper with.
I adhered all the layers to a Couture Creations Card base using Scotch ATG.
I used W Plus 9 Happy Trio dies which I ran through my Big Shot using some leftover black cardstock, it wasn't standing off my card enough so I grabbed some yellow cardstock from my leftovers bin and ran it through again, I then layered them using some American Tombow Mono Multi then adhered to the left hand side of my card. I stamped out the sentiment using Mama Elephant Happy Everything stamp set, a Lawn Fawn Acrylic Block and Memento Tuxedo Black Ink. I used my Tim Holtz Guillotine to cut the sentiment down.
That is my card complete, I also decorated the inside of the card to match.
I hope you have enjoyed my post today, if you have any questions feel free to send me a message or contact me via facebook (all links can be found below).
Watch the You Tube Video Here
Products Used On My Card (Affiliate Links Used Where Possible)
CAMERA SET UP - FOR YOU TUBE VIDEOS ONLY
Blue Yeti Microphone
Sony Handycam HDR CX4-05
Tripod – Manfrotto MKCompactaCN-BK
S O C I A L MEDIA
B L O G : http://angelhandmadepapercraft.blogspot.com.au/
I N S T A G R A M : http://instagram.com/angelhandmadepapercraft
YOU TUBE: http://www.youtube.com/c/AngelHandmadePapercraft
F A C E B O O K: http://www.facebook.com/angelhandmadepapercraft
PINTEREST: https://www.pinterest.com.au/angelhandmadepapercraft
I was a 2018 Ambassador for Copic Marker Australia and NZ
Today I coloured a gorgeous image from Paper Nest Dolls, this is the second one as I also had one done for you yesterday. I haven't had a chance to make her into a card yet however I wanted to share the colouring video with you all.
The picture links below do have the other items I normally use on my cards listed so please just ignore those I didn't want to delete them as I will edit this post later on when the card is complete and I will have a second video for you.
The image I have used today is a Digital Stamp called Butterfly Fairy Lulu, this is the second one I have coloured, I did one yesterday where I loaded a video of real time colouring her. Today I have sped her up and coloured her as a blonde.
I printed her onto X-Press It Blending Cardstock using my Brother Laser Printer and coloured her up using Copic Markers.
If you haven't already subscribed to my video I would love for you to do so and don't forget to hit the like button on the video if you loved it :-)
Catch up with you once these cards are complete.
I hope you have enjoyed my post today, if you have any questions feel free to send me a message or contact me via facebook (all links can be found below).
Watch the You Tube Video Here
Products Used On My Card (Affiliate Links Used Where Possible)
CAMERA SET UP - FOR YOU TUBE VIDEOS ONLY
Blue Yeti Microphone
Sony Handycam HDR CX4-05
Tripod – Manfrotto MKCompactaCN-BK
S O C I A L MEDIA
B L O G : http://angelhandmadepapercraft.blogspot.com.au/
I N S T A G R A M : http://instagram.com/angelhandmadepapercraft
YOU TUBE: http://www.youtube.com/c/AngelHandmadePapercraft
F A C E B O O K: http://www.facebook.com/angelhandmadepapercraft
PINTEREST: https://www.pinterest.com.au/angelhandmadepapercraft
I was a 2018 Ambassador for Copic Marker Australia and NZ
Today I coloured a gorgeous image from Paper Nest Dolls, I haven't had a chance to make her into a card yet however I wanted to share the "real time colouring" video with you all as I really love it.
The picture links below do have the other items I normally use on my cards listed so please just ignore those I didn't want to delete them as I will edit this post later on when the card is complete and I will have a second video for you.
The image I have used today is a Digital Stamp called Butterfly Fairy Lulu, she is a real sweetheart and I was super excited to get her coloured up.
I printed her onto X-Press It Blending Cardstock using my Brother Laser Printer and coloured her up using Copic Markers.
I can't tell you much more until I get her onto a card but you can watch the Real Time Colouring Video below. If you haven't already subscribed to my video I would love for you to do so and don't forget to hit the like button on the video if you loved it :-)
Here is the completed card
I hope you have enjoyed my post today, if you have any questions feel free to send me a message or contact me via facebook (all links can be found below).
Watch the You Tube Video Here
Products Used On My Card (Affiliate Links Used Where Possible)
CAMERA SET UP - FOR YOU TUBE VIDEOS ONLY
Blue Yeti Microphone
Sony Handycam HDR CX4-05
Tripod – Manfrotto MKCompactaCN-BK
S O C I A L MEDIA
B L O G : http://angelhandmadepapercraft.blogspot.com.au/
I N S T A G R A M : http://instagram.com/angelhandmadepapercraft
YOU TUBE: http://www.youtube.com/c/AngelHandmadePapercraft
F A C E B O O K: http://www.facebook.com/angelhandmadepapercraft
PINTEREST: https://www.pinterest.com.au/angelhandmadepapercraft
I was a 2018 Ambassador for Copic Marker Australia and NZ
It is Week 2 of The May New Release Images over at Whimsy Stamps and I am sharing with you a card I have made using Wee Stamps Dreamy Dragon.
This image has previously been released as a Rubber Stamp but this month is released as a Digital Stamp so that is what I have used as part of the Design Team.
I started by printing the image onto X-Press it Blending cardstock using my Brother Laser Printer I then coloured the images using Copic Markers.
Using a Patterned paper pad from Kmart called The Craft Stall I cut two squares then cut a piece of white cardstock to mat the smaller paper with.
I ran the image through my Sizzix Big Shot using Lawn Fawn Stitched Circle Die, it fit perfectly.
I used some more dies on my card - MFT Stamp Puffy Clouds and MFT Stamps Birch Trees, I ran them both through my Big Shot using American Crafts white cardstock, I ran the tree through again using some Kraft Cardstock.
I adhered the bigger layers to a Couture Creations Card base using Scotch ATG, then I added the trees and the clouds using American Tombow Mono Multi Liquid Adhesive, Finally I added the image using Scotch ATG.
I stamped the word happy out onto some white cardstock.. I didn't end up using this as it was going to cover too much of my image, I ended up re-stamping onto some Vellum and used my EK Success Cutterbee Scissors to fussy cut.. I had to be really careful because the sentiment was actually this still wet. I carefully added some Tombow liquid adhesive to the back of the Vibessentiment and used my Silhouette Pick Me Up Tool to drop it onto my happy.
I carefully used the sticky end to hold the happy sentiment and added some Tombow adhesive to the back very small amounts and only when the thicker parts of the lines are so that you would see it through the front. I then carefully popped it on top of the image. I then used the reverse of the tool to go around and carefully push it on as like I said it was still wet and I didn't want to smudge it.
I added some Uni-ball white gel pen to my image and I was done.
I hope you have enjoyed my post today, if you have any questions feel free to send me a message or contact me via facebook (all links can be found below).
Watch the You Tube Video Here
Products Used On My Card (Affiliate Links Used Where Possible)
CAMERA SET UP - FOR YOU TUBE VIDEOS ONLY
Blue Yeti Microphone
Sony Handycam HDR CX4-05
Tripod – Manfrotto MKCompactaCN-BK
S O C I A L MEDIA
B L O G : http://angelhandmadepapercraft.blogspot.com.au/
I N S T A G R A M : http://instagram.com/angelhandmadepapercraft
YOU TUBE: http://www.youtube.com/c/AngelHandmadePapercraft
F A C E B O O K: http://www.facebook.com/angelhandmadepapercraft
PINTEREST: https://www.pinterest.com.au/angelhandmadepapercraft
I was a 2018 Ambassador for Copic Marker Australia and NZ
Today I have been having fun playing with MFT Stamps Cute Chemists stamp set, I stamped quite a few of them out onto X-Press It Blending Card using my Misti Stamping Tool and Memento Tuxedo Black.
I will be featuring each of the cards over the next week so I hope I don't bother you too much :-p
For this first card I stamped the images together in a scene including the heart stamp set and the glasses onto their faces, I then coloured the images up using Copic Markers. I used a white gel pen to add details to the images.
I added some Mod Podge Dimensional Magic onto the glasses, I think this is like Glossy Accents..
I was doing a few things at the time which gave the glasses time to dry and I was able to get the card finished on the same time.
I cut a piece of American Crafts Black Cardstock down on my Cutterpillar Pro. Using MFT Stamps Lots of Heart Stencil I layed it over the black cardstock and using a Mini Blending Tool and Distress Oxide Ink in Picked Raspberry. This is the first time i've used the Oxide Ink over a stencil, It doesn't bring out the colour very well but I still love softness of it. The ink dried really quickly which is cool.
I stamped out the sentiment using a Lawn Fawn Acrylic Block onto an excess piece of the blending card and cut it down to fit the front of my card.
I really love the way this card turned out and can't wait to show you the rest of the cards I have created with this stamp set.
I hope you have enjoyed my post today, if you have any questions feel free to send me a message or contact me via facebook (all links can be found below).
Watch the You Tube Video Here (Video to Come)
Products Used On My Card (Affiliate Links Used Where Possible)
CAMERA SET UP - FOR YOU TUBE VIDEOS ONLY
Blue Yeti Microphone
Sony Handycam HDR CX4-05
Tripod – Manfrotto MKCompactaCN-BK
S O C I A L MEDIA
B L O G : http://angelhandmadepapercraft.blogspot.com.au/
I N S T A G R A M : http://instagram.com/angelhandmadepapercraft
YOU TUBE: http://www.youtube.com/c/AngelHandmadePapercraft
F A C E B O O K: http://www.facebook.com/angelhandmadepapercraft
PINTEREST: https://www.pinterest.com.au/angelhandmadepapercraft
I was a 2018 Ambassador for Copic Marker Australia and NZ
Today I thought whilst I was caught up on all my Design Team projects I would sit and colour and get some more cards made up for my shop.
I am using a new to me stamp set from MF T Stamps called Butterfly Kisses, such a super sweet image to colour up, I didn't use the butterfly catcher just the actual image and one of the sentiments.
I inked the image up using Memento Tuxedo Black and stamped it out using my Misti Stamping Tool onto X-Press It Blending Cardstock, then coloured the image up using Copic Markers.
I fussy cut the image out using my EK Success Cutterbee Scissors, I enjoy fussy cutting but have linked up the die for those of you wanting to purchase the matching die set.
I grabbed a doily and layed out the sentiment and the image and adhered them into place. I needed more on the card, I stamped out some images from Simon Says Stamp Happy Days then ran them through my Sizzix Big Shot with the dies. I coloured them up using Copic Markers.
I cut down some patterned papers from a paper pad from The Craft Stall using my Cutterpillar Pro.
I used a white gel pen to add details to the images and some Wink Of Stella. I then adhered all the layers to a Couture Creations card base.
I hope you have enjoyed my post today, if you have any questions feel free to send me a message or contact me via facebook (all links can be found below).
Watch the You Tube Video Here
Products Used On My Card (Affiliate Links Used Where Possible)
CAMERA SET UP - FOR YOU TUBE VIDEOS ONLY
Blue Yeti Microphone
Sony Handycam HDR CX4-05
Tripod – Manfrotto MKCompactaCN-BK
S O C I A L MEDIA
B L O G : http://angelhandmadepapercraft.blogspot.com.au/
I N S T A G R A M : http://instagram.com/angelhandmadepapercraft
YOU TUBE: http://www.youtube.com/c/AngelHandmadePapercraft
F A C E B O O K: http://www.facebook.com/angelhandmadepapercraft
PINTEREST: https://www.pinterest.com.au/angelhandmadepapercraft
I was a 2018 Ambassador for Copic Marker Australia and NZ
Something a little different for me today, I don't have a video for you just wanted to share what I have been working on.
I needed some baby cards for my stash so I pulled out my Mama Elephant Flying with friends stamp set, I love the little elephants. I needed a few sentiments so I grabbed my Neat and Tangled Itty Bitty Welcoming Committee Stamp Set.
For the "Baby" die cut I used MFT Stamps Oh Baby dies, I ran it through multiple times using X-Press It Blending Card off cuts, this was everything was all matching.
I ran the MFT Stamps Puffy Clouds through using more excess X-Press It and my Sizzix Big Shot.
I stamped out Welcome and Congrats multiple times using Memento Tuxedo Black and acrylic blocks onto X-Press It Blending Card.
I stamped out many difference colours of Distress Ink onto my glass media mat and sprayer water onto them, I then used some excess stamp packaging to smudge from the media mat onto my card bases.
I stamped out a heap of the images using Memento Tuxedo Black and my Misti Stamping Tool, I stamped them onto X-Press It Blending Card and used my EK Success Cutterbee Scissors to fussy cut all the images out. I then coloured them all up using Copic Markers.
I used American Tombow Mono Multi and Scotch ATG to put my cards together, finally I used Tonic Studios Nuvo Crystal Drops to finish my cards off.
I hope you have enjoyed my post today, if you have any questions feel free to send me a message or contact me via facebook (all links can be found below).
Products Used On My Card (Affiliate Links Used Where Possible)
CAMERA SET UP - FOR YOU TUBE VIDEOS ONLY
Blue Yeti Microphone
Sony Handycam HDR CX4-05
Tripod – Manfrotto MKCompactaCN-BK
S O C I A L MEDIA
B L O G : http://angelhandmadepapercraft.blogspot.com.au/
I N S T A G R A M : http://instagram.com/angelhandmadepapercraft
YOU TUBE: http://www.youtube.com/c/AngelHandmadePapercraft
F A C E B O O K: http://www.facebook.com/angelhandmadepapercraft
PINTEREST: https://www.pinterest.com.au/angelhandmadepapercraft
I was a 2018 Ambassador for Copic Marker Australia and NZ
Today I am sharing with you Baby Giraffe from Whimsy Stamps, I used the Digital Version of this stamp however there is a Rubber Stamp version if you prefer that. Me i'm not partial to either, I love them both. I have however used the Digital Stamp on this card today. I will link them both up in the picture links below
I printed the image onto X-Press It Blending Cardstock using my Brother Laser Printer then proceeded to colour it up with Copic Markers.
Using a Background Stamp from My Favourite Things called Giraffe, I layed it onto my desk and inked it up using Memento Rich Cocoa, I used some yellow card stock from American Crafts. I turned the cardstock over so the patterned side would be on the stamp and carefully rubbed the ink onto the card stock. It didn't take long to dry since it was Memento ink.
I cut some brown and white matte cardstock layers using my Cutterpillar Pro. I added a doily and some gold ribbon in between the layers.
Finally a ran through the number 1 die from MFT Stamps Big Numbers in my Sizzix Big Shot and adhered it using American Tombow Mono Multi.
I added all the layers to a Couture Creations card base using my ATG.
I used my Uni-Ball white gel pen to add some details and that was my card complete.
I hope you have enjoyed my post today, if you have any questions feel free to send me a message or contact me via facebook (all links can be found below).
Watch the You Tube Video Here
Products Used On My Card (Affiliate Links Used Where Possible)
CAMERA SET UP - FOR YOU TUBE VIDEOS ONLY
Blue Yeti Microphone
Sony Handycam HDR CX4-05
Tripod – Manfrotto MKCompactaCN-BK
S O C I A L MEDIA
B L O G : http://angelhandmadepapercraft.blogspot.com.au/
I N S T A G R A M : http://instagram.com/angelhandmadepapercraft
YOU TUBE: http://www.youtube.com/c/AngelHandmadePapercraft
F A C E B O O K: http://www.facebook.com/angelhandmadepapercraft
PINTEREST: https://www.pinterest.com.au/angelhandmadepapercraft
I was a 2018 Ambassador for Copic Marker Australia and NZ