Thursday 31 October 2019

Picket Fence Studios - You are a Hoot

Hi Everyone,

I made this card a little while ago however I forgot to post it.. so here we go :-)


I stamped this little guy out onto X-Press It Blending Card stock using Memento Tuxedo Black in my Misti Stamping Tool.

Once I stamped the images out I popped them onto an acrylic block and used my Hero Arts Scrubber Pad to clean my stamps.

I coloured the images up using Copic Markers, it is only a small image so it didn't take too many markers to colour.. although I did try to squeeze in as many as I could :-)


I used my EK Success Cutterbee Scissors to fussy cut the images out, I did stamp and colour 2 as I was planning on making multiple cards but you will only see the one card I ended up making.


I used MFT Stamps Stacking Stars and ran it through my Sizzix Big Shot using some leftover card stock. 


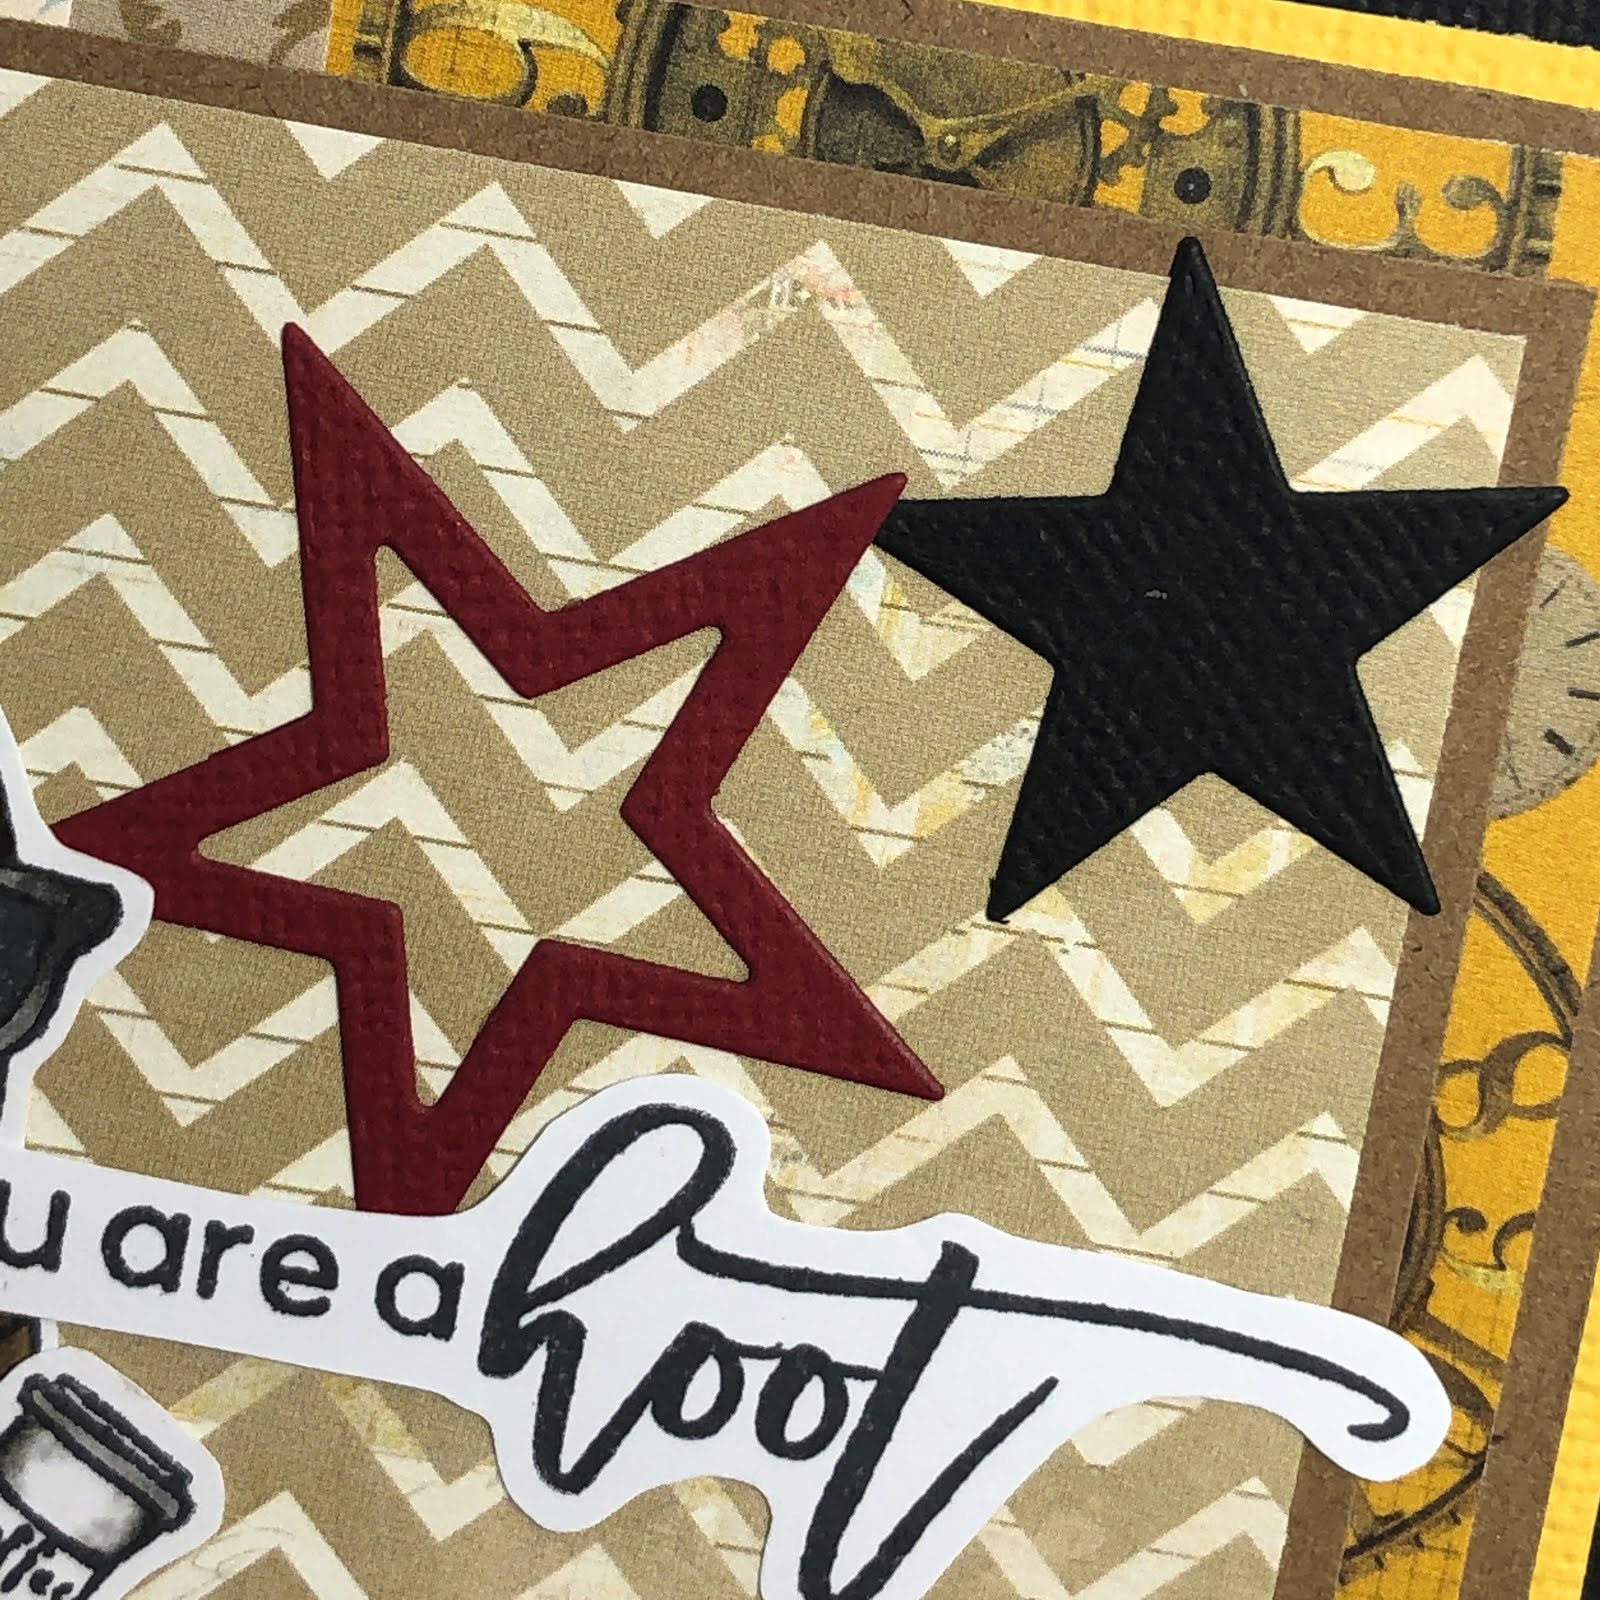
There was some leftover scraps so I used my Martha Stewart Heart Confetti punch to punch out some hearts (you will see this in the video but I didn't end up using any).


I used patterned paper from Bo Bunny The Avenues Collection 6x6 Paper Pad and matted them using some American Crafts card stock. 

I stamped out the sentiment onto some leftover X-Press It Blending Card using the same Memento Tuxedo Black and fussy cut it using my Cutterbee Scissors.

I decorated the inside of the card with the same papers to match the front of the card. 


I hope you have enjoyed my post today, if you have any questions feel free to send me a message or contact me via facebook (all links can be found below).

Watch the You Tube Video Here


Products Used On My Card (Affiliate Links Used Where Possible)


Copic Markers Used

T4, T6, 0 Colorless Blender
T6, T8, T10
E44, E47, E49
R17, R37, R39

Thanks for stopping by, Deni

CAMERA SET UP - FOR YOU TUBE VIDEOS ONLY
Blue Yeti Microphone
Sony Handycam HDR CX4-05
Tripod – Manfrotto MKCompactaCN-BK

S O C I A L MEDIA 
B L O G : https://ldli.co/e/3xky6x
I N S T A G R A M : https://ldli.co/e/5dn20x
YOU TUBE: https://ldli.co/e/ej5l90 
F A C E B O O K: https://ldli.co/e/mjxn2r
PINTEREST: https://ldli.co/e/2l9zom


I was a 2018 Ambassador for Copic Marker Australia and NZ


Sunday 27 October 2019

Whimsy Stamps - Snowman's Birdie

Hey Everyone :-)

Today are celebrating Christmas early with Snowman's Birdie Friend from Whimsy Stamps.


Such an adorable little image, and so fun to colour up.


This is a Digital stamp so I printed it out onto X-Press It Blending Card stock using my Brother Laser Printer, printing on my laser printer allows the image to be Copic friendly and no bleeding occurs.


I cut some mat layers using American Crafts Card Stock on my Cutterpillar Pro.

Patterned papers are from Kaisercraft Silver Bells 6x6 Paper Pad, I love this bauble paper it's so pretty.


I added some ribbons from my large stash that i've held onto for years.

The sentiment is from Lawn Fawn Winter Big Scripty Words stamp set, I stamped it out onto some leftover X-Press It Blending Cardstock using MFT Hybrid Black Licorice ink. This ink is a hybrid meaning you can use it for alcohol inks and watercolours, it's basically great for any colouring.


I don't have the dies for this stamp set so I used my EK Success Cutterbee Scissors to fussy cut the sentiment, I wasn't sure about it so I used some Glue Dots Repositionable Adhesive dots and added it to some of the leftover blue cardstock, I then fussy cut a shadow layer. Once I realised I was happy with it I used some more permanent adhesive.


I ran the image through my Sizzix Big Shot using Lawn Fawn Stitched Circle dies.

Using Scotch ATG I adhered all the layers down to a Couture Creations Card Base and finally I used some W Plus 9 Enamel Dots.


I decorated my card to match and my card was complete.


I hope you have enjoyed my post today, if you have any questions feel free to send me a message or contact me via facebook (all links can be found below).

Watch the You Tube Video Here


Products Used On My Card (Affiliate Links Used Where Possible)


Copic Markers Used

T2, T4,0, R20
T6, T8, T10
R05, R35, R39
G03, G09
B12, B14, B16
YR14, YR16


Thanks for stopping by, Deni

CAMERA SET UP - FOR YOU TUBE VIDEOS ONLY
Blue Yeti Microphone
Sony Handycam HDR CX4-05
Tripod – Manfrotto MKCompactaCN-BK

S O C I A L MEDIA 
B L O G : https://ldli.co/e/3xky6x
I N S T A G R A M : https://ldli.co/e/5dn20x
YOU TUBE: https://ldli.co/e/ej5l90 
F A C E B O O K: https://ldli.co/e/mjxn2r
PINTEREST: https://ldli.co/e/2l9zom


I was a 2018 Ambassador for Copic Marker Australia and NZ


Saturday 26 October 2019

Whimsy Stamps - Reindeer Farts

Hi Everyone

Today I hope you have a great sense of humour, I am sharing with you a new digital image from Whimsy Stamps called Reindeer Farts.


Such a great image, funny and cute all in one.


I cut mat layers from American Crafts Cardstock and some Francheville Kraft Cardstock. 


I used patterned papers from American Crafts Hollyday Paper pad. and also used some leftover strips from the same paper pad to create some banners for the top of the card.


I used my Uni-Ball white gel pen to add details to my image.


I decorate the inside of the card to match using leftover patterned papers.


I hope you have enjoyed my post today, if you have any questions feel free to send me a message or contact me via facebook (all links can be found below).

Watch the You Tube Video Here


Products Used On My Card (Affiliate Links Used Where Possible)


Copic Markers Used

R05, R35, R39
W1, W4
T2, T4,0
T6, T8, T10
E35, E37, E39
BG0000

Thanks for stopping by, Deni

CAMERA SET UP - FOR YOU TUBE VIDEOS ONLY
Blue Yeti Microphone
Sony Handycam HDR CX4-05
Tripod – Manfrotto MKCompactaCN-BK

S O C I A L MEDIA 
B L O G : https://ldli.co/e/3xky6x
I N S T A G R A M : https://ldli.co/e/5dn20x
YOU TUBE: https://ldli.co/e/ej5l90 
F A C E B O O K: https://ldli.co/e/mjxn2r
PINTEREST: https://ldli.co/e/2l9zom


I was a 2018 Ambassador for Copic Marker Australia and NZ


Thursday 24 October 2019

Helmar - La La Land Crafts - Deck The Halls

Good Morning Everyone,

Today I am super excited to share with you that I have joined the Helmar Design Team - Helmar is an adhesive company from Australia, they have an Australian Website and an American Website, I have linked both of them up in the picture links at the bottom of my blog post.


On my card today I have used Helmar Acid Free, this is the first time I have actually used this one of their glues and I must say I really like it, and you do not need to apply much of it at all.


I began by using a scrap piece of paper to stamp out a rough idea of my image layout, it didn't matter if the images were all stamped over each other as like I said it was just s scrap idea set out. The stamp set I have used is La La Land Crafts Deck The Halls.

Using Full Adhesive Post It Notes (I can't find my masking paper anywhere) I stamped out all the images, with the presents I stamped them out a couple of times as I knew I would be stamping a few out and would need them masked off to make my scene.

I stamped out the presents first onto X-Press It Blending Cardstock as I wanted those at the front of my scene, I then stamped the Tree and my hippo, applying each of the masks as I went along. I left all the masks on my images and used Ranger Mini Distress Inks in Twisted Citron and Squeezed Lemonade and a Mini Ink Blending Tool and blended the ink in a circular motion around the images.


I trimmed the baubles and the lights out of the Christmas Tree mask and applied them on the image so I could Copic flick the tree over the top instead of trying to go around them.

Using my Uni-Ball white gel pens (I used the fine tip and the broad) I added details to the images and to the Christmas Tree.


I coloured all the images up using Copic Markers, once I had everything coloured up I added some Wink Of Stella Clear to a few sections of the image and around the outside of the images.


I ran the image scene through my Sizzix Big Shot using a Lawn Fawn Stitched Circle Die.

I cut a few layers of patterned paper from Kaisercraft Starry Night 6.5" Paper Pad, I then cut mat layers from American Crafts Black Card Stock.


I adhered all the layers together using Helmar Acid Free Adhesive then used the same adhesive to adhere all those layers to a Couture Creations Card Base.


I cut some leftovers of the same patterned papers, and a rectangle of white card stock to finish off the card.


I hope you have enjoyed my post today, if you have any questions feel free to send me a message or contact me via facebook (all links can be found below).

Watch the You Tube Video Here


Products Used On My Card (Affiliate Links Used Where Possible)


Copic Markers Used

C00, C2, C4, V01
YR31, Y17, YR27
N6, N8, N10
W00, W1, W4, 0
R24, R29
E27, E77, E79
G14, G16, G19

Thanks for stopping by, Deni

CAMERA SET UP - FOR YOU TUBE VIDEOS ONLY
Blue Yeti Microphone
Sony Handycam HDR CX4-05
Tripod – Manfrotto MKCompactaCN-BK

S O C I A L MEDIA 
B L O G : https://ldli.co/e/3xky6x
I N S T A G R A M : https://ldli.co/e/5dn20x
YOU TUBE: https://ldli.co/e/ej5l90 
F A C E B O O K: https://ldli.co/e/mjxn2r
PINTEREST: https://ldli.co/e/2l9zom


I was a 2018 Ambassador for Copic Marker Australia and NZ


Wednesday 23 October 2019

Whimsy Stamps - Give Thanks Cinnamon

How gorgeous is this little one from Whimsy Stamps, this is Cinnamon with Pumpkin, I have paired her up with the Thanks Sentiment from MFT Stamps Kind Thanks stamp set.


I printed the image onto X-Press It Blending Cardstock using my Brother Laser Printer, I coloured her up using Copic Markers and then used my EK Success Scissors to fussy cut her out.


I stamped the sentiment out onto some more of the X-Press It Blending Cardstock using the MFT Hybrid Black Licorice Ink. I then used my scissors to fussy cut the word out.


Using Pebbles Spring Fling 6x6 Paper Pad I cut some pieces down to size and layered them onto some American Crafts and Francheville Cardstocks.


I used a Stitched Circle die from Lawn Fawn to cut a small circle from one of the patterned papers which I then layered onto a doily from my stash.


Adhered the image and sentiment to the patterned papers using American Tombow Mono Multi Liquid Adhesive and then adhered all the layers to a Couture Creations Card Base using Scotch ATG.


Finally adhering some enamel dots from W Plus 9 Autumn collection to the card.


I decorated the inside of the card to match using matching papers.

I hope you have enjoyed my post today, if you have any questions feel free to send me a message or contact me via facebook (all links can be found below).

Watch the You Tube Video Here


Products Used On My Card (Affiliate Links Used Where Possible)


Copic Markers Used

E000, E00, E21, E11, E04, R20
G14, YG09
YR02, YR16, E09
E42, E44
R81, R83, R85
E23 E25, E27, E29
E74, E09

Thanks for stopping by, Deni

CAMERA SET UP - FOR YOU TUBE VIDEOS ONLY
Blue Yeti Microphone
Sony Handycam HDR CX4-05
Tripod – Manfrotto MKCompactaCN-BK

S O C I A L MEDIA 
B L O G : https://ldli.co/e/3xky6x
I N S T A G R A M : https://ldli.co/e/5dn20x
YOU TUBE: https://ldli.co/e/ej5l90 
F A C E B O O K: https://ldli.co/e/mjxn2r
PINTEREST: https://ldli.co/e/2l9zom


I was a 2018 Ambassador for Copic Marker Australia and NZ


Tuesday 22 October 2019

Whimsy Stamps - Shelley

Hi All :-)

Today I am sharing a sweet little Birthday card I made using "Shelley" from Whimsy Stamps.


I printed her onto X-Press It Blending Card using my Brother Laser Printer and I coloured her up using Copic Markers.


Using Doodlebug Sweet Shoppe I cut patterned paper to size, I also cut some banners for down the left of my card.


I stamped the sentiment on one of the strips using Mama Elephant Birthday Messages, Memento Tuxedo Black and an acrylic block.


I used Uni-Ball white gel pen and Wink of Stella to add details to my card.


I adhered all the layers to a Couture Creations Card Base using Scotch ATG.


I hope you have enjoyed my post today, if you have any questions feel free to send me a message or contact me via facebook (all links can be found below).

Watch the You Tube Video Here


  Products Used On My Card (Affiliate Links Used Where Possible)


Copic Markers Used

E000, E00, E21, E11, E04 R20
R00, R01, R02
V000, V01
E81, E84, E87
G000, G21, G24, G05
B0000, B000, B01
BG000, C1
BG02, BG05, BG07, 0 Colorless Blender
E70, E74, E77, E79

Thanks for stopping by, Deni

CAMERA SET UP - FOR YOU TUBE VIDEOS ONLY
Blue Yeti Microphone
Sony Handycam HDR CX4-05
Tripod – Manfrotto MKCompactaCN-BK

S O C I A L MEDIA 
B L O G : https://ldli.co/e/3xky6x
I N S T A G R A M : https://ldli.co/e/5dn20x
YOU TUBE: https://ldli.co/e/ej5l90 
F A C E B O O K: https://ldli.co/e/mjxn2r
PINTEREST: https://ldli.co/e/2l9zom


I was a 2018 Ambassador for Copic Marker Australia and NZ