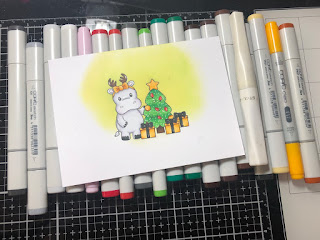
Today I am super excited to share with you that I have joined the Helmar Design Team - Helmar is an adhesive company from Australia, they have an Australian Website and an American Website, I have linked both of them up in the picture links at the bottom of my blog post.
On my card today I have used Helmar Acid Free, this is the first time I have actually used this one of their glues and I must say I really like it, and you do not need to apply much of it at all.
I began by using a scrap piece of paper to stamp out a rough idea of my image layout, it didn't matter if the images were all stamped over each other as like I said it was just s scrap idea set out. The stamp set I have used is La La Land Crafts Deck The Halls.
Using Full Adhesive Post It Notes (I can't find my masking paper anywhere) I stamped out all the images, with the presents I stamped them out a couple of times as I knew I would be stamping a few out and would need them masked off to make my scene.
I stamped out the presents first onto X-Press It Blending Cardstock as I wanted those at the front of my scene, I then stamped the Tree and my hippo, applying each of the masks as I went along. I left all the masks on my images and used Ranger Mini Distress Inks in Twisted Citron and Squeezed Lemonade and a Mini Ink Blending Tool and blended the ink in a circular motion around the images.
I trimmed the baubles and the lights out of the Christmas Tree mask and applied them on the image so I could Copic flick the tree over the top instead of trying to go around them.
Using my Uni-Ball white gel pens (I used the fine tip and the broad) I added details to the images and to the Christmas Tree.
I coloured all the images up using Copic Markers, once I had everything coloured up I added some Wink Of Stella Clear to a few sections of the image and around the outside of the images.
I ran the image scene through my Sizzix Big Shot using a Lawn Fawn Stitched Circle Die.
I cut a few layers of patterned paper from Kaisercraft Starry Night 6.5" Paper Pad, I then cut mat layers from American Crafts Black Card Stock.
I adhered all the layers together using Helmar Acid Free Adhesive then used the same adhesive to adhere all those layers to a Couture Creations Card Base.
I cut some leftovers of the same patterned papers, and a rectangle of white card stock to finish off the card.
I hope you have enjoyed my post today, if you have any questions feel free to send me a message or contact me via facebook (all links can be found below).
Watch the You Tube Video Here
Products Used On My Card (Affiliate Links Used Where Possible)

Copic Markers Used
C00, C2, C4, V01
YR31, Y17, YR27
N6, N8, N10
W00, W1, W4, 0
R24, R29
E27, E77, E79
G14, G16, G19
Thanks for stopping by, Deni
CAMERA SET UP - FOR YOU TUBE VIDEOS ONLY
Blue Yeti Microphone
Sony Handycam HDR CX4-05
Tripod – Manfrotto MKCompactaCN-BK
S O C I A L MEDIA
B L O G : https://ldli.co/e/3xky6x
I N S T A G R A M : https://ldli.co/e/5dn20x
YOU TUBE: https://ldli.co/e/ej5l90
F A C E B O O K: https://ldli.co/e/mjxn2r
PINTEREST: https://ldli.co/e/2l9zom
I was a 2018 Ambassador for Copic Marker Australia and NZ


No comments:
Post a Comment
Thankyou for stopping by, your comments mean a lot to me and I look forward to reading them :-)
Deni