Saturday, 28 September 2019

Whimsy Stamps - There's A Penguin in The Pumpkin Patch

Hi Everyone!

Today I have a super cute Whimsy Stamps card to share with you using Penguin Pumpkin Patch, one of the more recent Digital Release images.


I printed the image onto X-Press It Blending Cardstock using my Brother Laser Printer, then proceeded to colour the image up using Copic Markers.


I added some leftover orange cardstock behind the image, trimming it down so you could only see the top and bottom of the orange.


I cut a black and a white mat layer from American Crafts Cardstock and a Kraft Layer using Francheville Cardstock. The patterned papers are from Kaisercraft Miss Match Collection. I layered them up using Scotch ATG. I also cut some leftover pieces down to create banners.


I added a doily from my stash using American Tombow Mono Multi Liquid adhesive.I then layer down the image over the top.


I cut down a strip of vellum, using a sentiment from MFT Stamps Kind Thanks sentiment set, some Zing Embossing Powder in Metallic Finish, Versamark Watermark Ink Pad and a Lawn Fawn Acrylic Block, I then used my heat tool to melt the embossing powder. I wrapped the vellum around my card and carefully used a small dab of liquid adhesive under the ends to adhere it to my card.


I ran Lawn Fawn Stitched Leaves through my Sizzix Big Shot using some leftover brown cardstock and some vellum and layered them up and adhered them using American Tombow Mono Multi Liquid adhesive. I finally adhered all the layers to a a Couture Creations Card base.


I decorated the inside using leftovers of the patterned papers.


I hope you have enjoyed my post today, if you have any questions feel free to send me a message or contact me via facebook (all links can be found below).

Watch the You Tube Video Here


Products Used On My Card (Affiliate Links Used Where Possible)


Copic Markers Used

W0, W4, 0
T2, T4, 0, R20
T6, T8, T10
YR12, YR14, YR18, E09, E23
YR12, YR14, YR16
E13, E97, E25, G94
G94, BG96, G99

Thanks for stopping by, Deni

CAMERA SET UP - FOR YOU TUBE VIDEOS ONLY
Blue Yeti Microphone
Sony Handycam HDR CX4-05
Tripod – Manfrotto MKCompactaCN-BK

S O C I A L MEDIA 
B L O G : https://ldli.co/e/3xky6x
I N S T A G R A M : https://ldli.co/e/5dn20x
YOU TUBE: https://ldli.co/e/ej5l90 
F A C E B O O K: https://ldli.co/e/mjxn2r
PINTEREST: https://ldli.co/e/2l9zom


I was a 2018 Ambassador for Copic Marker Australia and NZ


Thursday, 26 September 2019

La La Land Crafts - Colouring Instructions - Knight Luka

Hi Everyone

Today I have a colouring video for you to watch, my new friend Heather wanted to watch something a little slower, unfortunately with the amount of time it takes me to colour these images I still had to speed it up a little bit.

Here is some step by step pictures of along the way.


This is Luka from La La Land Crafts, I have used the Knight Luka image, he is available as a Rubber Stamp and a Digital, I have both versions linked in the picture links below.

First I started on the skin, using E000, E00, E21, E11, E04, R20


Then I started working on the Grey areas, I used N0, N2, N4, N6


I jumped onto the purple areas using V04, V06, V09, then went back and completed the grey areas


Next I've used the YR markers to colour the gold areas - I have used YR21, YR24, YR27


Lastly I coloured his hair using E74, E77, E79


The image is now complete


I hope you have enjoyed my post today, if you have any questions feel free to send me a message or contact me via facebook (all links can be found below).

Watch the You Tube Video Here


Products Used On My Card (Affiliate Links Used Where Possible)


Copic Markers Used

YR21, YR24, YR27
V04, V06, V09
N0, N2, N4, N6
E74, E77, E79
E000, E00, E21, E11, E04, R20


Thanks for stopping by, Deni

CAMERA SET UP - FOR YOU TUBE VIDEOS ONLY
Blue Yeti Microphone
Sony Handycam HDR CX4-05
Tripod – Manfrotto MKCompactaCN-BK

S O C I A L MEDIA 
B L O G : https://ldli.co/e/3xky6x
I N S T A G R A M : https://ldli.co/e/5dn20x
YOU TUBE: https://ldli.co/e/ej5l90 
F A C E B O O K: https://ldli.co/e/mjxn2r
PINTEREST: https://ldli.co/e/2l9zom


I was a 2018 Ambassador for Copic Marker Australia and NZ


Saturday, 21 September 2019

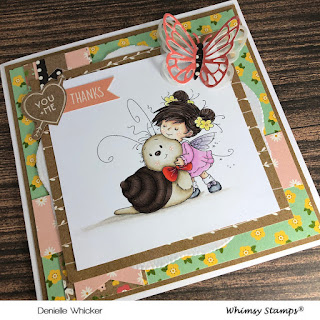
Whimsy Stamps - Love You Slow Much

Hi Everyone, Welcome to my blog.

Today I am sharing with you a card I have create using Love You Slow Much, a new image to the Whimsy Digital Collection, previously released as a Rubber Stamp.


I have linked up below both of the options for those of you who prefer one over the other.


I printed the image onto X-Press It Blending Cardstock using my Brother Laser Printer then proceeded to colour the image up using my Copic Markers.


I added some Wink Of Stella Clear and a Uni-Ball white gel pen to add extra detail to the image.


I used a patterned papers from Pebbles Inc Spring Fling Collection and I also cut the heart from the same patterned paper pad. I cut some of the strips into banners using my Ek Success Cutterbee Scissors and I cut all the layers using my Cutterpillar Pro.


I used Francheville Kraft Cardstock to cut a mat layer and added a doily underneath the image.


I ran Lawn Fawn Layered Butterflies dies through my Sizzix Big Shot using the same patterned paper pad from above.

I adhered all the bigger layers using Scotch ATG and the smaller bits and pieces including the butterfly using American Tombow Mono Multi liquid Adhesive.


Finally using a Couture Creations Card Base I adhered all the layers together using Scotch ATG.

I decorate the inside of the card using leftover products from the front of the card.


I hope you have enjoyed my post today, if you have any questions feel free to send me a message or contact me via facebook (all links can be found below).

Watch the You Tube Video Here


Products Used On My Card (Affiliate Links Used Where Possible)


Copic Markers Used

E000, E00, E21, E11, E04, R20
E40, E42, E44
E74, E77, E79
R05, R35, R39
W0, W5
V20, V22, V25
Y11, Y13
V12
C2, C5, C7
C2, 0
RV52, RV63, RV55

Thanks for stopping by, Deni

CAMERA SET UP - FOR YOU TUBE VIDEOS ONLY
Blue Yeti Microphone
Sony Handycam HDR CX4-05
Tripod – Manfrotto MKCompactaCN-BK

S O C I A L MEDIA 
B L O G : https://ldli.co/e/3xky6x
I N S T A G R A M : https://ldli.co/e/5dn20x
YOU TUBE: https://ldli.co/e/ej5l90 
F A C E B O O K: https://ldli.co/e/mjxn2r
PINTEREST: https://ldli.co/e/2l9zom


I was a 2018 Ambassador for Copic Marker Australia and NZ


Friday, 20 September 2019

Passionate Paper Creations and Whimsy Stamps - Get Well Collab

Hi Everyone

Currently over at Passionate Paper Creations on Facebook they are running a Get Well Challenge, Rhea one of the owners is not in the best of health at the moment so we are all coming together and creating cards to help her feel a little better.

I have links below of the Facebook Group if you would like to play along.


Crissy Armstrong from Whimsy Stamps has kindly donated this image to the Group to help them create, you can download the image via the group or with the link below.


I printed the image onto X-Press It Blending Cardstock using my Brother Laser Printer, I then coloured him up using Copic Markers, I will have all the markers listed below the video link.


Using patterned papers from Kaisercraft Miss Match collection I cut some layers and used one of the punch outs down the left hand side.


I cut a mat layer of Francheville Kraft Cardstock and adhered all the patterned paper layers using Scotch ATG, I then added a doily using American Tombow Mono Multi Liquid Adhesive.

I ran the image through my Sizzix Big Shot using my Lawn Fawn Stitched Circle dies.


The sentiment is from Gerda Steiner Under The Weather stamp set, I stamped it onto a pre-cut banner die from Taylored Expressions Simple Strips - I cut a few of them a few weeks ago and had some leftovers.

I used Versamark Watermark Stamp Pad, Lawn Fawn Acrylic Block, Ranger Ink Super Fine White Detail Embossing Powder and heat set the embossing powder using my heat tool. Before doing any of this I did prep the yardstick using an Embossing Buddy.

All the layers were then adhered to a Couture Creations Card Base using Scotch ATG.


I hope you have enjoyed my post today, if you have any questions feel free to send me a message or contact me via facebook (all links can be found below).

Watch the You Tube Video Here


Products Used On My Card (Affiliate Links Used Where Possible)


Copic Markers Used

N6, N8, N10
W1, W3, 0
E17, E07, E09


Thanks for stopping by, Deni

CAMERA SET UP - FOR YOU TUBE VIDEOS ONLY
Blue Yeti Microphone
Sony Handycam HDR CX4-05
Tripod – Manfrotto MKCompactaCN-BK

S O C I A L MEDIA 
B L O G : https://ldli.co/e/3xky6x
I N S T A G R A M : https://ldli.co/e/5dn20x
YOU TUBE: https://ldli.co/e/ej5l90 
F A C E B O O K: https://ldli.co/e/mjxn2r
PINTEREST: https://ldli.co/e/2l9zom


I was a 2018 Ambassador for Copic Marker Australia and NZ


Wednesday, 18 September 2019

September 2019 Haul - Kikki K and Eckersleys

Hi Everyone,

Just a quick haul post for you today.

Eckersleys Art and Craft Shop has a sale on at the moment so I grabbed some more American Tombow Mono Multi Liquid Adhesive, they also had a spend $30 on Tombow and get a free pouch wrap so I got one of those also.


They also had the Derwent Inktense Travel Paint Pan on sale so I grabbed one of those, it comes with 12 colours and in an awesome little travel container and a Travel Water Brush.


Next up Kikki K had a sale on this past week - Buy any 2 items and get the third of lesser or equal valuer free, I purchased 3 new planners - 3 of the new She Shines Collection - 1 of the gold and 2 of the Coral. I really like the new clasp on the newer planners. These two planner colours are just beautiful. A few days before the sale started I purchase some of the new pens also which are from the new collection.


These pens are really nice to write with, the weight of them does take a little getting used to but then you dont even think about it anymore. The pink also comes in a Rose Gold version.

The sale has no unfortunately finished but if you aren't already signed up, you should do so as you will receive a $10 voucher for becoming a member.

I have all the links below of all the items I purchased and hope you can also enjoy them.


I hope you have enjoyed my post today, if you have any questions feel free to send me a message or contact me via facebook (all links can be found below).

Watch the You Tube Video Here


Products Used On My Card (Affiliate Links Used Where Possible)


Thanks for stopping by, Deni

CAMERA SET UP - FOR YOU TUBE VIDEOS ONLY
Blue Yeti Microphone
Sony Handycam HDR CX4-05
Tripod – Manfrotto MKCompactaCN-BK

S O C I A L MEDIA 
B L O G : https://ldli.co/e/3xky6x
I N S T A G R A M : https://ldli.co/e/5dn20x
YOU TUBE: https://ldli.co/e/ej5l90 
F A C E B O O K: https://ldli.co/e/mjxn2r
PINTEREST: https://ldli.co/e/2l9zom


I was a 2018 Ambassador for Copic Marker Australia and NZ


Saturday, 14 September 2019

Whimsy Stamps - PC Flash

Hi Everyone,

Today I am here to share with you a card I made for Whimsy Stamps using an image from the September Digital Stamp Release. The image I have used today is Flash from the Pollycraft Collection.


This is a Digital Stamp so I printed him onto X-Press It Blending Card Stock using my Brother Laser Printer, using a laser printer allows me to colour using Copic Markers. Some Inkjet printers are also Copic compatible - my Canon Pixma is.


Once I had the image coloured up I added some details using Wink Of Stella Clear and Uni-Ball white gel pen. I then fussy cut him out using my EK Success Cutterbee Scissors, I didn't want a white outline so I cut right on the line. Normally I would then run around the edge using my Tombow marker but I totally forgot on this one hehe.


Using Pebbles Inc, Party with Amy Locurto paper pad I cut a mat layer using my Cutterpillar Pro, I then used a strip I had leftover from another project and used my Cutterbee Scissors to fishtail the end.


I grabbed one of old Spellbinders dies out - Labels Twenty Two, one of my favourites from my old dies and ran it through my Sizzix Big Shot using some of the Cloud paper from the Party paper pad. I adhered the banner down to the polka dots using Scotch ATG, the cloud die cut I adhered down using American Crafts Foam Dots, I wanted it to be popping up from my card.

I grabbed some American Crafts Black Cardstock banners that I had already cut out using Tayored Expressions Simple Strips dies. I prepared the strips first using a powder tool, I then stamped out sentiments from Heffy Doodle Happy Snappy Crocs Stamp set using Versamark Watermark Ink Pad and a Lawn Fawn Acrylic Block, I then used Ranger Ink Super Fine White Embossing Powder and a heat tool to melt the powder.


I trimmed the "hope you have a" sentiment down using my trimmer. The "Super" word was cut using MFT Stamps By The Letters Dies and some leftover yellow card stock from another project, I adhered them using American Tombow Mono Multi Liquid Adhesive. Finally I used the bannered end that I cut off the sentiment and added it to the top right hand corner of the clouds paper.


I adhered all my layers to a Couture Creations Card Base using Scotch ATG. I used leftover patterned papers to decorate the inside of my card to match.


I hope you have enjoyed my post today, if you have any questions feel free to send me a message or contact me via facebook (all links can be found below).

Watch the You Tube Video Here


Products Used On My Card (Affiliate Links Used Where Possible)


Copic Markers Used

E000, E00, E21, E11, E04, R20
BG02, BG05, BG09
Y02, Y06, Y19
V04, V06, V09

Thanks for stopping by, Deni

CAMERA SET UP - FOR YOU TUBE VIDEOS ONLY
Blue Yeti Microphone
Sony Handycam HDR CX4-05
Tripod – Manfrotto MKCompactaCN-BK

S O C I A L MEDIA 
B L O G : https://ldli.co/e/3xky6x
I N S T A G R A M : https://ldli.co/e/5dn20x
YOU TUBE: https://ldli.co/e/ej5l90 
F A C E B O O K: https://ldli.co/e/mjxn2r
PINTEREST: https://ldli.co/e/2l9zom


I was a 2018 Ambassador for Copic Marker Australia and NZ