Saturday, 9 January 2021

Whimsy Stamps - Bunny Close Up

Hi Everyone, 

Today I am sharing with you a card I created for Whimsy Stamps, using Bunny Spring Squares from the January 2021 Crissy Armstrong Release. The image I have selected to use from the set is Bunny Close Up. This image is available as a Digital Image and as a Rubber Stamp Set.


I printed the image onto X-Press It Blending Cardstock using my Brother Laser Printer. 


Printing the Digital Image using my Brother Laser Printer allows the image to be able to be coloured using Copic Markers without any bleeding. 


I trimmed patterned papers down from Pebbles Inc Ever After Collection, unfortunately this is a very old paper collection from my stash so it is not able to be purchased, I do apologise however this paper collection was perfect for my card today. 


I ran the image through my Sizzix Big Shot using MFT Stamps Stitched Mini Scallop Square Stax.. I thought these were still unavailable but unfortunately are not unless you can find them in a de-stash group, im sure there is similar products out there from other companies. 


I used some of the green patterned paper from the set and ran it through my Sizzix Big Shot using MFT Stamps Grassy Fields dies, I also trimmed down a strip from the patterned paper with the individual flowers which I slid underneath the grass. 


I layered this onto some of the patterned papers then matted those onto Kaisercraft Candy Cardstock.


I adhered all the layers to a Couture Creations Card Base.

Finally I added some MFT Stamps Puffy Clouds which I die cut using some leftovers of X-Press It Blending Card. I adhered these to my card using Helmar Acid Free liquid Adhesive. I also added some Tonic Studios Nuvo Crystal Drops in Summer Sunrise


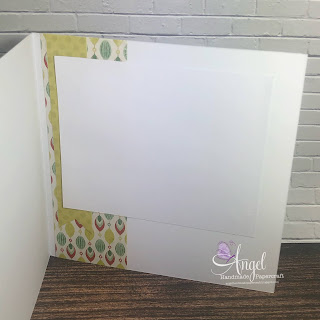
I used the same patterened papers to decorate the inside of the card. 


I hope you have enjoyed my post today, if you have any questions feel free to send me a message or contact me via facebook (all links can be found below).

Watch the You Tube Video Here


Products Used On My Card (Affiliate Links Used Where Possible)


Copic Markers Used

C0, C1, C3, C6
0 Colorless Blender
G14, G07
RV11, RV66
V22, V25
BG15

Thanks for stopping by, Deni

CAMERA SET UP - FOR YOU TUBE VIDEOS ONLY
Blue Yeti Microphone
Sony Handycam HDR CX4-05
Tripod – Manfrotto MKCompactaCN-BK

S O C I A L MEDIA 
B L O G : https://ldli.co/e/3xky6x 
I N S T A G R A M : https://ldli.co/e/5dn20x
YOU TUBE: https://ldli.co/e/ej5l90 
F A C E B O O K: https://ldli.co/e/mjxn2r
PINTEREST: https://ldli.co/e/2l9zom


I was a 2018 Ambassador for Copic Marker Australia and NZ


Friday, 1 January 2021

Whimsy Stamps - Bunny and his Dragonfly

Hi Everyone, 

Happy New Year, It is New Release time over at Whimsy Stamps, the first images of 2021 and we are so excited to share them all with you.


I printed the image onto X-Press It Blending Cardstock using my Brother Laser Printer so the images were all Copic safe. 


Using Copic Markers I coloured the images up then used my Uni-Ball Signo White Angelic gel pen to add details to the image and finally finishing him off using Derivan Kindy Glitz. 


Today I have chosen to work with  Bunny and Dragonfly from the Bunny Spring Squares image set. This image is available in both Digital and Rubber Stamp, I will have them both linked up in the picture links at the end of this blog post.


Using patterned papers from Kaisercraft's Little One 6.5" Paper Pad I trimmed down the clouds and the the flowers layers then matted them onto Kaisercraft Candy Cardstock. 


The sentiment is from Whimsy Stamps, I think it's a retired stamp set as I couldn't find links in the Whimsy Shop. 


I punched out some stars from the Kaisercraft Candy Cardstock scraps using my EK Success Star Confetti Punch.


I adhered all the layers to a Couture Creations Card Base. 


I am so happy with the way this card turned out, I finally found a smile on my face :-)


I used leftover of the patterned paper and plain card stocks to decorate the inside of the card. 


I hope you have enjoyed my post today, if you have any questions feel free to send me a message or contact me via facebook (all links can be found below).

Watch the You Tube Video Here


Products Used On My Card (Affiliate Links Used Where Possible)


Copic Markers Used

BG000, BG02
C0, C1, C3, C4, C6
G14, G09
RV10
V22

Thanks for stopping by, Deni

CAMERA SET UP - FOR YOU TUBE VIDEOS ONLY
Blue Yeti Microphone
Sony Handycam HDR CX4-05
Tripod – Manfrotto MKCompactaCN-BK

S O C I A L MEDIA 
B L O G : https://ldli.co/e/3xky6x 
I N S T A G R A M : https://ldli.co/e/5dn20x
YOU TUBE: https://ldli.co/e/ej5l90 
F A C E B O O K: https://ldli.co/e/mjxn2r
PINTEREST: https://ldli.co/e/2l9zom


I was a 2018 Ambassador for Copic Marker Australia and NZ


Thursday, 31 December 2020

Gerda Steiner - Deck The Halls Meowy Christmas

Hi Everyone,

Today I am sharing another Christmas Card with you using Deck The Halls from Gerda Steiner Designs, I love this stamp so much.


I coloured the image up quite a while ago so I don't have any Copic Markers lists for this card. I stamped the image onto X-Press It Blending Card using Memento Tuxedo Black and my Misti Stamping Tool. Copic Markers were used to colour the image up.

I cut down American Crafts Christmas Card and patterned papers from Kaisercraft Mistletoe 6.5" Paper Pad. 

I followed a sketch from Mojo Monday #499.


Sometimes you just need a little help with layout and these sketches are awesome to get your creativeness going. I haven't used any for a while and this is my second one now in a week of creative slump.

I decided to go through my container of images that I have coloured up previously and start getting them onto cards. 

I began by die cutting the image using Lawn Fawn Stitched Oval die which I ran through my Sizzix Big Shot. I did carefully cut the tail so that it didn't get cut off (if you slide the die underneath that part won't be cut.)


I trimmed the patterned paper down and layered them on top of American Crafts cardstock, finally adhering to a Couture Creations Card Base. 


The last step is to add Glitter glue to the bauble and the lights, I used Derivan Kindy Glitz however I could not find any links to this so have linked up a few other similar products. 


I stamped a sentiment from the same stamp set using a Lawn Fawn Acrylic Block and Memento Tuxedo Black Ink.


I decorated the inside of the card to match the front just using a few leftovers from the same paper pad.


I hope you have enjoyed my post today, if you have any questions feel free to send me a message or contact me via facebook (all links can be found below).

Watch the You Tube Video Here


Products Used On My Card (Affiliate Links Used Where Possible)


Copic Markers Used

Sorry no list today
Thanks for stopping by, Deni

CAMERA SET UP - FOR YOU TUBE VIDEOS ONLY
Blue Yeti Microphone
Sony Handycam HDR CX4-05
Tripod – Manfrotto MKCompactaCN-BK

S O C I A L MEDIA 
B L O G : https://ldli.co/e/3xky6x 
I N S T A G R A M : https://ldli.co/e/5dn20x
YOU TUBE: https://ldli.co/e/ej5l90 
F A C E B O O K: https://ldli.co/e/mjxn2r
PINTEREST: https://ldli.co/e/2l9zom


I was a 2018 Ambassador for Copic Marker Australia and NZ


Deck The Halls - Gerda Steiner

Hi Everyone, 

Can you believe it's only 3 weeks til Christmas, this year has gone way too fast for my liking. 

Today I have put together a Christmas Card from an image I coloured up a while ago from the Gerda Steiner Deck The Halls Clear  3x4" stamp set. 


I stamped the images onto X-Press It Blending Cardstock using my Misti Stamping Tool and Memento Tuxedo Black Ink.

I ran the image through my Sizzix Big Shot using a Lawn Fawn Stitched Circle Die, these are my favourite circle dies if you haven't noticed :-)

Once I had the image die cut I decided to have a look for a sketch - my brain just wasn't working properly today haha. I went to pinterest and found this sketch from Mojo Monday #385


I am using papers from an old Kaisercraft Paper Pad - Mistletoe 6.5"x6.5" Paper Pad and cardstocks from American Crafts Christmas Cardstock Pack. 


The sentiment is also from the same Kaisercraft Paper Pad, I cut all the words out separately so I could split them across my card. 


I used my EK Success Star Confetti Punch to punch out some stars from the leftover white cardstock from the image. I adhered the stars to my card using Helmar Acid Free liquid adhesive, then using Derivan Kindyglitz to sparkle them up, I couldn't find links for it but have linked up some other glitter glues.


I also added the glitter glue to the lights and the baubles, you can see how sparkly they are in this picture.


I also added a doily in behind some of the patterned papers.


Everything was adhered to my card today using Helmar Acid Free liquid adhesive, this is my go to for liquid adhesives. 


I hope you have enjoyed my post today, if you have any questions feel free to send me a message or contact me via facebook (all links can be found below).

Watch the You Tube Video Here


Products Used On My Card (Affiliate Links Used Where Possible)


Copic Markers Used

sorry, no list for you today. 


Thanks for stopping by, Deni

CAMERA SET UP - FOR YOU TUBE VIDEOS ONLY
Blue Yeti Microphone
Sony Handycam HDR CX4-05
Tripod – Manfrotto MKCompactaCN-BK

S O C I A L MEDIA 
B L O G : https://ldli.co/e/3xky6x 
I N S T A G R A M : https://ldli.co/e/5dn20x
YOU TUBE: https://ldli.co/e/ej5l90 
F A C E B O O K: https://ldli.co/e/mjxn2r
PINTEREST: https://ldli.co/e/2l9zom


I was a 2018 Ambassador for Copic Marker Australia and NZ


Whimsy Stamps - A Christmas Unicorn

Hi Everyone :-)

Today I am sharing with you a Christmas Card I created using A Christmas Unicorn from Whimsy Stamps, isn't she just beautiful :-)


I love this image so much :-)


I printed the image onto X-Press It Blending Cardstock using my Brother Laser Printer, then fussy cut her down using my EK Success Cutterbee Scissors. 


I wanted to try and do a white on white background with American Crafts white cardstock and a doily but it needed a pop of red so I added a layer of red American Crafts Cardstock.


I printed some sentiments from Whimsy Stamps digital sentiment sets - Big Wishes and Everyday Banner.


I really love how the card turned out, sometimes simple is better. I added lots of glitter to the image, used some leftover card stock for the inside of the card and it was complete.


I hope you have enjoyed my post today, if you have any questions feel free to send me a message or contact me via facebook (all links can be found below).

Watch the You Tube Video Here


Products Used On My Card (Affiliate Links Used Where Possible)


Copic Markers Used

RV000, RV10, RV11
Y26, YR27
Y02, Y08
BG000, BG02, BG07
C0, C1, C4, C6
0 Colorless Blender
G14, G03, G09
R27, R39, R59

Thanks for stopping by, Deni

CAMERA SET UP - FOR YOU TUBE VIDEOS ONLY
Blue Yeti Microphone
Sony Handycam HDR CX4-05
Tripod – Manfrotto MKCompactaCN-BK

S O C I A L MEDIA 
B L O G : https://ldli.co/e/3xky6x 
I N S T A G R A M : https://ldli.co/e/5dn20x
YOU TUBE: https://ldli.co/e/ej5l90 
F A C E B O O K: https://ldli.co/e/mjxn2r
PINTEREST: https://ldli.co/e/2l9zom


I was a 2018 Ambassador for Copic Marker Australia and NZ