Saturday, 10 October 2020

Ghostly Planner Layout - Whimsy Stamps and Erin Condren

Hi Everyone 

Sorry I've been away for so long, I have had a lot of health issues going on including my silly ankle still giving me trouble (Last update is the screw that was put in has now moved ahh), not sure what's happening next with that is it is what it is at the moment. 

Anyways let's get onto the post. 

Today I am sharing with you a Planner Layout I have done in my Erin Condren Vertical Planner using Halloween Ghost Gang from Whimsy Stamps.


I began by printing the images onto X-Press It Blending Cardstock using my Brother Laser Printer.

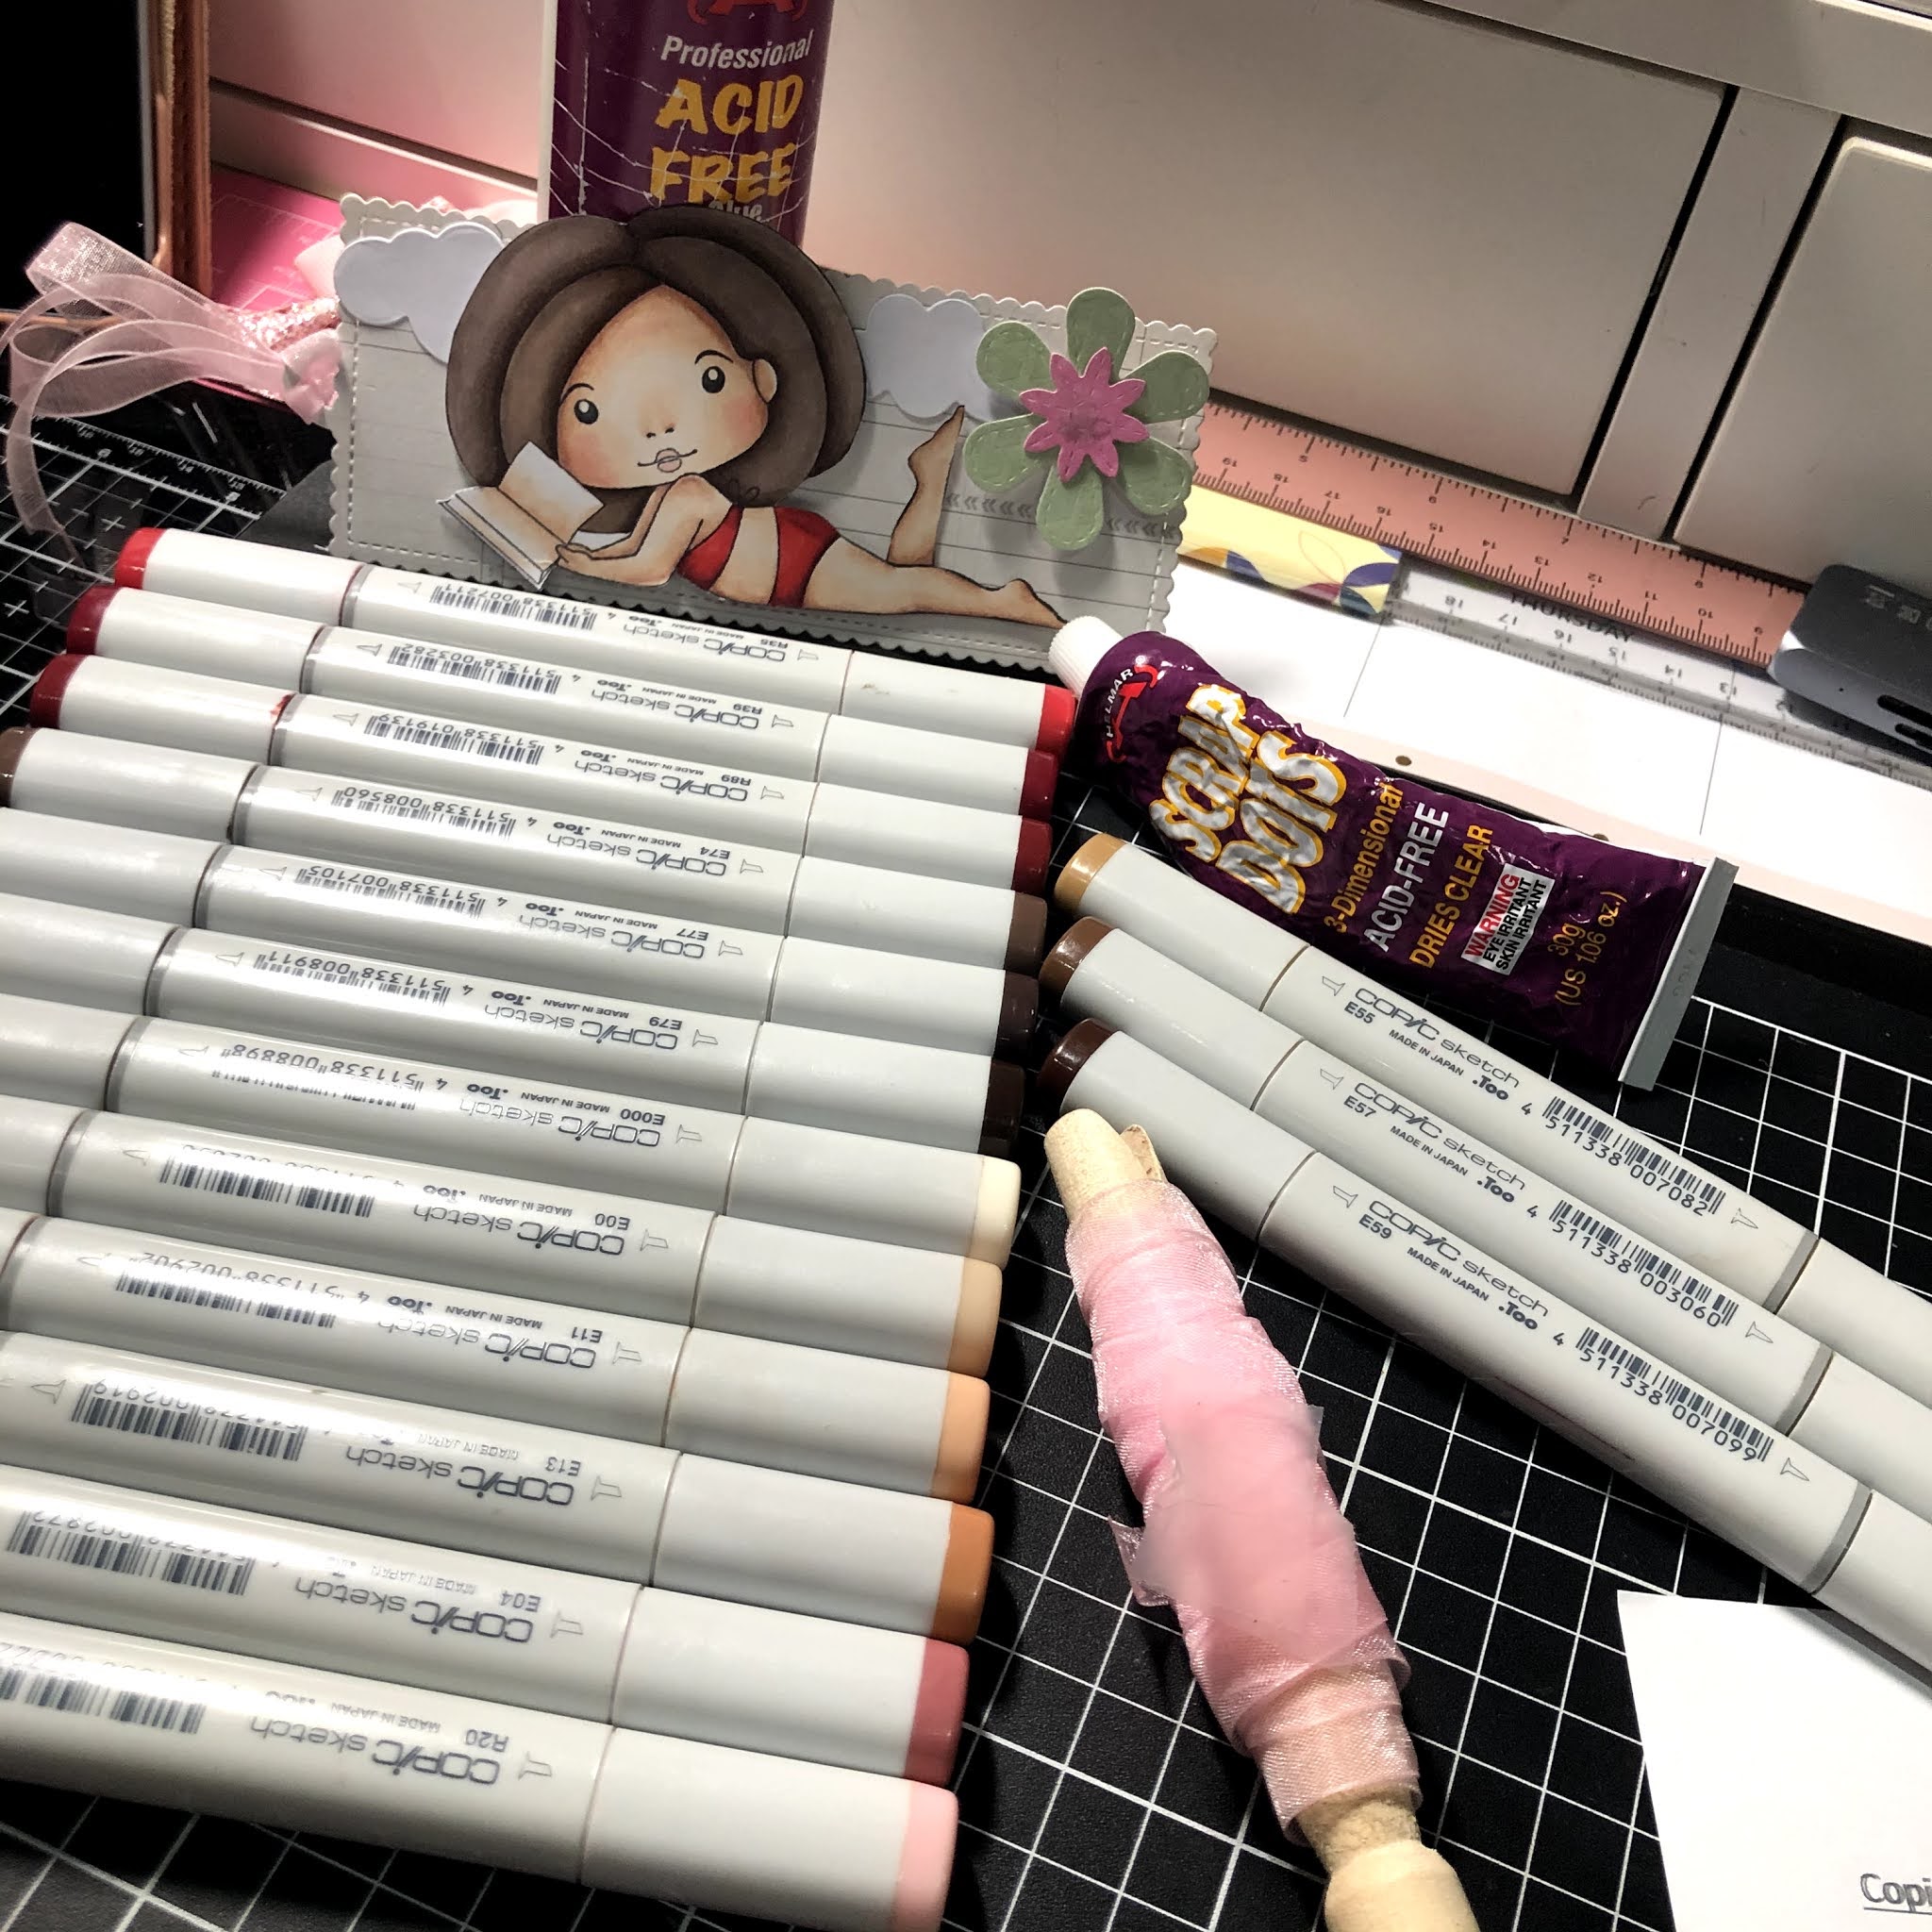
I wanted to colour the images using my Copic Markers so it needed to be Copic safe card stock. 


I had to screen shot this from my video because in all the excitement of creating I forgot to take a photo of the images all coloured up.

I forgot to take photos before adhering in my planner so here is a few photos of the images in my planner.


I began colouring all the images up, adding extra details using Uni-Ball Signo White Angelic Gel Pen and Wink Of Stella Clear . 


Using my EK Success Cutterbee Scissors I fussy cut all the images out just using a small white border. (Remember the best way to fussy cut is using nice pointy sharp scissors and moving your cardstock around rather than your scissors. 


I opened my Erin Condren planner at Halloween week and began decorating using all the stickers that come with your Vertical planner and I also used some Washi Tapes from Doodlebug.

If you are interested in purchasing an Erin Condren Life Planner please use my referral link here and we will Both receive a $10 credit.

I began by laying down my Washi Tapes, I layed my images out so I knew exactly where everything was going, once my Washi was down I adhered the images and finally all my productive stickers.


I hope you have enjoyed my post today, if you have any questions feel free to send me a message or contact me via facebook (all links can be found below).

Watch the You Tube Video Here


Products Used On My Card (Affiliate Links Used Where Possible)


Copic Markers Used

E31, E33, E35
YR23, YR16, E08
YG21, YG25
V04, V06, V09
R35, R39
T6, T8, T10
B37
E04, E07, E0-
T0, T2, T4, 0 Colorless Blender
R20
E44

Thanks for stopping by, Deni

CAMERA SET UP - FOR YOU TUBE VIDEOS ONLY
Blue Yeti Microphone
Sony Handycam HDR CX4-05
Tripod – Manfrotto MKCompactaCN-BK

S O C I A L MEDIA 
B L O G : https://ldli.co/e/3xky6x 
I N S T A G R A M : https://ldli.co/e/5dn20x
YOU TUBE: https://ldli.co/e/ej5l90 
F A C E B O O K: https://ldli.co/e/mjxn2r
PINTEREST: https://ldli.co/e/2l9zom


I was a 2018 Ambassador for Copic Marker Australia and NZ


Friday, 11 September 2020

Helmar - How To Make a Rosette

Hi Everyone, 

Today I am working with Helmar Worldwide and I will be doing a How To Video For You.
We are going to be learning how to make a Rosette without using any dies, just using what's on hand.


What will you need?

-Helmar Quick Dry 450
-Bone Folder
-Circle Punch or die
-Trimmer / Score Board/ Ruler
-Scrap card stock - preferable 30cmx2.5cm


First things first cut down a piece of scrap cardstock to a strip of approx 30cmx2.5cm in size. 

I am using my Fiskars Trimmer which has an indent where the blade goes through (alternatively you can use a ruler or scoring board if you have one), I scored at 1 inch to begin with but then went back and scored every half inch (or every 1.5cm) using my bone folder. 


Once you strip is scored you can add Helmar Quick Dry 450 to the end and adhere it to the other end creating a circle.


Leave that to dry for a moment, whilst waiting punch out a small circle (or die cut one if you don't have a punch) this is going to create a backing piece to hold your rosette together. 

Now your strip should be dry carefully use the palm of your hand to push down on the rosette, you will put Helmar 450 Quick Dry covering the circle you punched out, then add the rosette on top and carefully hold it down until it is dry, I usually wait a few seconds then turn it over and carefully centre your circle.

Once your Rosette is dry you can add a button or something decorative to the centre to finish it off. 


I used an EK Success Butterfly punch and layered it up, then brushed Wink Of Stella to the wings and some Tonic Studios Nuvo Crystal Drops in Glitter Drops- Summer Sunrise. 


Your Rosette is now complete, you can add it to your project using more of the 450 Helmar Quick Dry.


I hope you have enjoyed my post today, if you have any questions feel free to send me a message or contact me via facebook (all links can be found below).

Watch the You Tube Video Here


Products Used On My Card (Affiliate Links Used Where Possible)


Thanks for stopping by, Deni

CAMERA SET UP - FOR YOU TUBE VIDEOS ONLY
Blue Yeti Microphone
Sony Handycam HDR CX4-05
Tripod – Manfrotto MKCompactaCN-BK

S O C I A L MEDIA 
B L O G : https://ldli.co/e/3xky6x 
I N S T A G R A M : https://ldli.co/e/5dn20x
YOU TUBE: https://ldli.co/e/ej5l90 
F A C E B O O K: https://ldli.co/e/mjxn2r
PINTEREST: https://ldli.co/e/2l9zom


I was a 2018 Ambassador for Copic Marker Australia and NZ

Friday, 4 September 2020

Colour With Deni - La La Land Crafts - Doctor Marci and Dr Luka

Hi Everyone,

Sorry I haven't been around much, have some personal stuff going on at the moment and have had to put all my Design Team positions on hold. 

Today I sat down and did some colouring and thought I would share it with you guys. 

This is Doctor Marci and Doctor Luka from La La Land Crafts, both of these images are available as Rubber and Digital Stamps which I will have linked up at the end of this video. 


I had so much fun colouring these two up, it was nice to just sit and colour and clear my head for a little while. 

I will have a list of all the Copic Markers I have used at the end of this blog post.

I began by printing the images onto X-Press It Blending Card as I had used the Digital Stamps for both of these images. 


Using my Copic Markers I coloured the images up, also using a Uni-Ball Angelic Gel Pen to add details to the images. 


EK success Cutterbee Scissors were used to fussy cut the images then I used a Tombow N15 black marker to run around the images and add a black edging to them. This finishes them off and covers any spots you didn't cut right to the line. 


I hope you have enjoyed my post today, if you have any questions feel free to send me a message or contact me via facebook (all links can be found below).

Watch the You Tube Video Here


Products Used On My Card (Affiliate Links Used Where Possible)


Copic Markers Used 

E000, E00, E21, Ell, E04, R20
B12, B45, B66
YR21, YR24, YR27
N1, N2, N4, N6, 0 Colorless Blender
E44, E47, E49
N6, N8, N10
Thanks for stopping by, Deni

CAMERA SET UP - FOR YOU TUBE VIDEOS ONLY
Blue Yeti Microphone
Sony Handycam HDR CX4-05
Tripod – Manfrotto MKCompactaCN-BK

S O C I A L MEDIA 
B L O G : https://ldli.co/e/3xky6x 
I N S T A G R A M : https://ldli.co/e/5dn20x
YOU TUBE: https://ldli.co/e/ej5l90 
F A C E B O O K: https://ldli.co/e/mjxn2r
PINTEREST: https://ldli.co/e/2l9zom


I was a 2018 Ambassador for Copic Marker Australia and NZ


Friday, 21 August 2020

Lawn Fawn - Admission Coaster Critters

Hi Everyone, 

This morning my cousin asked if I could make her daughter a birthday card in a Carnivale theme, I immediately thought about some of the Lawn Fawn Stamps I have in my stash.


I dug out Admit One and Coaster Critters and decided I wanted to make a scene with them.

I layed them all out on some scrap paper first so I could get an idea of how I wanted them all to look in my scene. 


I created masks by stamping the images onto Reflex Copy Paper with Memento Tuxedo Black, I then used my EK Success Cutterbee Scissors to fussy cut them out - making sure to cut right up tp the stamping line. 

I used American Tombow Mono Multi to adhere my masks, this is a temporary adhesive and also a permanent. I used the back of my had to remove some of the stickiness before I layed them all down. 

I stamped out my scene by starting with any images that would be at the front of my scene first then worked my way to the images at the back, adding masks onto the stamped images as I was going. 

I Love the way everything turned out :-)


I coloured all the images up using Copic Markers, added some number 8's onto balloons and and the roller coaster cart using a Copic Multiliner. 


I grabbed my Wink Of Stella and my Uni-ball white gel pen to finish off all the images. 


Adding a mat layer using some American Crafts Cardstock then adhering all my layers to a Couture Creations Card Base Using my Scotch ATG. 


I used the same stamps to also decorate the inside of the card.


I hope you have enjoyed my post today, if you have any questions feel free to send me a message or contact me via facebook (all links can be found below).

Watch the You Tube Video Here


Products Used On My Card (Affiliate Links Used Where Possible)


Copic Markers Used

G12, G14, G07
RV11, RV14
Y13, Y15
V06, V09
YR12, YR16
B00, B12, B16
C4
T3, T5
T6, T10
E97, E99
E50, E33
R35, R29
E50, E57
E77, E79, 0 Colorless Blender

Thanks for stopping by, Deni

CAMERA SET UP - FOR YOU TUBE VIDEOS ONLY
Blue Yeti Microphone
Sony Handycam HDR CX4-05
Tripod – Manfrotto MKCompactaCN-BK

S O C I A L MEDIA 
B L O G : https://ldli.co/e/3xky6x 
I N S T A G R A M : https://ldli.co/e/5dn20x
YOU TUBE: https://ldli.co/e/ej5l90 
F A C E B O O K: https://ldli.co/e/mjxn2r
PINTEREST: https://ldli.co/e/2l9zom


I was a 2018 Ambassador for Copic Marker Australia and NZ


Wednesday, 19 August 2020

Helmar - Create with Deni - A Summer Bookmark

Good Morning All,

Today I am sharing with you all a Bookmark I created using a few different adhesives from Helmar - I have used the Acid Free and the Scrap Dots.


First of all I am using a brand new stamp from La La Land Crafts called Reading On The Beach Marci, she is part of the June 2020 Club so isn't available to purchase separately at the moment. 

I trimmed the stamp set down using my Tim Holtz red scissors, then used my Mini Misti to stamp out the Marci image onto X-Press It Blending Cardstock using Memento Tuxedo Black. 

I coloured the image up using Copic Markers then fussy cut her out using my EK Success Cutterbee Scissors. 


I used a bookmark die from  Mama Elephant that unfortunately I couldn't find any links for so I have linked up some other dies for you to try out. 

I cut out some clouds from MFT Stamps Puffy Clouds, and some flowers from an old retired die set. 


For my flower I layered each section up using some Helmar Scrap Dots, I love this adhesive it's like liquid foam tape :-).


I adhered the clouds to my patterned paper using Helmar Acid Free. 

I then used the Helmar Scrap Dots to add adhesive to the back of my Marci image then carefully layed her down onto my patterned paper. 


I added the same Helmar Scrap Dots to the back of my flower and carefully adhered it to my bookmark. I left all of my layers to dry then added some ribbon to complete the bookmark. 


I hope you have enjoyed my post today, if you have any questions feel free to send me a message or contact me via facebook (all links can be found below).

Watch the You Tube Video Here


Products Used On My Card (Affiliate Links Used Where Possible)


Copic Markers Used

E000, E00, E11, E13
R35, R37, R39
E74, E77, E79, 
E04, R20


Thanks for stopping by, Deni

CAMERA SET UP - FOR YOU TUBE VIDEOS ONLY
Blue Yeti Microphone
Sony Handycam HDR CX4-05
Tripod – Manfrotto MKCompactaCN-BK

S O C I A L MEDIA 
B L O G : https://ldli.co/e/3xky6x 
I N S T A G R A M : https://ldli.co/e/5dn20x
YOU TUBE: https://ldli.co/e/ej5l90 
F A C E B O O K: https://ldli.co/e/mjxn2r
PINTEREST: https://ldli.co/e/2l9zom


I was a 2018 Ambassador for Copic Marker Australia and NZ


Saturday, 8 August 2020

Whimsy Stamps - Sweet Pixie Birthday

Good Morning Everyone,

This sweet little stamp on my card today is from Whimsy Stamps Wee Stamps Collection By Sylvia Set, this is WS Pixie. 


I printed the image, ran it through my Sizzix Big Shot using a Lawn Fawn Stitched Circle then coloured it up using Copic Markers.


I coated the wings with Wink Of Stella Clear, I love the glittery ness it gives. I also added details using Uni-Ball Signo White Gel Pen.


Using patterned papers from Anko Whimsical Paper pad I cut some layers down and matted them onto Reflex Copy paper in white and blue. 


I added a doily layer underneath the image to pop it off the patterned paper. 

I printed Whimsy Stamps Everyday Banner Sentiments and trimmed down the Sincere Thanks Sentiment. 


I used Helmar 450 Quick Dry to adhere some white flowers to the right corner of my card.

Finally I adhered all the layers to a Couture Creations Card Base using Helmar Acid Free Liquid Adhesive.


I hope you have enjoyed my post today, if you have any questions feel free to send me a message or contact me via facebook (all links can be found below).

Watch the You Tube Video Here


Products Used On My Card (Affiliate Links Used Where Possible)


Copic Markers Used

V20, V22, V25
V000, V01
G14, G07, G17
E99, E59
E000, E00, E21, E11, E04, R20
B93, B95, B97
Y02, Y04, Y19
B01, B02, Y19
E74, E77, E79

Thanks for stopping by, Deni

CAMERA SET UP - FOR YOU TUBE VIDEOS ONLY
Blue Yeti Microphone
Sony Handycam HDR CX4-05
Tripod – Manfrotto MKCompactaCN-BK

S O C I A L MEDIA 
B L O G : https://ldli.co/e/3xky6x 
I N S T A G R A M : https://ldli.co/e/5dn20x
YOU TUBE: https://ldli.co/e/ej5l90 
F A C E B O O K: https://ldli.co/e/mjxn2r
PINTEREST: https://ldli.co/e/2l9zom


I was a 2018 Ambassador for Copic Marker Australia and NZ


Saturday, 1 August 2020

Whimsy Stamps - Penguin Beach Fun

Hi Everyone,

It is New Release time over at Whimsy Stamps and today I am sharing with you an image from the Digital Collection - this is Penguin Beach.


I printed the image onto X-Press It Blending Cardstock using my Brother Laser Printer. I then ran the image through my Sizzix Big Shot using a Lawn Fawn Stitched Rectangle Die. 


I printed Whimsy Stamps Everyday Banner Sentiments onto X-Press It Blending Cardstock and trimmed down the "Happy Birthday".


I also printed digital papers from the Whimsy Stamps Flourishing Papers Digital set, I printed it onto some copy paper.


I trimmed down some American Crafts Black Cardstock to use as a mat layer, before adhering the layers I ran the black piece through my Sizzix Big Shot using a Lawn Fawn Stitched Circle die.


I hope you have enjoyed my post today, if you have any questions feel free to send me a message or contact me via facebook (all links can be found below).

Watch the You Tube Video Here


Products Used On My Card (Affiliate Links Used Where Possible)


Copic Markers Used

YR14, YR18, E09
C1, C4, 0, R20
N6, N8, N10
B12, B14, B16
R05, R29, R39
E51, E53, E55, E57

Thanks for stopping by, Deni

CAMERA SET UP - FOR YOU TUBE VIDEOS ONLY
Blue Yeti Microphone
Sony Handycam HDR CX4-05
Tripod – Manfrotto MKCompactaCN-BK

S O C I A L MEDIA 
B L O G : https://ldli.co/e/3xky6x 
I N S T A G R A M : https://ldli.co/e/5dn20x
YOU TUBE: https://ldli.co/e/ej5l90 
F A C E B O O K: https://ldli.co/e/mjxn2r
PINTEREST: https://ldli.co/e/2l9zom


I was a 2018 Ambassador for Copic Marker Australia and NZ