Welcome to my blog if you haven't been here before, if you have.. welcome back :-)
Today I am sharing with you a card I have made for Whimsy Stamps using one of the May new release images, this is Rainy Day.
I printed the image using my Brother Laser Printer onto X-Press It Blending Cardstock since this is a Digital Stamp. Once I had the image printed I coloured it up using Copic Markers.
I cut down some patterned papers from American Crafts Dear Lizzy Day Dreamer 6x6 Paper Pad. Such a sweet little paper pad, and of course this rain patterned paper was perfect for this card.
I cut some clouds using MFT Stamps Puffy Clouds die just using some leftover X-Press It Blending Cardstock, for those of you who follow me know that I need all my whites to be the same.. it's the OCD in me :-)
I stamped the sentiment out using WPlus9 Sending Sunshine Stamp Set onto some leftover aqua cardstock from my stash, I used my new Mini Misti to stamp this out and make sure it was perfect.
I used Ink On 3 Hybrid Blackout Detail Ink to stamp it out. I trimmed the sentiment down using my EK Success Cutterbee Scissors and bannered it up.
I used a white Uni-Ball Pen to add details to my image and a 0 Colorless blender to add some rain marks to the umbrella.
I adhered all my layers to a Couture Creations Card Base Using Helmar Acid Free liquid adhesive.
Once I had the front of my card complete I used leftovers of the patterned paper to decorate the inside of the card.
I hope you have enjoyed my post today, if you have any questions feel free to send me a message or contact me via facebook (all links can be found below).
Watch the You Tube Video Here
Products Used On My Card (Affiliate Links Used Where Possible)
Last weekend I shared with you a card I made using Whimsy Stamps In The Doghouse, today I am using the same stamp, I don't have the colouring on today's video so refer back to that one if you are interested.
I printed the image onto X-Press It Blending Cardstock using my Brother Laser Printer.
I ran the image through my Sizzix Big Shot using a Lawn Fawn Stitched Circle die.
I cut some layers down from this doggy paper that I've had in my stash since forever ago, I matted them using American Crafts Chocolate Brown Cardstock and some Francheville Kraft Cardstock.
I used an old die set from MFT Stamps called Paw Prints, ran it through my Big Shot twice, using Kraft and Red Cardstocks then layered them up on my card.
Using Taylored Expressions Simple Strips I inked up the stamp set using Ink On 3 Embossing Ink, Ranger Ink Super Fine White Embossing Powder, I melted it using my Heat Tool, then ran it through my Big Shot using the matching dies.
I added some grass from MFT Stamps Grassy Fields die.
I used matching papers to decorate the inside of the card.
I hope you have enjoyed my post today, if you have any questions feel free to send me a message or contact me via facebook (all links can be found below).
Watch the You Tube Video Here
Products Used On My Card (Affiliate Links Used Where Possible)
Today I am using a gorgeous new stamp set (to me) from Honey Bee Stamps called Shine On. I really love this stamp set, unfortunately when I ordered it was out of stock so I had to wait for it. It finally arrived and I was so busy I wasn't able to use it until now.
I stamped the nail polish bottle out 3 times onto X-Press It Blending Cardstock using Memento Tuxedo Black using a Lawn Fawn Acrylic Block.
I ran the images through my Sizzix Big Shot using the matching dies (Which I had cut apart using my wire cutters), I used a small piece of washi tape to hold the die in place so they did not move as I ran them through.
Using some glitter card stock I ran the bow die through a couple of times. I used the same glitter card stock and stamped out the nail polish bottles out onto the reverse side.. I used my EK Success Cutterbee Scissors to cut just the bottom part of the bottle.
I ran the bow die through a second time using some vellum and layered it over the glitter card, just using adhesive on the centre so the sides popped off the bottle a little bit. I coloured the reverse of the centre using Copic Markers just to keep that bright colour going.
I grabbed another Honey Bee Stamp Set - Happy Birthday, I stamped the sentiment out onto Vellum using Ink On 3 Embossing Ink, Super Fine White Embossing Powder from Ranger Ink and melted it using my Heat Tool. I also prepared the vellum beforehand using a powder tool. I then used my EK Success Cutterbee Scissors to fussy cut the sentiment out.
I grabbed the Nail Polish bottles that I first cut out and coloured them up using Copic Markers (you can find them listed below).
I used my Helmar Acid Free to start layering up the Nail Polish bottles, I adhered the glitter layer I cut down earlier to the bottom of the bottle, then the bows on top of those and the vellum layer of bow.
I used Paper Rose Jumbo Numbers and ran them through my Big Shot using American Crafts Black Cardstock, I used my Uni-Ball white gel pen to add some details to the numbers and add the TH to the 6.
I began adhering all the layers to a Couture Creations Card Base using Helmar Acid Free.
To finish the card off I used Tonic Studios Nuvo Crystal Drops in Silver Moondust.
I hope you have enjoyed my post today, if you have any questions feel free to send me a message or contact me via facebook (all links can be found below).
Watch the You Tube Video Here
Products Used On My Card (Affiliate Links Used Where Possible)
Copic Markers Used
T1, T4, 0 Colorless Blender
R17
R83
Thanks for stopping by, Deni
CAMERA SET UP - FOR YOU TUBE VIDEOS ONLY
Blue Yeti Microphone
Sony Handycam HDR CX4-05
Tripod – Manfrotto MKCompactaCN-BK
Loving this new image from Whimsy Stamps May Digital Release, this is In The Doghouse. I have used the image on a Housewarming card, I thought it would be cute.
I printed the image using X-Press It Blending Cardstock and my Brother Laser Printer.
I ran the image through my Sizzix Big Shot using a Lawn Fawn Stitched Circle Die then coloured it up using Copic Markers.
I love the way the planks of wood turned out when I coloured them up :-)
The patterned papers I used are ones I've had for quite a while so I don't have any branding or anything on them but they were certainly perfect for this card.
I used a stamp set from Taylored Expressions, Sentiment Strips, I stamped them onto American Crafts Cardstock using Ink On 3 Embossing Ink, added Ranger Ink Super Fine White Embossing Powder and melted it using a Heat Gun.
I then ran the dies through my Sizzix Big Shot to cut all the sentiments down.
I adhered the image and patterned paper to some American Crafts Cardstock using Helmar Acid Free liquid Adhesive. I then adhered all those layers to a Couture Creations Card Base.
I used some leftovers of the same patterned papers to decorate the inside of the card.
I hope you have enjoyed my post today, if you have any questions feel free to send me a message or contact me via facebook (all links can be found below).
Watch the You Tube Video Here
Products Used On My Card (Affiliate Links Used Where Possible)
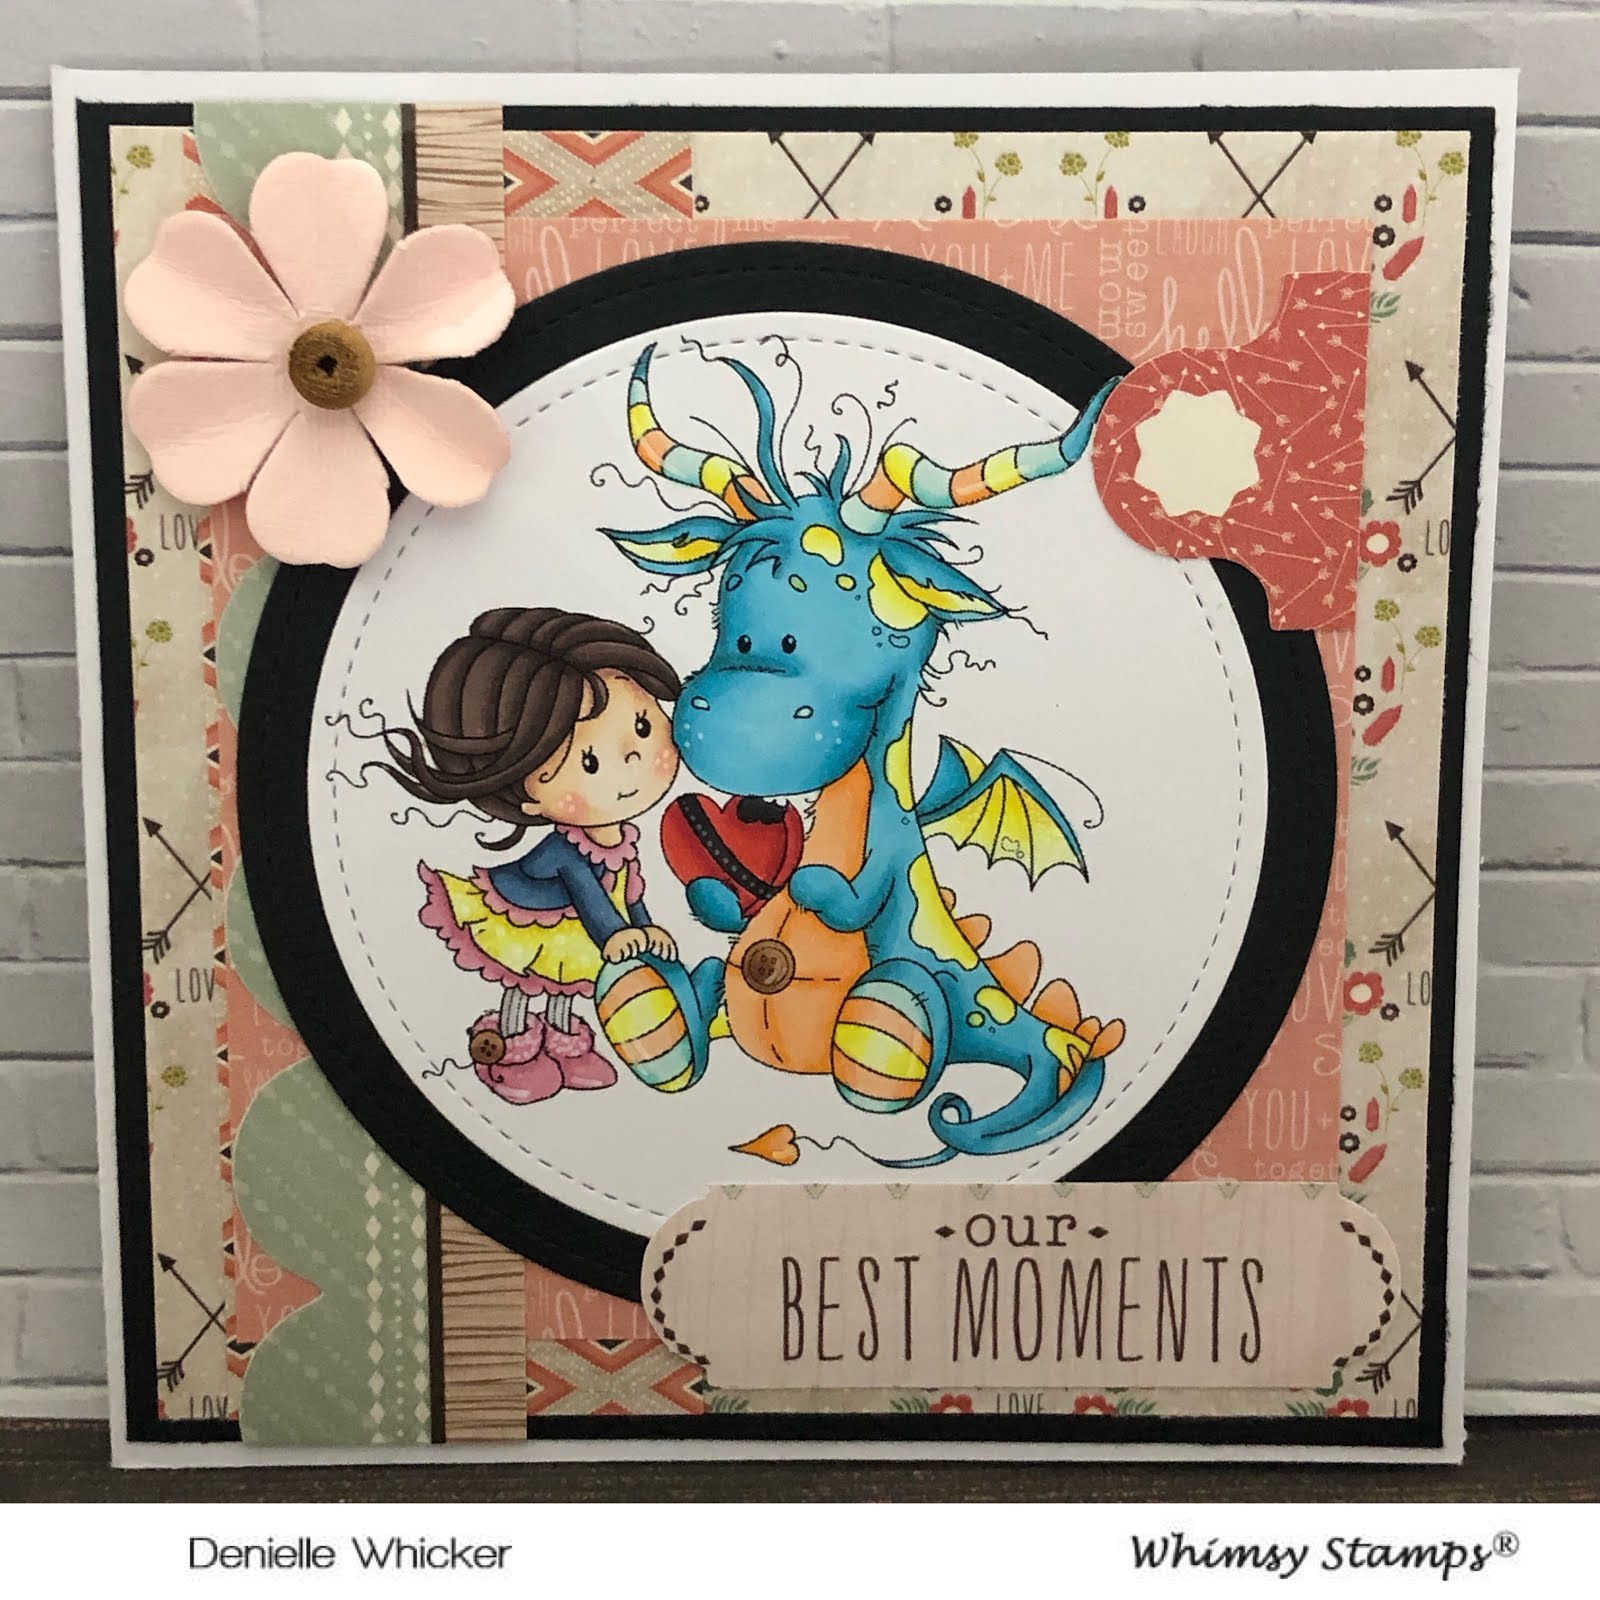
For my card share today I am using Betty and Bob from Whimsy Stamps May Digital Stamp Release.
As always I printed the image onto X-Press It Blending Cardstock using my Brother Laser Printer then coloured them up using Copic Markers. I also went in and added some details to the image using a Uni-Ball white gel pen.
The paper pad I have used today is Bow and Arrow from Kaisercraft, this is a paper pad I have had for a while but have been hoarding and thought it was time to finally starting pulling it out.. after all what's the use of having pretty things if you can't actually use them.
I trimmed down a few layers, Matted the biggest one onto some American Crafts black cardstock, I also used some of the pop out strips from the back of the paper pad and one of the sentiments which I actually trimmed down.
I ran the image through my Sizzix Big Shot using a Lawn Fawn stitched circle die, I also ran the next size up die through also but using some American Crafts Black Cardstock.
I adhered all the layers to a Couture Creations Card Base using Helmar Acid Free liquid adhesive.
Using 450 Quick Dry from Helmar I added a pink flower from Mont Marte to the top left of the card. I have a. habit of knocking things that I am supposed to be letting dry hence why I used the quick dry, I can keep crafting and not worry I have screwed something up haha,
Finally I used some of the leftover patterned papers to decorate the inside of the card.
I hope you have enjoyed my post today, if you have any questions feel free to send me a message or contact me via facebook (all links can be found below).
Watch the You Tube Video Here
Products Used On My Card (Affiliate Links Used Where Possible)
Today I am posting for Helmar Worldwide, I would like to share with you a card I made for a friend for his wife - a special request card.
Here is my special project
I used two different Helmar products on my project, Acid Free and Scrap Dots - of course my two favourite products haha.
You must excuse the state of my poor little Scrap Dots, I've been squeezing every last little bit of adhesive out of him - you must make use of the last little bit right :-)
Let's talk our way through the project.. I started with a Couture Creations Card Base (I purchased these in bulk quite a while ago, they come with matching envelopes and I love a square card).
There is two sections to my card as I played with colours, before finally coming to the final layout.
I cut a piece of patterned paper down from a very old Mother's Day Paper Pad that I had purchased from Kmart (I'm talking ancient hoarding here). I used this to base my layout around as I knew I wanted to go a little simplicity but still pretty.
I had my Dad print out some photos that my friend had sent me of him, Bub and beautiful Wife, I got him to print them small enough that they would be centred on my card but not huge. This one that I ended up using on my project I ran through my Sizzix Big Shot using a Polaroid Shaker Frame from MFT Stamps, I only needed the centre piece as I waned the polaroid frame in white. I then ran the die through again a few times using some leftovers of white cardstock, the top piece ended up being some leftover X-Press It Blending Cardstock so it has that nice smooth finish. (I posted all the extra photos off to my friend)
Using Helmar Acid Free I began adhering all the frames together, for the bottom I adhered two of the centre pieces and adhered them on opposite corners (on the back of the polaroids) so I was able to inlay my photo piece that I had already cut and it wouldn't move or fall through.
I really should have done this before adhering all the layers but it turned out all ok in the end so that's all that matters I guess.. I decided to emboss a "Mother's Day" sentiment onto the bottom of the polaroid. I grabbed my SSS Mother's Day Sentiment set and actually carefully cut the Happy part from the sentiment - yep I cut my stamp in half! I used my EK Success Scissors so it was a super straight cut and if I ever want to use it all together again they will go back together on a stamping block perfectly. It's ok to do this :-)
I prepared the card using an embossing buddy (powder tool) and used Ink On 3 Embossing Ink, Ranger Super Fine White Embossing Powder and my heat gun to emboss the sentiment.
Using Lawn Fawn Scripty Happy I ran it through my Big Shot using some scrap cardstock (I went in later on in the video and coated the sentiment with Embossing Ink and gold embossing powder and heated it up to melt the embossing powder and turn the word gold).
I cut the number 1 from Paper Rose Jumbo Numbers and the ST is from Concord & 9th Tall Type Numbers, I did the same process as mentioned above to turn everything gold.
The flowers are from MFT Stamps Stitched Flowers and the leaves are from MFT Stamps Layered Leaves. I cut the flowers from some Kaisercraft Bow & Arrow patterned paper and the leaves are from some leftover white cardstock. (I originally cut all the flowers using some leftover pink cardstock but changed up the colours).
I layered the flowers using Helmar Acid Free, the top layer I used Scrap Dots to make them pop off the flowers a little big extra then I finished the flowers off using Tonic Studios Nuvo Crystal Drops in Mustard Gold - such a stunning colour.
I grabbed my card base and adhered a doily, the patterned paper over top and began adhering all my layers down using Acid Free.
Once my card layers were all added I used some more of the Nuvo Drops to add a few enamel dots around the card.
I hope you have enjoyed my post today, if you have any questions feel free to send me a message or contact me via facebook (all links can be found below).
Watch the You Tube Video Here
Products Used On My Card (Affiliate Links Used Where Possible)
Thanks for stopping by, Deni
CAMERA SET UP - FOR YOU TUBE VIDEOS ONLY
Blue Yeti Microphone
Sony Handycam HDR CX4-05
Tripod – Manfrotto MKCompactaCN-BK