Saturday, 7 September 2019

Whimsy Stamps - You're My Penguin Hero

Hi Everyone,

Hope you are all having a fantastic week, I have been busy putting in extra hours at my "normal job" so haven't been around much.. my apologies.

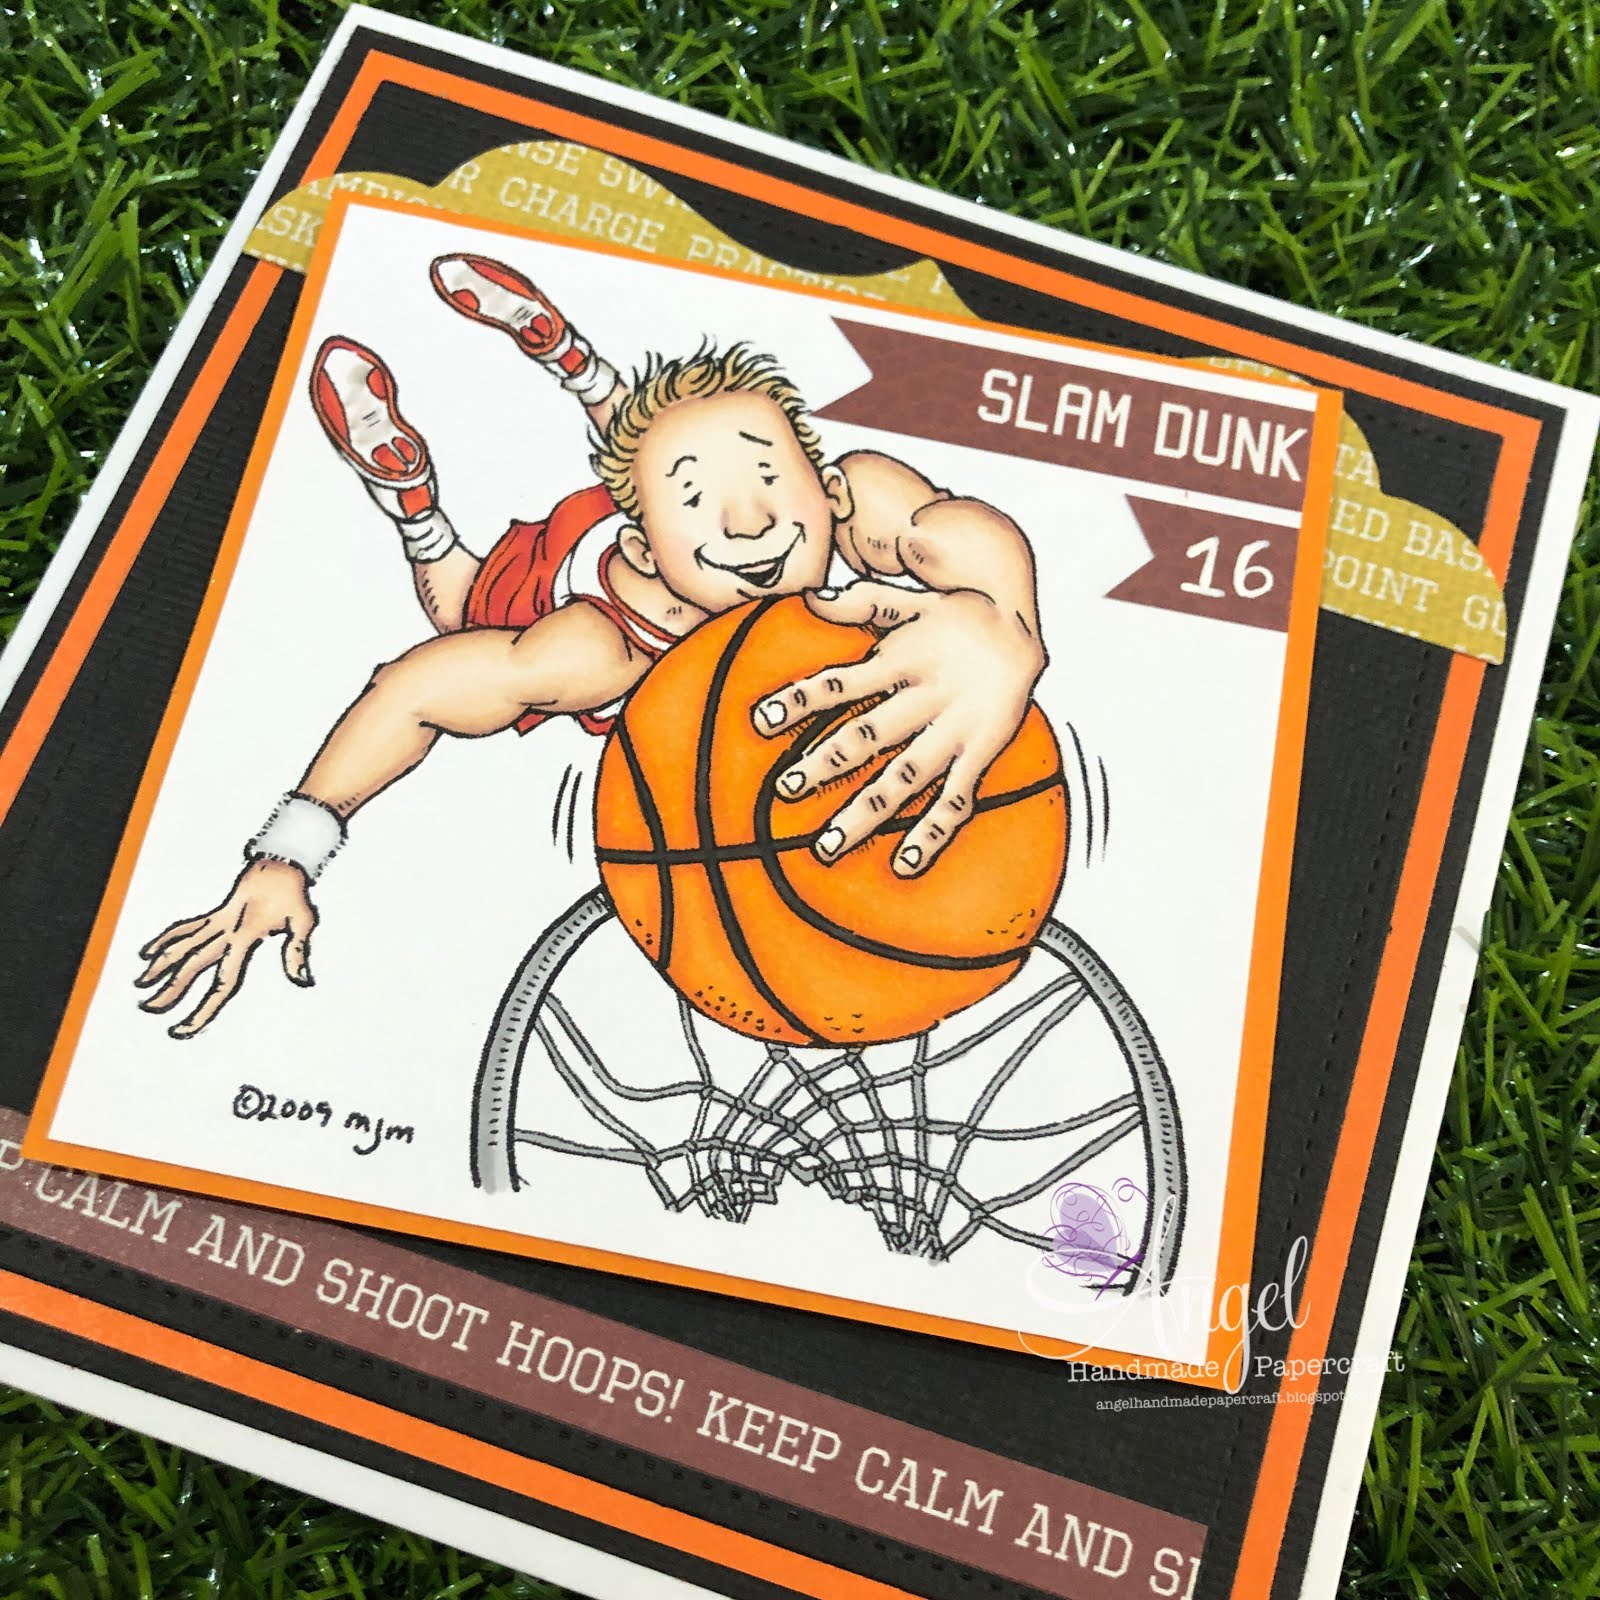
Today I am sharing with you a card I have made for Whimsy Stamps using Penguin Super Hero, he is available in both Rubber and Digital - I will have both versions linked up below for you.


I actually coloured this image up a while ago but had not had a chance to get him onto a card so the New Release was the perfect time to showcase him again. He is on X-Press It Blending Card Stock ready for Copic Colouring.

I fussy cut the image out once I had him ready to go using my EK Success Cutterbee scissors, these scissors are seriously amazing, so if you are after a super sharp super pointy pair of fussy cutting scissors these guys are your go to.


I used MFT Stamps Star Stax dies, I used some washi tape to adhere two of them together so I was able to cut out a frame using some black American Crafts Cardstock, I then ran the smallest star back through using some of the coloured paper from the Hampton Art Celebrate Patterned Paper Pad using my Sizzix Big Shot.

I cut a red piece for matting from the same  patterned paper pad and then a pice of the dot/star pattern. I adhered those two layers to a Couture Creations Card Base using Glue Dots Permanent Glue Squares Tape Runner.


I used some washi tape to adhered the star frame and the green insert piece together before I adhered them to my card, just to make sure that they were lined up perfectly.

I used Mama Elephant Congrats Die and ran it through my Big Shot using an orange piece of scrap from the same patterned paper pad (all the sheets have a plain side and a patterned side). I then decided it needed to pop off my card more.. I don't have a frame word die for this one so I traced the outside of the die onto some X-Press It Blending Card using a mechanical pencil then using my Cutterbee Scissors I fussy cut it out then carefully used an eraser to take away all the pencil lines. I then using American Tombow Mono Multi Liquid Adhesive I adhered the two layers together. I adhered it to the star using the same liquid adhesive.


I trimmed the two sentiments down (they came from the rubber stamp) and adhered those and the image to my card using American Crafts foam dots.

Finally I added some Wink Of Stella to the image and the star and it was complete.


I hope you have enjoyed my post today, if you have any questions feel free to send me a message or contact me via facebook (al links can be found below).

Watch the You Tube Video Here


Products Used On My Card (Affiliate Links Used Where Possible)


Copic Markers Used

no list sorry

Thanks for stopping by, Deni

CAMERA SET UP - FOR YOU TUBE VIDEOS ONLY
Blue Yeti Microphone
Sony Handycam HDR CX4-05
Tripod – Manfrotto MKCompactaCN-BK

S O C I A L MEDIA 
B L O G : https://ldli.co/e/3xky6x  
I N S T A G R A M : https://ldli.co/e/5dn20x
YOU TUBE: https://ldli.co/e/ej5l90
F A C E B O O K: https://ldli.co/e/mjxn2r
PINTEREST: https://ldli.co/e/2l9zom


I was a 2018 Ambassador for Copic Marker Australia and NZ


Thursday, 5 September 2019

Your Next Stamp - Get Your Fiction On

Hi Everyone,

I have been making a few Teacher cards for a friend this past week, her daughter is finishing off High School and wanted to say Thankyou to her teachers.


For my card today I used Your Next Stamp - Get Your Fiction On and also Spectacular Teacher stamp sets.

The other major part on my card is the MFT Stamps Red Delicious Die, which I absolutely love however it is a long time retired and you can't find it anywhere.

I used a piece of American Crafts Black card stock (just a scrap piece I had in my bucket), I stamped the "For making a difference" sentiment on it using Ink On 3 Embossing Ink, coated it with Ranger Super Fine White Detail Embossing Powder and melted it with my heat gun. I then trimmed it down using my Tim Holtz Guillotine which is perfect for cutting these small strips as it has a finger guard so you can hold it tight.

The thanks word is Lawn Fawn Scripty Thanks that I ran through my Sizzix Big Shot using American Crafts Black Card Stock.

Everything was adhered to a Couture Creations Card Base using American Tombow Mono Multi Liquid Adhesive.


I hope you have enjoyed my post today, if you have any questions feel free to send me a message or contact me via facebook (all links can be found below).

Watch the You Tube Video Here


Products Used On My Card (Affiliate Links Used Where Possible)


Copic Markers Used

R08, R37
N6, N8, N10
E21, E23, E25, R20
B24, B29
E53, E55, E57

Thanks for stopping by, Deni

CAMERA SET UP - FOR YOU TUBE VIDEOS ONLY
Blue Yeti Microphone
Sony Handycam HDR CX4-05
Tripod – Manfrotto MKCompactaCN-BK

S O C I A L MEDIA 
B L O G : http://angelhandmadepapercraft.blogspot.com.au/
I N S T A G R A M : http://instagram.com/angelhandmadepapercraft
YOU TUBE: http://www.youtube.com/c/AngelHandmadePapercraft
F A C E B O O K: http://www.facebook.com/angelhandmadepapercraft
PINTEREST: https://www.pinterest.com.au/angelhandmadepapercraft


I was a 2018 Ambassador for Copic Marker Australia and NZ


Monday, 2 September 2019

Fabrika Fantasy - Forest Mouse

Good Morning Everyone,

Yesterday I shared with you my post for Happy Craft Challenge using Fabrika Fantasy Forest Mouse.

I made a second card using the same image but not for the sketch challenge, I was just on a roll creating.


I used MS Word to create the Happy Father's Day Dad Sentiment then printed them onto X-Press It Blending Cardstock using my Brother Laser Printer.

I ran the image through my Sizzix Big Shot using Lawn Fawn Stitched Circle Die.


All the patterned papers I have used are from Kaisercraft Garage Days Collection 6x6 Paper Pad. I don't have a lot of papers left in the pad so thought these last few sheets would be great on this card. I cut them all down to size using my Cutterpillar Pro.


I used some stars that I had already punched out of EK Success Star Confetti Punch using American Crafts Cardstock.

Th moustache was also cut from the same American Crafts Cardstock using Memory Box Moustache Set of dies.


I adhered all the larger layers and the image to a Couture Creations card base using Scotch ATG and for the smaller areas I used American Tombow Mono Multi Liquid Adhesive.


I hope you have enjoyed my post today, if you have any questions feel free to send me a message or contact me via facebook (all links can be found below).

Watch the You Tube Video Here


Products Used On My Card (Affiliate Links Used Where Possible)


Copic Markers Used

R24, R29, R59
T4, T6, T8
N9
W2, W4, W6, 0 Colorless Blender
E39

Thanks for stopping by, Deni

CAMERA SET UP - FOR YOU TUBE VIDEOS ONLY
Blue Yeti Microphone
Sony Handycam HDR CX4-05
Tripod – Manfrotto MKCompactaCN-BK

S O C I A L MEDIA 
B L O G : http://angelhandmadepapercraft.blogspot.com.au/
I N S T A G R A M : http://instagram.com/angelhandmadepapercraft
YOU TUBE: http://www.youtube.com/c/AngelHandmadePapercraft
F A C E B O O K: http://www.facebook.com/angelhandmadepapercraft
PINTEREST: https://www.pinterest.com.au/angelhandmadepapercraft


I was a 2018 Ambassador for Copic Marker Australia and NZ


Sunday, 1 September 2019

Whimsy Stamps - Penguin Winter Love

Good Afternoon,

As a new month begins a New Release we must have, so today I am sharing with you a New Release Digital Stamp from Whimsy Stamps.


I printed the image onto X-Press It Blending Cardstock and coloured it up using Copic Markers, I trimmed the image down using my Cutterpillar Pro.


I added some Snow Writer pen to my image then hit it with my heat tool to puff it up, I left it to dry over night.


I used a piece of red cardstock leftover from another project for my mat layer then used some patterned papers from Kaisercraft Mistletoe 6 1/2" Pad. I added the red and the patterned to a Couture Creations Card Base using Glue Dots Permanent Tape Runner.


I added a doily from my stash and the image using the same adhesive runner.

I used some die cuts from La La Land Crafts - Lamp Post and Small Snowflakes which I ran through my Sizzix Big Shot using X-Press It Blending Card and some American Crafts Cardstock. I adhered them to my card using American Tombow Mono Multi liquid adhesive.


Finally I added some Wink Of Stella Clear to the lamp post.


I used leftover patterned papers to decorate the inside of my card.


I hope you have enjoyed my post today, if you have any questions feel free to send me a message or contact me via facebook (all links can be found below).

Watch the You Tube Video Here


Products Used On My Card (Affiliate Links Used Where Possible)


Copic Markers Used

C1, C2, C3, 0
YR02, YR16, E09
R81, R83, R85
W0, W4, 0
YG07, YG09, G28
R05, R35, R37, R39
C5, C7, C10

Thanks for stopping by, Deni

CAMERA SET UP - FOR YOU TUBE VIDEOS ONLY
Blue Yeti Microphone
Sony Handycam HDR CX4-05
Tripod – Manfrotto MKCompactaCN-BK

S O C I A L MEDIA 
B L O G : http://angelhandmadepapercraft.blogspot.com.au/
I N S T A G R A M : http://instagram.com/angelhandmadepapercraft
YOU TUBE: http://www.youtube.com/c/AngelHandmadePapercraft
F A C E B O O K: http://www.facebook.com/angelhandmadepapercraft
PINTEREST: https://www.pinterest.com.au/angelhandmadepapercraft


I was a 2018 Ambassador for Copic Marker Australia and NZ

Papercraft Business Challenge - My Number One Bear

Hi Everyone, 

September has begun, I cannot believe how quickly these months are going, we at Papercraft Business Challenge are about to begin  the September Challenge Theme: There's A Bear In There (Use a bear - Teddy, Panda etc). Come and join in the challenge here.


I decided to use Newton's Nook Winston's BBQ, I thought he would be perfect for this challenge


I stamped the bear and the BBQ out onto X-Press It Blending Card using Memento Tuxedo Black, I then coloured up the images up using Copic Markers. (You can watch all of this in my You Tube video below or watch directly on my channel here)


Using a Lawn Fawn Stitched Circle Die I ran the image through my Sizzix Big Shot. Once I knew exactly where my images were going to be cut out I added some shadow and some grass. 


Finally I adhered some MFT Stamps Puffy Clouds dies that I had already cut out and had sitting on my desk, (I have a little bowl on my desk that I keep all my little extras in - clouds, stars etc) I used a small amount of American Tombow Mono Multi to adhered them to my image.


I wasn't sure what I was going to do patterned paper wise so in the end I decided to make my own. I used the other stamps in the stamp set and stamped them all over a piece of X-Press It Blending Card - I wanted to make sure my whites were all the same. I used the Memento Tuxedo Black again and a Lawn Fawn Acrylic Block. 

I used patterned paper from Kaisercraft's Mountain Air for the bottom layer of my card and I cut the sentiment piece from the same paper pad. I also used some extra bits to create a strip down the left and also a banner in the same place. 

Using a paper punch from EK Success called Star Confetti I punched out some stars from American Crafts cardstock and adhered them to the front of my card using the same liquid adhesive. 


The Moustache was cut from Memory Box Moustache Set using the same black American Crafts Cardstock, and I adhered all the small pieces I had just cut using American Tombow Mono Multi Liquid Adhesive. Unofrtunately this die set is retired so I have linked another one up that I could find online.

I finally adhered all the layers to a Couture Creations Card Base using Scotch ATG, and my card was complete.

Dont forget to head over and join is in the September Challenge here, a super easy challenge all you have to do is use some kind of bear - teddy, 

I hope you have enjoyed my post today, if you have any questions feel free to send me a message or contact me via facebook (all links can be found below).

Watch the You Tube Video Here


Products Used On My Card (Affiliate Links Used Where Possible)


Copic Markers Used

B95, B97, B99
G40, G24, G43
R35
W1, W5
N2, N4
E70, E71, E74, E77, E79
T8, T10
0 Colorless Blender

Thanks for stopping by, Deni

CAMERA SET UP - FOR YOU TUBE VIDEOS ONLY
Blue Yeti Microphone
Sony Handycam HDR CX4-05
Tripod – Manfrotto MKCompactaCN-BK

S O C I A L MEDIA 
B L O G : http://angelhandmadepapercraft.blogspot.com.au/
I N S T A G R A M : http://instagram.com/angelhandmadepapercraft
YOU TUBE: http://www.youtube.com/c/AngelHandmadePapercraft
F A C E B O O K: http://www.facebook.com/angelhandmadepapercraft
PINTEREST: https://www.pinterest.com.au/angelhandmadepapercraft


I was a 2018 Ambassador for Copic Marker Australia and NZ


The Happy Craft Challenge - Thanks Dad

Hi Everyone,

Today I am sharing with you a card for Happy Craft Challenge, new month means new challenge and we have a great one for you.

We have a great sketch to use and I can't wait to see what you all create with it.

Here is the Sketch for September


My creation using the Sketch


To begin I printed the image - Happy Mouse from Fabric Fantasy onto X-Press It Blending Card using my Brother Laser Printer. I then moved onto colouring using Copic Markers. 

Once I had the image coloured up I ran it through my Sizzix Big Shot using a Lawn Fawn Stitched Circle Die. 


I used patterned papers from Kaisercraft Mountain Air 6x6 Paper Pad,  I then decided the background was not going to stand out enough so I used a painters palette and some paints from Kaisercraft, an old paint brush and my Lawn Fawn Acrylic Block and of course some clean water and watered down the pain just enough that I was able to flick it onto my paper using the side of the block and my paint brush. I trimmed the papers using Cutterpillar Pro.

I cut a banner into the strip I had cut down using my EK Success Cutterbee Scissors. The Thanks word is from MFT Stamps Thanks Die-namics which I cut out using some American Crafts Cardstock on my Big Shot. 

I used Memory Box Moustache Set of dies, I cut some reds some black and some white, I liked the white over the other colours so that's what I went with. 

The sentiment is from Altenew Best Dad, I just changed it around a little by masking off areas using my Post It Notes. I inked it up using Memento Tuxedo Black and a Lawn Fawn Acrylic Block. 

Once I had my card all created I added some Liquid Mercury Tonic Studios Nuvo Crystal Drops to the right hand side, I didn't like the way they turned out the first time so I scraped them off while they were still wet and did them again, unfortunately the patterned paper was ruined so I had to cut another piece and carefully remove the top layer of patterned paper.


Don't forget to come and play along with the Challenge here.

I hope you have enjoyed my post today, if you have any questions feel free to send me a message or contact me via facebook (all links can be found below).

Watch the You Tube Video Here


Products Used On My Card (Affiliate Links Used Where Possible)


Copic Markers Used

W4, W6, R20
W2, W4, 0 Colorless Blender
B93, B95,B97
R08, R27, R56
E39

Thanks for stopping by, Deni

CAMERA SET UP - FOR YOU TUBE VIDEOS ONLY
Blue Yeti Microphone
Sony Handycam HDR CX4-05
Tripod – Manfrotto MKCompactaCN-BK

S O C I A L MEDIA 
B L O G : http://angelhandmadepapercraft.blogspot.com.au/
I N S T A G R A M : http://instagram.com/angelhandmadepapercraft
YOU TUBE: http://www.youtube.com/c/AngelHandmadePapercraft
F A C E B O O K: http://www.facebook.com/angelhandmadepapercraft
PINTEREST: https://www.pinterest.com.au/angelhandmadepapercraft


I was a 2018 Ambassador for Copic Marker Australia and NZ


Thursday, 29 August 2019

Mo's Digital Pencil - Slam Dunk


Welcome one and all,

Today I am working on a boy card, it doesn't happen too often but this one was an order from a friend for her son's 16th Birthday.


I absolutely love this image from Mo Manning called Slam Dunk and can't wait to create more cards with it.


I wasn't sure what I was going to do background wise but ended up walking into a Kaisercraft Shop and finding the Game On - Basketball Sticker Sheet on Clearance. I didn't use a lot of the stickers but was happy with what I have used.

I printed the image onto X-Press It Blending Card Stock using my Brother Laser Printer, this is a Copic Safe printer so I don't get any bleeding with my Copic Markers.


I used American Crafts Cardstock for the black, I think the orange is from another company.

Everything was adhered to a Couture Creations Card Base using Scotch ATG.


I hope you have enjoyed my post today, if you have any questions feel free to send me a message or contact me via facebook (all links can be found below).

Watch the You Tube Video Here

No Video on this one sorry

Products Used On My Card (Affiliate Links Used Where Possible)


Copic Markers Used

E000, E00, E21, E11, E04, R20
YR12, YR16, YR09, N8
N2, N0, 0
E31, E33
N2, N4
R05, R35, R37
W5, 0

Thanks for stopping by, Deni

CAMERA SET UP - FOR YOU TUBE VIDEOS ONLY
Blue Yeti Microphone
Sony Handycam HDR CX4-05
Tripod – Manfrotto MKCompactaCN-BK

S O C I A L MEDIA 
B L O G : http://angelhandmadepapercraft.blogspot.com.au/
I N S T A G R A M : http://instagram.com/angelhandmadepapercraft
YOU TUBE: http://www.youtube.com/c/AngelHandmadePapercraft
F A C E B O O K: http://www.facebook.com/angelhandmadepapercraft
PINTEREST: https://www.pinterest.com.au/angelhandmadepapercraft


I was a 2018 Ambassador for Copic Marker Australia and NZ