It's always Time For Tea and Cupcakes :-)
Here is my card for this week for Time For Tea Designs using "Birthday Cupcakes" which is a Rubber Stamp in their collection.
I stamped the image out onto Mondi Color Copy 250GSM using Memento Tuxedo Black and Fiskars Stamp Press I then coloured her up using Copic Markers and fussy cut her using EK Success Cutterbee Scissors.
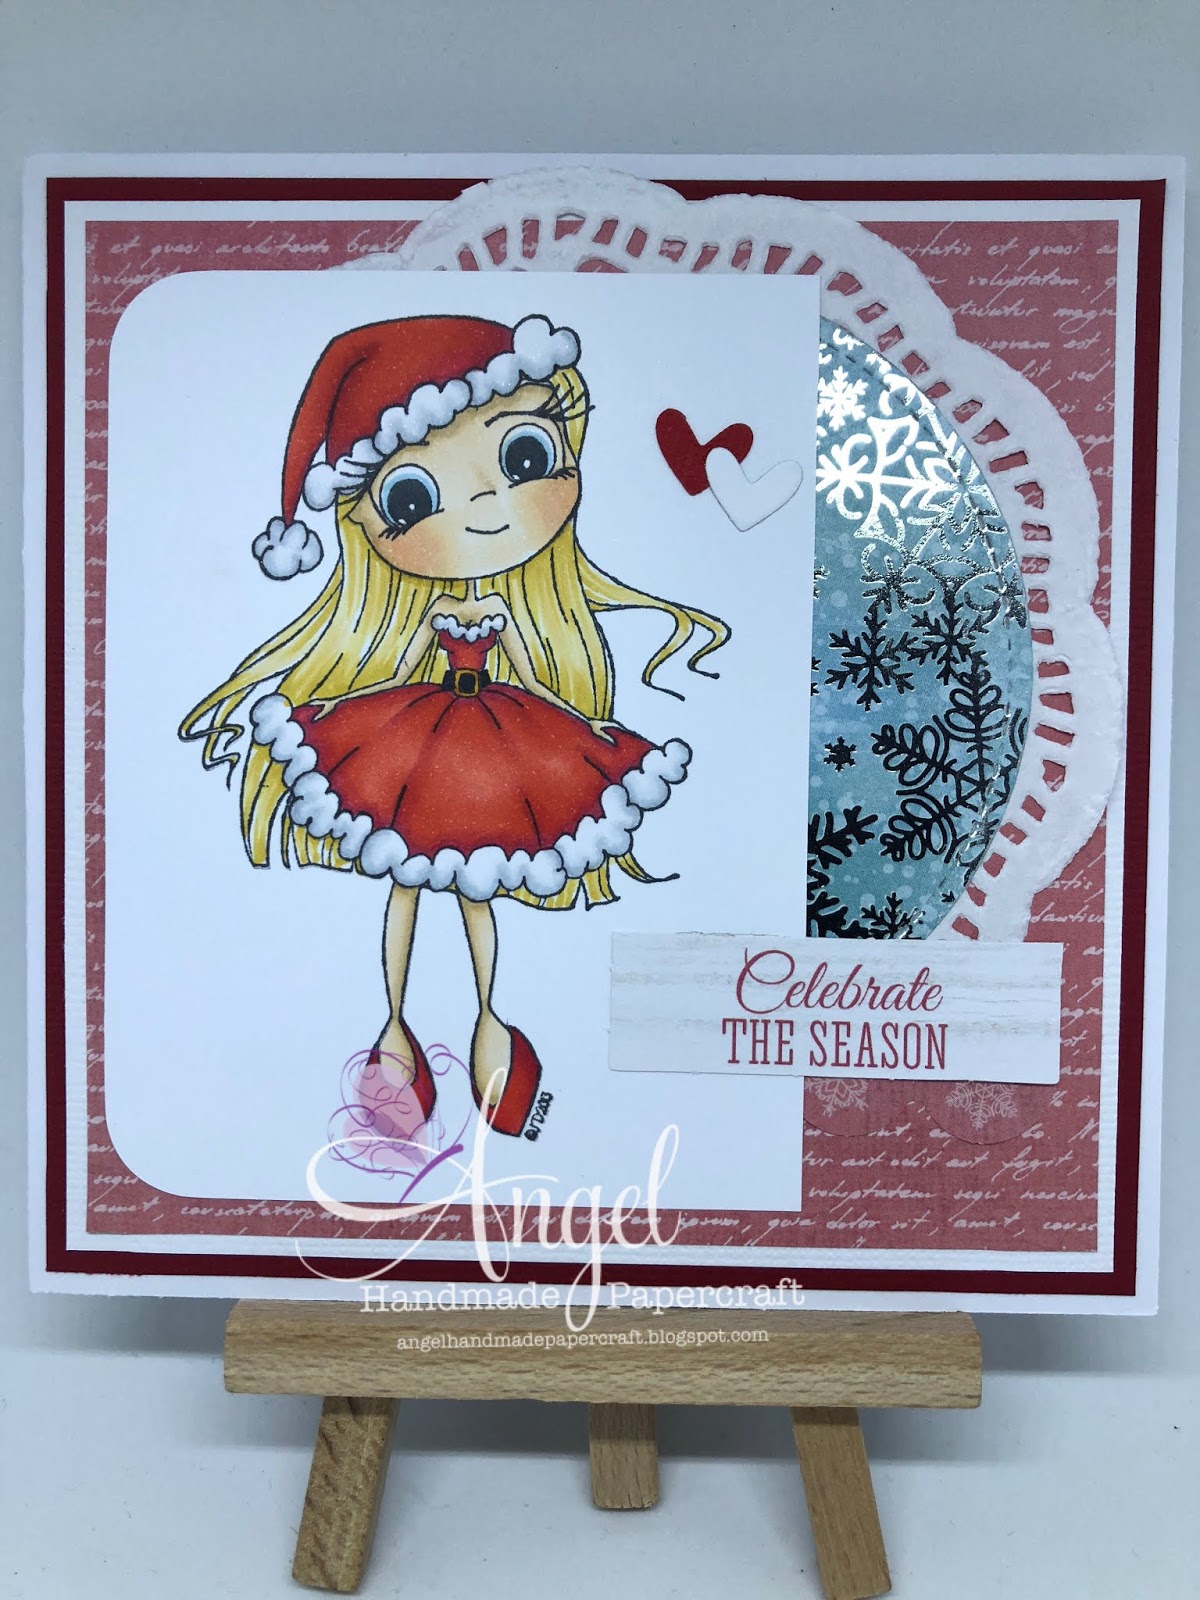
I grabbed some papers from Hampton Art Celebrate Paper Pad 6x6 Paper Pad which seemed to match the colours i had used to colour her up. I cut a mat layer of the plain purple, then an inlayed layer from the banners. I cut a small square for the centre (which I actually off centred to suit the layout), I ran this last small square through my Sizzix Big Shot using MFT Stitched Square Stax
I grabbed a doily from my stash, then cut a circle using MFT Stitched Circle using the same Mondi Color Copy 250GSM that I used to stamp the image on. I ran it through my Sizzix Big Shot.
I adhered all the layers down using Scotch ATG the doily and the image I adhered using American Tombow Mono Multi Liquid Adhesive .
I used my Cutterpillar Pro Pro to cut all the layers.
I grabbed some die cuts off my desk that were left over from other projects - stars and the smile word die cut and adhered them to the front of my card. The sentiment is from MFT Splendid Swans, I used a Lawn Fawn Acrylic Block and Memento Tuxedo Black ink to stamp it out onto a piece of leftover Aqua cardstock from the patterned paper pad.
I adhered the sentiment using Scotch ATG I then grabbed some Nuvo Crystal Drops in Simply White. I also added some Wink Of Stella Clear Glitter Brush .
Products Used On This Card
Fiskars Stamp Press
Mondi Color Copy 250GSM
Copic Markers
Sizzix Big Shot
American Tombow Mono Multi Liquid Adhesive
Scotch ATG
EK Success Cutterbee Scissors
Nuvo Crystal Drops
Cutterpillar Pro
Memento Tuxedo Black
Copic Markers Used
E33, E35, E37, R22
R35, R37
R30, B12, V12
V06, V09
N3, N5, 0
I hope you have enjoyed my post today, if you have any questions feel free to send me a message or contact me via facebook (all links can be found below).
Thanks for stopping by, Deni
You can find my cards for sale here
https://www.facebook.com/angelhandmadepapercraft
My You Tube Here
https://www.youtube.com/user/Denielle1983/
Instagram Here
http://instagram/angelhandmadepapercraft
Pinterest Here
https://www.pinterest.com.au/DeniAngelHandmade/
Sunday, 9 September 2018
Saturday, 8 September 2018
It's A Mermaid Christmas - Whimsy Stamps
Hi Everyone!
Today I am sharing with you my DT Inspiration Card for Whimsy Stamps Digital Team, I have used an image called "Christmas Mermaid" how cute is she!
I printed her onto Mondi Color Copy using my Brother Laser Printer then coloured her up using Copic Markers.
The papers are from Kaisercraft Silver Bells 6.5" Paper Pad, I loved the pinks in this Christmas paper pad and wanted to keep them in the colour combo of my card.
I cut a circle from the paper pad using Lawn Fawn Stitched Circle Die which I ran through Sizzix Big Shot Machine Only (White & Gray). I also used some of the cut outs from the paper pad - the scallop and the sentiment.
The bubble background was also cut on my Sizzix Big Shot Machine Only (White & Gray) using leftover white cardstock, im not sure what company the die was from as I purchased it from a yard sale with some other craft goodies. I adhered it to my patterned paper after running it through Xyron Create A Sticker Max.
I ran the image through my Sizzix Big Shot Machine Only (White & Gray) using Lawn Fawn Stitched Rectangle die. Everything was adhered to a pre-made Twiddleybitz Card Base using Scotch ATG.
I cut the word Happy from Lawn Fawn Happy Happy Happy Lawn Cuts, the sentiment I stamped using Memento Tuxedo Black and an acrylic block and is also from the same Lawn Fawn Happy Happy Happy.
All the layers were added to Twiddleybitz Card Base using Scotch ATG.
I hope you have enjoyed my post today, if you have any questions feel free to send me a message or contact me via facebook (all links can be found below).
Items Used
Whimy Stamps Christmas Mermaid
Sizzix Big Shot Machine Only (White & Gray)
Scotch ATG Tape Club
Lawn Fawn Stitched Rectangle
Copic Markers
Lawn Fawn Happy Happy Happy Lawn Cuts
Lawn Fawn Happy Happy Happy
Memento Tuxedo Black
Lawn Fawn Acrylic Block
Kaiercraft Silver Bells
Memento Tuxedo Black
EK Success Cutterbee Scissors
Xyron Create A sticker Max
Thanks for stopping by, Deni
You can find my cards for sale here
https://www.facebook.com/angelhandmadepapercraft
My You Tube Here
https://www.youtube.com/c/AngelHandmadePapercraft/
Instagram Here
http://instagram/angelhandmadepapercraft
Pinterest Here
https://www.pinterest.com.au/DeniAngelHandmade/
Friday, 7 September 2018
The Things I Do For You - MFT Stamps Puddle Jumper - Auzz Trinklets N Crafts
Good Morning,
Today I am sharing a card I made for Auzz Trinklets N Crafts using MFT Stamps Puddle Jumper Stamp Set You can purchase it here from Auzz Trinklets N Crafts or if you are International you can purchase from MFT here BB Puddle Jumper, Die-namics BB Puddle Jumper.
I started by stamping the image and sentiment onto Mondi Color Copy using my Misti Stamping Tool and Memento Tuxedo Black. I ran the image through my Sizzix Big Shot with the matching die and then coloured it using Copic Markers which I will have listed below my walk through.
I then grabbed a patterned paper pad from Pebbles called "Garden Party", I used a small piece of green polka dots which I had left from another project.
I used a Lawn Fawn Acrylic Block and stamped just the top section of the image onto that patterned paper. I used EK Success Cutterbee Scissors to carefully fussy cut the umbrella piece out and used a small amount of American Tombow Mono Multi liquid adhesive and adhered the umbrella to the image. It turned out perfect!
When I first started this card I had come across the patterned paper pad above as it was used on a recent project, and the thing that jumped out at me was the "rain words" sheet of paper, funny enough it was actually the only full sheet of paper left in the pad and I knew I wanted to use this Puddle Jumper Stamp.
I didn't want to lose too much of the rain words so I decided to pop the image onto a piece of vellum which I had cut using Lawn Fawn Stitched Circle Die which I had ran through my Sizzix Big Shot.
I had some smaller pieces left in the pad so I layed down a couple of strips to the left of my layout, then layed the rain words over top. I cut some clouds using Die-namics Puffy Clouds and some excess white cardstock. I glued one underneath the vellum and one over top so I could hide the adhesive. I carefully cut the little boys arm using a Pen Blade so I could slide the sentiment under. I then adhered them both using Scotch ATG. The Card still needed something more so I added some little white hearts that I had sitting on my desk and that was my card complete. I really love the way it turned out.
Products Used
Mondi Color Copy
Sizzix Big Shot
Copic Markers
EK Success Cutterbee Scissors
MFT Stamps Puddle Jumper & Die-namics BB Puddle Jumper
Twiddleybitz Card Base
Misti Stamping Tool
Memento Tuxedo Black
American Tombow Mono Multi
Lawn Fawn Acrylic Block
MFT Stamps - Puffy Clouds
Lawn Fawn Stitched Circle Dies
Scotch ATG
Scotch ATG Refill
Pebbles - Garden Party
Pen Blade
Copic Markers Used
E000, E00 E21, E11, E04, R20
R05, R35, R37
B95, B97, B99
E31, E33, E35, E37
Y02, Y06, Y18
BB Puddle Jumper
Die-namics BB Puddle Jumper
I hope you have enjoyed my post today, if you have any questions feel free to send me a message or contact me via facebook (all links can be found below).
You can find my cards for sale here
https://www.facebook.com/angelhandmadepapercraft
My You Tube Here
https://www.youtube.com/c/AngelHandmadePapercraft/
Instagram Here
http://instagram/angelhandmadepapercraft
Pinterest Here
https://www.pinterest.com.au/DeniAngelHandmade/
Today I am sharing a card I made for Auzz Trinklets N Crafts using MFT Stamps Puddle Jumper Stamp Set You can purchase it here from Auzz Trinklets N Crafts or if you are International you can purchase from MFT here BB Puddle Jumper, Die-namics BB Puddle Jumper.
I started by stamping the image and sentiment onto Mondi Color Copy using my Misti Stamping Tool and Memento Tuxedo Black. I ran the image through my Sizzix Big Shot with the matching die and then coloured it using Copic Markers which I will have listed below my walk through.
I then grabbed a patterned paper pad from Pebbles called "Garden Party", I used a small piece of green polka dots which I had left from another project.
I used a Lawn Fawn Acrylic Block and stamped just the top section of the image onto that patterned paper. I used EK Success Cutterbee Scissors to carefully fussy cut the umbrella piece out and used a small amount of American Tombow Mono Multi liquid adhesive and adhered the umbrella to the image. It turned out perfect!
I didn't want to lose too much of the rain words so I decided to pop the image onto a piece of vellum which I had cut using Lawn Fawn Stitched Circle Die which I had ran through my Sizzix Big Shot.
I had some smaller pieces left in the pad so I layed down a couple of strips to the left of my layout, then layed the rain words over top. I cut some clouds using Die-namics Puffy Clouds and some excess white cardstock. I glued one underneath the vellum and one over top so I could hide the adhesive. I carefully cut the little boys arm using a Pen Blade so I could slide the sentiment under. I then adhered them both using Scotch ATG. The Card still needed something more so I added some little white hearts that I had sitting on my desk and that was my card complete. I really love the way it turned out.
Products Used
Mondi Color Copy
Sizzix Big Shot
Copic Markers
EK Success Cutterbee Scissors
MFT Stamps Puddle Jumper & Die-namics BB Puddle Jumper
Twiddleybitz Card Base
Misti Stamping Tool
Memento Tuxedo Black
American Tombow Mono Multi
Lawn Fawn Acrylic Block
MFT Stamps - Puffy Clouds
Lawn Fawn Stitched Circle Dies
Scotch ATG
Scotch ATG Refill
Pebbles - Garden Party
Pen Blade
Copic Markers Used
E000, E00 E21, E11, E04, R20
R05, R35, R37
B95, B97, B99
E31, E33, E35, E37
Y02, Y06, Y18
BB Puddle Jumper
Die-namics BB Puddle Jumper
I hope you have enjoyed my post today, if you have any questions feel free to send me a message or contact me via facebook (all links can be found below).
You can find my cards for sale here
https://www.facebook.com/angelhandmadepapercraft
My You Tube Here
https://www.youtube.com/c/AngelHandmadePapercraft/
Instagram Here
http://instagram/angelhandmadepapercraft
Pinterest Here
https://www.pinterest.com.au/DeniAngelHandmade/
Thursday, 6 September 2018
Love From Lizi September 2018 Super Kit Unboxing
Hi Everyone,
Just a quick one for you today to let you all know the Love From Lizi September Super Kit is now available and they are in limited supply so if you would like to subscribe do it :-)
Here is my unboxing if you would like to watch me open everything :-)
You can subscribe to the kit here
I hope you have enjoyed my post today, if you have any questions feel free to send me a message or contact me via facebook (all links can be found below).
Thanks for stopping by, Deni
You can find my cards for sale here
https://www.facebook.com/angelhandmadepapercraft
My You Tube Here
https://www.youtube.com/c/AngelHandmadePapercraft/
Instagram Here
http://instagram/angelhandmadepapercraft
Pinterest Here
https://www.pinterest.com.au/DeniAngelHandmade/
Sunday, 2 September 2018
Time For Tea - Santa Baby
It's not Christmas yet, but if you are like me and super un-organised and overwhelmed when it gets so close to Christmas that I don't actually send any out lol.. shock horror for a card maker I know, but every year i'm the same :-(
But not this year.. I have already started on them.. ok when I say i've started I mean.. I've made one lol. That's classed as started right :-)
I have had a play with Santa Baby, isn't she just darling :-) I trimmed her up using Tonic Studios / Tim Holtz Red Scissors I then popped the image onto a Fiskars Stamp Press and inked her up using Memento Tuxedo Black and pressed her onto a piece of Mondi Color Copy 250GSM I then cleaned off my stamp using a wet baby wipe and put it away.
Watch the You Tube Colouring Video Here
I coloured her up using Copic Markers - very simple colouring all the markers I used will be listed at the end of the blog post. I love the way the fluffy parts turned out, a little grey markers and some Copic Blending Solution and perfect :-)
Once I had my image coloured up and ready to go I used my X-Cut Corner Cutter to chop the two left hand corners - I swear I have had this since I first started scrapbooking but for some reason always forget I have it.. hope I can start using him not and give him a second life haha.
I cut some mat layers from American Crafts Cardstock using Cutterpillar Pro and a patterned paper layer from Kaisercraft - Silver Bells 6.5" Paper Pad. I also ran a piece of the same patterned paper pad through my Sizzix Big Shot using Lawn Fawn Stitched Circle Dies I layered all the mat layers onto a Twiddleybitz Card Base using Scotch ATG.
I then layered a doily down using American Tombow Mono Multi Liquid Adhesive (I have used tape runner way more times than I care to admit and ended up ripping my doily).
Next I grabbed the circle of patterned paper and adhered that on top of the doily using Scotch ATG then popped the image on top using the same tape runner. I had some little hearts on my desk leftover from another project so I popped those on using American Tombow Mono Multi Liquid Adhesivee because they were so small.
I added some Wink Of Stella Clear Glitter Brush to the fluffy part of her hat and her dress and that finished off my card.
Products Used On This Card
Tonic Studios / Tim Holtz Red Scissors
Fiskars Stamp Press
Memento Tuxedo Black
Mondi Color Copy 250GSM
American Crafts Cardstock
Cutterpillar Pro
Sizzix Big Shot
American Tombow Mono Multi Liquid Adhesive
Lawn Fawn Stitched Circle Dies
Scotch ATG
Copic Markers Used
R05, R35, R37
YR24, YR27
Y21, Y23, Y26
C8, C10
E51, E53, E55, R20
B52
C1, C3, 0
E77, E79, E49
I hope you have enjoyed my post today, if you have any questions feel free to send me a message or contact me via facebook (all links can be found below).
Thanks for stopping by, Deni
You can find my cards for sale here
https://www.facebook.com/angelhandmadepapercraft
My You Tube Here
https://www.youtube.com/user/Denielle1983/
Instagram Here
http://instagram/angelhandmadepapercraft
Pinterest Here
https://www.pinterest.com.au/DeniAngelHandmade/
Labels:
American Crafts,
American Tombow,
Copic Markers,
Cutterpillar Pro,
Fiskars,
Lawn Fawn,
Memento,
Mondi,
Scotch,
Sizzix,
Tim Holtz,
Time For Tea Designs,
Tonic Studios
Saturday, 1 September 2018
September New Release - Whimsy Stamps - Penguin Fall'n For You
Today is the beginning of a new month and time for a New Release over at Whimsy Stamps, I am part of the Digital Design Team so I will share with you one of the latest releases "Penguin Fun In Fall" He looks like he is having an absolute ball in the fall leaves. You can purchase more of the New Release Items here, including the new Rubber Release.
I coloured him up using Copic Markers after printing him onto Mondi Color Copy 250GSM using my Brother Laser Printer.
I cut a black base layer from American Crafts Card Stock and cut layers from Kaisercraft Miss Match 6x6" Paper Pad, I inked the layers up using a Mini Ink Blending Tool and Tim Holtz Ranger Distress Ink in Vintage Photo.
To adhere all the layers together I used Scotch ATG, this is my go to Tape Runner adhesive, when I am using smaller items I use a liquid adhesive. I am part of a Tape Club for this so I have a package of them auto sent to me every month.. makes my life so much easier as I never have to worry about running low. If you are interested the link is here, don't forget to let them know "Angel Handmade Papercraft" referred you.
Once I had all my patterned paper layers I decided to run my image through my Sizzix Big Shot using a Stitched Circle die from Lawn Fawn, I then used my Fiskars Sure Cut Trimmer to trim the bottom off the circle. I didn't worry about inking the edge of the circle because I wanted it to stand up off my papers. I then adhered it to my patterned paper layers.
I prepped a piece of black card stock using EK Success Powder Tool, then stamped a sentiment from Lawn Fawn Happy Happy Happy Stamp Set using Versamark Watermark Stamp Pad and a Lawn Fawn Acrylic Block, I applied Ranger Super Fine White Embossing Powder I then ran the matching Happy Happy Happy Lawncuts dies through my Sizzix Big Shot using some excess red card stock.
I added some American Tombow Mono Multi Liquid Adhesive to the bottom of the Happy die cut and carefully layed it onto the Dance strip. I then played with it until I had the position where I wanted it and then ran some Scotch ATG to the back of the strip and adhered it. I used EK Success Cutterbee Scissors to cut the excess from the sides.
Products Used On This Card
Whimsy Stamps - Fun In Fall Digital Stamp
Copic Markers
Mondi Color Copy 250GSM
Tim Holtz Ranger Distress Ink Vintage Photo
Ragner Mini Ink Blending Tool
Ranger Mini Ink Blending Tool - Replacement Foams
American Crafts Cardstock
Cutterpillar Pro
Scotch ATG
Scotch ATG Refill Club
American Tombow Mono Multi Liquid Adhesive
Sizzix Big Shot
Fiskars Sure Cut Trimmer
Ek Success Cutterbee Scissors
Kaisercraft Miss Match 6x6" Paper Pad
Lawn Fawn Happy Happy Happy Stamps & Dies
Versamark Watermark Stamp Pad
Lawn Fawn Acrylic Block
EK Success Powder Tool
Twiddleybitz Pre-Made Card Base
I hope you have enjoyed my post today, if you have any questions feel free to send me a message or contact me via facebook (all links can be found below).
Thanks for stopping by, Deni
You can find my cards for sale here
https://www.facebook.com/angelhandmadepapercraft
My You Tube Here
https://www.youtube.com/user/Denielle1983/
Instagram Here
http://instagram/angelhandmadepapercraft
Pinterest Here
https://www.pinterest.com.au/DeniAngelHandmade/
I cut a black base layer from American Crafts Card Stock and cut layers from Kaisercraft Miss Match 6x6" Paper Pad, I inked the layers up using a Mini Ink Blending Tool and Tim Holtz Ranger Distress Ink in Vintage Photo.
Once I had all my patterned paper layers I decided to run my image through my Sizzix Big Shot using a Stitched Circle die from Lawn Fawn, I then used my Fiskars Sure Cut Trimmer to trim the bottom off the circle. I didn't worry about inking the edge of the circle because I wanted it to stand up off my papers. I then adhered it to my patterned paper layers.
I prepped a piece of black card stock using EK Success Powder Tool, then stamped a sentiment from Lawn Fawn Happy Happy Happy Stamp Set using Versamark Watermark Stamp Pad and a Lawn Fawn Acrylic Block, I applied Ranger Super Fine White Embossing Powder I then ran the matching Happy Happy Happy Lawncuts dies through my Sizzix Big Shot using some excess red card stock.
I added some American Tombow Mono Multi Liquid Adhesive to the bottom of the Happy die cut and carefully layed it onto the Dance strip. I then played with it until I had the position where I wanted it and then ran some Scotch ATG to the back of the strip and adhered it. I used EK Success Cutterbee Scissors to cut the excess from the sides.
Products Used On This Card
Whimsy Stamps - Fun In Fall Digital Stamp
Copic Markers
Mondi Color Copy 250GSM
Tim Holtz Ranger Distress Ink Vintage Photo
Ragner Mini Ink Blending Tool
Ranger Mini Ink Blending Tool - Replacement Foams
American Crafts Cardstock
Cutterpillar Pro
Scotch ATG
Scotch ATG Refill Club
American Tombow Mono Multi Liquid Adhesive
Sizzix Big Shot
Fiskars Sure Cut Trimmer
Ek Success Cutterbee Scissors
Kaisercraft Miss Match 6x6" Paper Pad
Lawn Fawn Happy Happy Happy Stamps & Dies
Versamark Watermark Stamp Pad
Lawn Fawn Acrylic Block
EK Success Powder Tool
Twiddleybitz Pre-Made Card Base
Thanks for stopping by, Deni
You can find my cards for sale here
https://www.facebook.com/angelhandmadepapercraft
My You Tube Here
https://www.youtube.com/user/Denielle1983/
Instagram Here
http://instagram/angelhandmadepapercraft
Pinterest Here
https://www.pinterest.com.au/DeniAngelHandmade/
Monday, 27 August 2018
Kitty says Hooray - Whimsy Stamps
I have an extra Inspiration Post for you for Whimsy Stamps today.
I am using a Stamp set called "A Girl's Best Friend" which I got my hands on recently.
I wanted to try and work with black cardstock and white embossing powder, so I grabbed a piece of American Crafts Cardstock and cut it to size using Cutterpillar Pro. I then turned it over so I was using the Reverse side without the pattern on it as I needed a flat smooth surface to work with.
I prepped the area using EK Success Powder Tool. I grabbed the images I wanted to use and popped them onto Lawn Fawn Acrylic Blocks. I inked them up using Versamark Watermark Stamp Pad and stamped each of the images onto my card, I could see what I was doing so I didn't bother to put Embossing Powder on until the end.
Once I had all the images stamped down I grabbed my Ranger Super Fine White Embossing Powder and added it all over my cardstock then tapped off the excess. I then used my Crafter's Companion Heat Tool to melt it all.

I used some Red Lawn Fawn Ink to add the little foot prints into the areas that were not stamped on. This didn't show up so much on the photos you will see on my post today. I added everything to a pre-made card base from Lawn Fawn and then I was done.
I hope you have enjoyed my post today, if you have any questions feel free to send me a message or contact me via facebook (all links can be found below).
Whimsy Stamps "A Girl's Best Friend"
Mondi Color Copy 250GSM
American Crafts Cardstock
Cutterpillar Pro
Scotch ATG
Scotch ATG Refill Club
American Tombow Mono Multi Liquid Adhesive
Twiddleybitz Card Base
Sizzix Big Shot
EK Success Powder Tool
Ek Success Cutterbee Scissors
Versamark Watermark Pad
Ranger Super Fine Embossing Powder - White
Lawn Fawn Acrylic Block
Fiskars Surecut Trimmer
American Crafts #summer 6x6
Prismacolor Pencils
Lawn Fawn Ink - Lobster Ink Pad
Universal Crafts - Heat Gun Tool
Thanks for stopping by, Deni
You can find my cards for sale here
https://www.facebook.com/angelhandmadepapercraft
My You Tube Here
https://www.youtube.com/user/Denielle1983/
Instagram Here
http://instagram/angelhandmadepapercraft
Pinterest Here
https://www.pinterest.com.au/DeniAngelHandmade/
Subscribe to:
Posts (Atom)